
Installing a roll cage isn’t just about safety – it’s about improving your vehicle’s structure for better performance. Whether you’re tackling rough terrain or hitting the track, a properly designed roll cage protects occupants and reinforces your car’s chassis. Here’s what you need to know:
- Purpose: A roll cage maintains survival space in rollovers and adds structural rigidity for better handling.
- Materials: Choose between DOM mild steel (affordable, easy to weld) and 4130 Chromoly (stronger, lighter, but pricier).
- Tools: Essential tools include a tubing bender, tube notcher, MIG/TIG welder, and angle grinder.
- Installation Steps: Measure accurately, tack weld before finalizing, and use gussets for added strength.
- Safety Tips: Use SFI-rated padding, ensure proper head clearance, and avoid using standard pipe.
For complex builds or competition-level standards, hiring a professional fabricator is often the best option. A well-installed roll cage can save lives – don’t cut corners.
Roll Cage Purpose and Benefits
What a Roll Cage Actually Does
A roll cage serves two essential purposes: protecting the occupants and reinforcing the vehicle’s structure. In the event of a rollover, the cage prevents the roof from caving in, preserving a "survival space" – the area around the occupants that keeps them safe from being crushed.
Beyond that, a roll cage redistributes the impact energy from the roof across the chassis. As the WAAG4x4 Engineering Team explains:
"Well-built cages don’t just protect vehicles – they save lives by maintaining survival space and managing crash energy during rollovers."
Another critical point: seats and harnesses should be mounted to the cage itself, not the floor. This ensures that both move together as a single safety capsule during a crash. Gene Giroud of Wild Rides Race Cars emphasizes this:
"The roll cage that’s designed to save your life on the track is meant for an environment where you’re using proper safety gear – a helmet, harnesses, and everything else."
In addition to protecting occupants, a well-designed roll cage boosts the vehicle’s torsional rigidity. This added stiffness keeps the suspension geometry stable, even on rough terrain, allowing shocks and alignment to perform as they should. These advantages highlight why a full roll cage – not a show bar – is essential for comprehensive protection.
Roll Cages vs. Show Bars: What’s the Difference
While a full roll cage provides critical safety and structural benefits, not all bars are created equal. A show bar, also known as a sport bar, is primarily for aesthetics rather than safety. It’s typically made from thinner materials, covers only the area behind the seats, and is often bolted to the vehicle’s sheet metal instead of being integrated into the frame. In a severe rollover, this type of mounting can even tear through the floor.
A full roll cage, on the other hand, surrounds the entire cabin and uses properly sized structural tubing. It’s securely welded or bolted to frame nodes, which are the strongest points on the chassis. The difference in protection between the two is stark.
| Feature | Show Bar / Sport Bar | Full Roll Cage |
|---|---|---|
| Primary Purpose | Aesthetics / light protection | Maximum occupant safety |
| Coverage | Behind seats only | Entire cabin |
| Mounting | Often bolted to sheet metal | Welded/bolted to frame nodes |
| Chassis Stiffening | Minimal | Significant torsional rigidity gain |
| Best For | Casual light off-roading | Serious off-road or racing use |
For anyone tackling challenging terrain, a show bar isn’t a safety upgrade – it’s purely decorative. If you’re serious about protection, a properly constructed and mounted full roll cage is the only real choice.
sbb-itb-afc4690
Tips you need before building a roll cage
Materials and Tools for Roll Cage Installation
Choosing the right materials and tools is crucial to ensure both safety and performance in roll cage construction.
How to Choose the Right Tubing Material
In the U.S., the two most popular materials for roll cage tubing are DOM mild steel and 4130 chromoly. Here’s a closer look at both:
- DOM Tubing (1020 Carbon Steel): Known for its affordability and ease of welding (suitable for both MIG and TIG), DOM tubing is a go-to for entry-level builds, hobbyist projects, and SCCA/NASA classes. It offers a yield strength of 60,000–70,000 psi, making it a reliable choice for many applications.
- 4130 Chromoly: This alloy steel, containing chromium and molybdenum, boasts a higher strength-to-weight ratio with a yield strength of 70,000–90,000 psi. It’s the material of choice for professional motorsports, including NHRA drag racing. However, it comes at a higher cost – often more than double that of mild steel – and requires TIG welding with specific filler rods like ERNiCu-1 or ER70S-2 to meet SFI and NHRA standards.
| Feature | 4130 Chromoly | DOM Mild Steel |
|---|---|---|
| Yield Strength | 70,000–90,000 psi | 60,000–70,000 psi |
| Cost | Higher (2× or more than mild steel) | More affordable |
| Welding | TIG welding with specific filler rods | MIG or TIG; easier to work with |
| Typical Use | Pro-level motorsports (NHRA, drag racing) | Entry-level, hobbyist, SCCA, NASA |
For 4130 chromoly, TIG welding requires no pre-heat or post-weld heat treatment. NHRA standards also specify a minimum wall thickness of 0.095 inches (approximately 2.4 mm) for main structures.
Tools You Need for the Job
Having the right tools is just as important as selecting the right materials. Here’s what you’ll need:
- Tubing Bender: A tubing bender is essential for creating smooth, deformation-free bends. Pipe benders should be avoided as they can crush or score the tubing. As fabricator Scott F. explains:
"The first rule of bending tubing is that no deformation is allowed. The bend must be smooth with no scoring or ovalizing of the tube."
For 2-inch tubing, an 8-inch bend radius is standard to avoid overstretching the outer wall. - Tube Notcher: For precise "fish mouth" joints, a tube notcher is indispensable. While hand-grinding is an option, a hole-saw style notcher (like those from JD2) ensures a tighter, gapless fit. Mike Ruth from Alston Race Cars advises:
"You can buy a very inexpensive tubing notcher that hooks to a drill press and after a few cuts, you could make a cut as good as anybody."
Entry-level notchers start at around $49. - Welder: Match your welder to the material – MIG for mild steel, TIG for chromoly. For MIG welding mild steel, use .030 wire with a 75/25 argon/CO₂ shielding gas mix for better penetration. NHRA rules prohibit grinding finished welds, as it can hide poor penetration.
- Additional Tools:
- 4.5-inch angle grinder (for metal prep)
- Chop saw or band saw (for straight cuts)
- Basic layout tools like a tape measure, carpenter’s square, and level
Why Pipe Should Not Be Used in Roll Cages
It’s essential to avoid using standard pipe for roll cages. While it may look similar to structural tubing, pipe is designed for fluid transport and has a welded seam that creates a weak point along its length. In contrast, DOM and seamless tubing are produced without seams, ensuring consistent wall thickness and superior load-bearing capacity.
SFI certification standards strictly prohibit welded seam tubing for competition vehicles. As Industrial Monitor Direct emphasizes:
"DOM (Drawn Over Mandrel) or seamless tubing is required – welded seam tubing does not meet SFI certification standards for competition vehicles."
Using standard pipe compromises the structural integrity of the roll cage, regardless of the intended use. Always ensure the tubing is certified DOM or chromoly and check for stamped identification to confirm it meets SFI standards before starting fabrication.
Planning and Measuring Before You Build
Skipping the planning stage in roll cage fabrication can lead to costly mistakes. A poorly fitting cage might not pass compliance checks, could restrict the driver’s movement, or even require a complete rebuild.
How to Measure Your Vehicle’s Interior
Start by stripping the interior down to bare metal. This allows you to measure directly from the mounting points on the floor and pillars without interference from carpet or trim.
There are four key measurements that form the foundation of any cage layout:
| Measurement | Purpose |
|---|---|
| Dimension A – Top straight section of the main hoop | Determines the roof width and where bends should begin |
| Dimension B – Roofline to shoulder/doorsill | Defines vertical drop and side clearance |
| Dimension C – Roof to floor/framerail | Establishes the cage’s overall height |
| Dimension E – Cross section at the doorsill | Determines the widest point of the cage base |
When measuring the floor width for the main hoop base, subtract about 1 inch per side from the raw measurement. This extra space ensures you can weld cleanly around the tube where it meets the floor plate.
Another critical measurement is helmet headroom – the space between the driver’s helmet and the nearest bar. This is even more important in street-driven vehicles where helmets aren’t typically worn. Gene Giroud of Wild Rides Race Cars explains:
"The roll cage that’s designed to save your life on the track is meant for an environment where you’re using proper safety gear – a helmet, harnesses, and everything else… What’s there to save your life at the track can be your worst enemy on the street."
For a snug yet functional fit, aim for 1/4 to 1/2 inch clearance from the headliner. This keeps the cage tight to the interior while leaving just enough space to work.
Accurate measurements are the foundation of a compliant and precise cage design.
Sketching or Drafting Your Cage Layout
After gathering your measurements, sketch your cage layout before cutting any material. A hand-drawn sketch is often enough for most builds, but if you’re working on a sanctioned class vehicle, a detailed drawing helps ensure your design meets rules for bar placement, diameter, and wall thickness.
Curt Perry of Chassis Engineering highlights that for common stock vehicles, shops may already have standard dimensions on file. However, custom builds often require starting from scratch:
"When a customer calls and they want to put a rollbar or rollcage into a stock vehicle… we generally have those dimensions in our system… Where that changes is when they call with a specific vehicle, they’re going to skin the car."
Use a digital angle finder or protractor to measure and record every bend angle, particularly around the roofline and A-pillar areas. Note these angles directly on your sketch to ensure symmetry on both sides. Before cutting, create cardboard mockups of floor plates and complex bends to confirm the fit.
Jeff Lilly of Jeff Lilly Restorations adds this advice:
"We always leave the tubes a minimum 6 inches longer to allow for exact trimming and or notching when joining to another bar in the cage."
Leaving extra length gives you room to fine-tune connections during assembly without wasting material. Also, account for spring back – the slight release of tension in the material after bending. Chromoly and mild steel behave differently, so your actual angles may need adjustment to match your plans.
These careful preparations ensure precise fabrication and adherence to safety standards, setting the stage for a successful installation.
How to Install a Weld-In Roll Cage Step by Step
Roll Cage Installation: Step-by-Step Process Guide
With your measurements in hand and your layout planned, it’s time to dive into the actual installation. Taking your time during each stage is key to ensuring everything lines up correctly and the structure is solid.
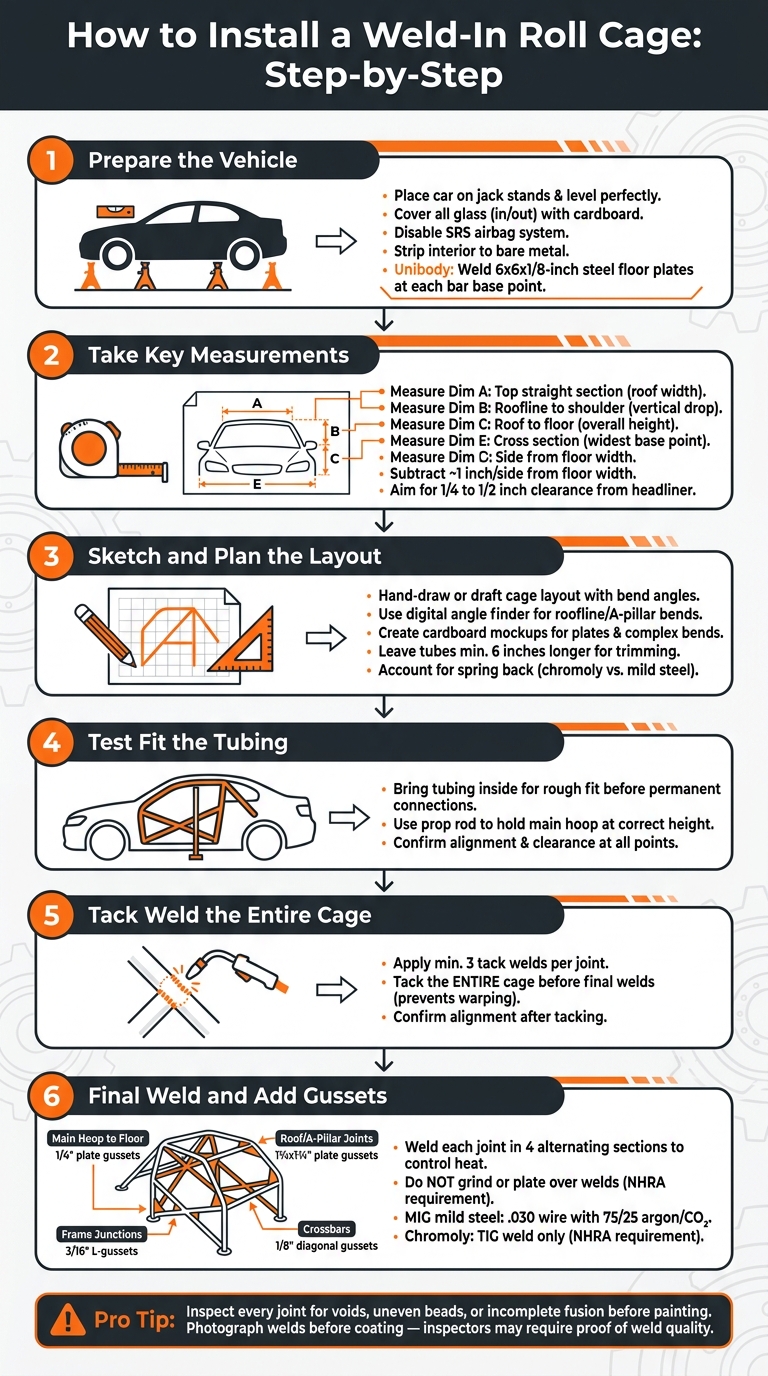
Preparing the Vehicle for Installation
Start by placing the vehicle on jack stands, making sure it’s perfectly level. This ensures all your measurements and cuts are accurate. As Auto Weld Chassis explains:
"Put car on jack stands and level up. Cover all glass inside and out with cardboard."
Covering the glass protects it from sparks and slag during the welding process. If you’re keeping the headliner, use sheet metal shields and wet rags to avoid heat damage when working on the upper bars. Don’t forget to disable the SRS airbag system before you start. Cusco USA Inc. highlights the importance of this step:
"Any and all roll cages may impact, and modify, or defeat the safe and intended functions of production road car equipped with Passive Restraints, SRS Airbags, Crumple Zones, and other systems."
For unibody vehicles, NHRA regulations require 6x6x1/8-inch steel plates welded to the floor as base points for any bar that touches the interior. If your car has a factory frame, the bars can usually attach directly to the frame, reducing the need for floor modifications. Once the vehicle is prepped and safety measures are in place, you’re ready to test-fit the cage.
Test Fitting and Tack Welding the Cage
With the car prepped, bring the tubing inside for a rough fit before making any permanent connections. Use a prop rod to hold the main hoop in place, keeping it at the correct height and stable during tack welding.
Tack weld the entire cage before committing to final welds. Ryan Mitchell, a professional in automotive welding, emphasizes:
"Tack the entire cage together before finishing the welds to prevent warping and confirm alignment."
Each joint should have at least three tack welds. Rebecca Henderson from Workshop Welding advises:
"Use a minimum of 3 tack welds to keep your tubing in place. With only 2 tack welds, you risk the pieces twisting apart."
Final Welding and Adding Gussets
Once you’ve confirmed the cage is properly aligned and securely tack-welded, move on to final welding. Weld in stages, dividing each joint into four sections and alternating the weld passes. This method helps control heat buildup and keeps everything aligned. Avoid grinding or plating over the welds – NHRA rules require visible welds for inspection.
At high-stress points, gussets are essential to distribute the load and prevent cracks. Mechaniquad explains:
"Where multiple tubes meet, use gussets to spread stress over a larger area. Without them, cracks form right at the weld toe."
Here’s a quick guide to common attachment points and the gussets you should use:
| Attachment Point | Recommended Gusset | Purpose |
|---|---|---|
| Main Hoop to Floor | 1/4″ thick plate / Triangular gussets | Distributes vertical loads across the base |
| Frame Junctions | 3/16″ thick plate / L-shaped gussets | Reinforces the connection to the vehicle chassis |
| Roof/A-Pillar Joints | 1¾" x 1¾" plate gussets | Provides overhead protection |
| Crossbars | 1/8″ thick plate / Diagonal gussets | Enhances torsional strength against lateral forces |
For MIG welding mild steel, use a 75/25 argon/CO₂ gas mix with .030 wire for clean penetration. If you’re working with 4130 Chromoly tubing, NHRA rules require TIG welding. After welding, inspect every joint closely for voids, uneven beads, or incomplete fusion to ensure everything is solid.
Making Your Roll Cage Safe and Comfortable
Once the structural framework is in place, it’s time to focus on safety, comfort, and those all-important finishing touches. After welding, you’ll want to add padding, adjust the seats, and apply a protective coating.
Installing SFI Rated Padding
To ensure maximum safety, all tubes within the driver’s reach must be equipped with high-density padding that meets the SFI 45.1 standard. This type of foam is specifically designed to absorb impact energy effectively. Forget about using pool noodles or standard pipe lagging – they simply don’t cut it. As Robinson Race Cars explains:
"The density of [pipe lagging] is nowhere near high enough to absorb the impact of a crash helmet in the event of an accident."
For areas where head contact might occur, materials like Ethafoam or Ensolite are ideal. For spots like the knees and elbows, dual-durometer padding is a smart choice. Its firm inner layer provides protection, while the softer outer layer adds comfort. If you’re looking for a budget-friendly upgrade, SFI-rated mini-padding costs about $20 for a 3-foot section. To make installation easier, especially around curved tubing, warm the padding beforehand to keep it flexible.
Once the padding is in place, double-check that the seat positioning and head clearance are properly aligned with the protective measures.
Head Clearance and Seat Positioning
Reinstall the seat and test its range of motion to ensure that the roll cage doesn’t interfere with its travel. The main hoop, often mounted on the floor behind the seat, can limit how far back the seat can move if not planned for during the initial tack-welding phase. Fixing this early is far simpler than trying to adjust it after final welding.
For maximum head clearance, the halo bar should sit as close to the roofline as possible. Using a prop rod during tack welding can help maintain this alignment. In street-driven vehicles, precise positioning is even more critical. Bars placed too close to the driver’s head can be dangerous without a helmet, so careful placement is key.
If the vehicle is used on the street frequently, consider adding swing-out sidebars. These make getting in and out of the car easier while still maintaining the cage’s structural strength.
Once everything fits and functions as it should, you can move on to finishing the cage.
Finishing and Painting the Cage
Most roll cage kits arrive as raw, unpainted steel to simplify the welding process. After the welding is complete, it’s essential to paint or coat the cage immediately to prevent rust from forming. Start by cleaning off any welding slag and oxidation to ensure a smooth surface for the finish.
For long-term durability, a zinc-rich coating works well for touch-ups and areas prone to wear. If you want a more professional look, powder coating is an excellent option. It typically costs around $200 and provides a tough, long-lasting finish. Once the coating is applied, make it a habit to inspect the cage every few months. Pay close attention to joints and tie-in points – rust halos or bubbling paint near welds could indicate moisture intrusion or early signs of stress.
One important note for competition builds: never grind or plate over welds. NHRA regulations require welds to remain visible, and covering them is considered a rule violation.
When to Hire a Professional Fabricator
Some roll cage projects demand more than just DIY enthusiasm. Knowing when to bring in a professional can make all the difference between a roll cage that passes tech inspection and one that doesn’t.
Situations That Call for a Professional
Professional fabrication becomes essential when safety and performance standards are non-negotiable. For example, if your vehicle runs 10.99 seconds or faster or exceeds 135 mph, professional expertise is necessary to meet NHRA’s strict requirements. Similarly, builds using 4130 Chromoly tubing or those featuring intricate designs require advanced skills. Chromoly cages, while offering a weight advantage of 50–60 pounds over mild steel, come with higher costs and require precise TIG welding. If you’re not a certified TIG welder, this isn’t the place to experiment.
Certain complex configurations – like 12-point or 14-point cages, SFI 25.X Funny Car cages, or those needing direct frame tie-ins for unibody chassis – also call for professional handling. For unibody vehicles, NHRA rules demand 6-inch square steel plates (at least 1/8-inch thick) welded to the floor at each bar base. Mistakes here can compromise the entire structure. Additionally, if your car still has factory airbags, it’s safer to let a professional handle the integration to avoid accidental deployment or malfunction.
Dave Wallace from Speedway Motors puts it bluntly:
"The one time you wreck, if the cage is sub-par, you’re going to wish it were built to a higher standard."
Once you’ve decided professional help is necessary, the next challenge is finding the right fabricator.
How to Pick the Right Fabricator
Choosing a fabricator can feel daunting, but there are tried-and-true methods to simplify the process. Start by asking experienced racers in your class which shops they trust. Gene Giroud of Wild Rides Race Cars emphasizes:
"Without a doubt, going to the track and talking to people and asking who did their chassis or cage is the best way to go about it. If you see something you like, you can ask who did it, and how their experience was."
After narrowing down your options, visit the shops in person. Mike Ruth of Alston Race Cars suggests a practical approach:
"I always tell customers to come to our shop, and then visit some others, and make a mental note of the cars that are in their shops, and then go back three weeks later and see how much work has been done to those cars. If they’re covered in dust and in the same condition as the last time, chances are your car is going to sit a while."
Make sure the shop uses the correct welding process for your chosen material – TIG for Chromoly, and either MIG or TIG for mild steel. Also, confirm that the fabricator is up-to-date with the rulebook for your sanctioning body. As Giroud points out: "You don’t get the same product from everyone." While a full-time shop with insurance and skilled welders might cost more, the quality and reliability are well worth the investment.
Key Takeaways for Roll Cage Installation
When it comes to installing a roll cage, there are a few key elements that can’t be overlooked: the right materials, precise fitment, and solid welds. Whether you’re working with mild steel or Chromoly, always check that the tubing meets the required specifications for your sanctioning body. As Jeg Coughlin Jr. wisely notes:
"The NHRA is very strict on their rules since your safety is their primary concern. The last thing you want to happen is to find out that something you spent a lot of time on doesn’t meet regulations and has to be redone."
Taking the time to plan thoroughly can save you both money and frustration. Always double-check your measurements, tack the entire cage together before final welding, and ensure joints are fully welded to maintain structural strength. If you’re working on a unibody vehicle, be aware that floor plates must be 6-inch square steel, at least 1/8-inch thick, and welded securely to the sill rather than just the floor pan.
Details like padding, clearance, and documentation are just as critical as the cage itself. Install SFI-rated padding on any bars within reach of the driver’s head for added safety. Additionally, take photos of your welds before painting; inspectors often require proof of weld quality during homologation. A properly installed roll cage can cut the risk of injury in high-speed crashes by up to 50%, but only if every step is executed correctly.
Finally, know when to call in a professional. Complex designs – like Chromoly cages, 12-point or 14-point configurations, or cages requiring frame tie-ins – are best handled by certified fabricators. Remember, the roll cage is your ultimate safety barrier. Build it to meet the highest standards.
FAQs
What roll cage design is best for my off-road vehicle?
When designing a roll cage, triangulation is key to achieving maximum strength. Triangles are inherently stable and distribute forces effectively. Always prioritize straight tubes over curved ones since bends naturally weaken the structure. If bends are unavoidable, ensure they are gusseted and positioned at node points for added reinforcement.
For the best protection, the roll cage should include a main hoop, A and B pillars, and roof bracing. These components must be securely tied into the chassis – not just the floor – for maximum integrity. Using seamless steel tubing is essential to ensure durability and safety.
Do I need to tie the cage into the frame or use floor plates?
When deciding whether to tie the cage into the frame or use floor plates, it largely depends on the specific kit and how it’s designed to be installed. Most kits are floor-mounted, relying on welded plates to create a strong and secure base. These plates should be bent to partially wrap around the side sill and positioned on horizontal surfaces to maximize strength. While some kits may connect directly to the sill, using floor plates remains the standard approach for ensuring both stability and safety.
Will a roll cage make street driving more dangerous without a helmet?
Yes, a roll cage can make street driving riskier if you’re not wearing a helmet. The bars, especially those close to the driver or passenger, need to be wrapped in approved padding to help minimize injury risks. Additionally, roll cages can interfere with factory-installed safety systems like airbags. Their rigid design can lead to severe injuries during a collision if you hit them without proper protective gear.
Leave a Reply