Off-road vehicle modifications can transform your stock vehicle into a trail-ready machine capable of tackling rugged terrains. If you’re new to off-roading, start with these key upgrades:
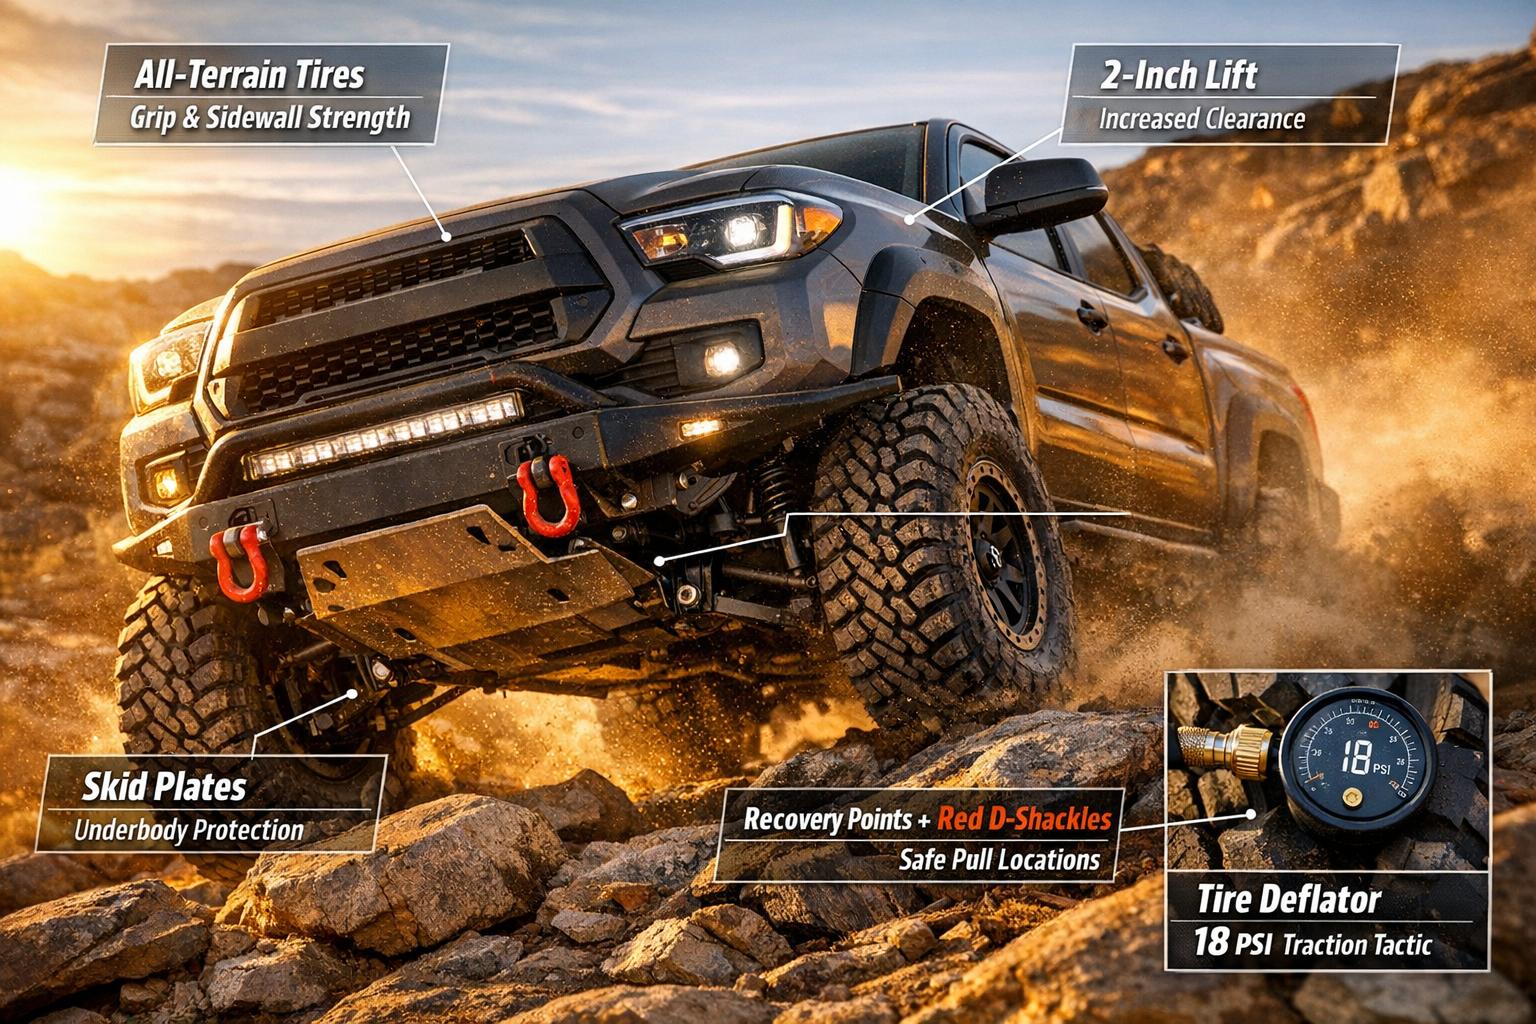
- Tires: All-terrain or mud-terrain tires improve traction and ground clearance.
- Recovery Gear: Essential tools like recovery ropes, traction boards, and soft shackles help you get unstuck without costly towing.
- Skid Plates and Rock Sliders: Protect vital components like the oil pan, transfer case, and doors from damage.
- Suspension Lifts: A 2–3-inch lift improves clearance and wheel articulation while maintaining safety.
- Tire Pressure Management: Airing down tires enhances traction on trails; carry a portable compressor to reinflate them for highway driving.
Plan upgrades in stages to avoid costly mistakes. Prioritize safety, reliability, and alignment with your driving needs. For example, a truck used on highways and light trails may only need all-terrain tires and basic armor, while rock crawlers require more advanced lifts and protection.
Pro Tip: Always account for hidden costs like alignment, extended brake lines, or re-gearing when budgeting for modifications.
This guide covers everything from beginner-friendly upgrades to advanced setups for different terrains, ensuring your vehicle is ready for your next adventure.
Planning Your First Off-Road Build
Setting Goals and Budget
Before diving into upgrades, take a moment to figure out how you’ll actually use your vehicle. A truck that spends most of its life on city streets will need a completely different setup than a rig built for rugged weekend trails. Being upfront about your driving habits can save you from wasting money on parts you’ll later regret.
When setting your budget, don’t just focus on the price tag of individual components. For instance, a $1,500 lift kit might seem affordable – until you factor in extras like professional alignment ($100–$200), extended brake lines ($50–$150 per axle), and possibly re-gearing if you’re adding much larger tires.
"All told, a ‘$2,000 lift kit’ can easily become a $5,000–$7,000 project once you account for everything." – Forged 4×4 Editorial Team
Here’s a quick breakdown of typical beginner-level modification costs:
| Modification | Parts Cost | Installation Cost |
|---|---|---|
| Leveling Kit (1–2.5") | $100–$500 | $200–$400 |
| Budget Suspension Lift (2–3") | $400–$1,500 (installed) | – |
| All-Terrain Tires (set of 4) | $800–$2,500+ | $100–$200 (mount/balance) |
| Recovery Gear | $250–$1,200 | N/A (DIY) |
| Skid Plates / Rock Sliders | $400–$1,800 | $200–$500 |
| Professional Alignment | – | $100–$200 |
Understanding Your Vehicle’s Limits
Every vehicle has its factory limits, and knowing them can save you from costly mistakes. For example, most stock trucks and SUVs are designed to handle tire sizes between 29 and 32 inches. Go beyond that without proper modifications, and you risk tire rubbing during sharp turns or suspension compression.
Suspension design also plays a huge role. Independent Front Suspension (IFS) setups, such as those found on the Toyota Tacoma or Ford Ranger, are more sensitive to lift height. On a Tacoma, the factory upper control arm (UCA) operates at about 18 degrees of deflection at stock height. Add a 3-inch lift without upgrading the UCAs, and you could push that angle past 28 degrees, which significantly increases the risk of premature failure. On the other hand, solid-axle vehicles like the Jeep Wrangler handle lifts more easily but still require steering adjustments for lifts over 3.5 inches.
Keep in mind that not all modifications increase ground clearance. Leveling kits and body lifts change the vehicle’s stance but don’t raise the frame, axles, or skid plates. To truly gain clearance, you’ll need larger tires or a proper suspension lift.
Beginner Build Pathways
The right build depends on the terrain you plan to conquer. Here are three common approaches to beginner setups, along with how LSK Suspension components can fit into your plans:
Mild Trail Build:
This setup is great for forest roads, fire trails, and moderate dirt paths. It typically includes a 2–3-inch suspension lift, 33-inch all-terrain tires, and basic skid plates for protection. LSK Suspension offers bolt-on kits and upper control arms that correct geometry for IFS vehicles, making this an easy upgrade path without requiring custom work.
Desert Pre-Runner Setup:
For desert driving, high-speed stability is more important than extreme ground clearance. These builds often start with long-travel shocks, reinforced bumpers, and plenty of auxiliary lighting. LSK Suspension’s long-travel kits and bumper systems are specifically designed for the demands of high-speed, high-impact conditions.
Rock-Crawling Upgrades:
Rock crawling demands maximum articulation and protection. These builds usually begin with rock sliders and a bumper with recovery points, eventually progressing to 4-inch or larger lifts with long-arm kits. LSK Suspension’s weld-it-yourself options are perfect for experienced DIYers looking to fine-tune their rig for the toughest terrain.
"The smartest first upgrades are the ones that improve the contact patch, reduce the chance of getting stuck, protect expensive parts, and support the type of terrain you truly drive." – Forged 4×4 Editorial Team
sbb-itb-afc4690
Suspension System Upgrades for Beginners
Suspension Basics Explained
Your vehicle’s suspension system is a collection of components that work together to keep your ride smooth and controlled. Knowing the role of each part can help you make informed upgrade choices. Springs – whether coil or leaf – support the vehicle’s weight and absorb the initial impact from bumps or rough terrain. Meanwhile, shocks and struts ensure your tires stay in contact with the ground instead of bouncing uncontrollably. As Forged 4×4 explains:
"The springs hold the truck up; the shocks determine how it rides."
Two often-overlooked parts are bump stops and control arms. Bump stops act as a cushion, preventing the suspension from bottoming out during hard impacts. Control arms, on the other hand, connect the suspension to the chassis and play a critical role in maintaining proper alignment and handling – especially on lifted vehicles, where poor control arm angles can lead to noticeable issues.
Before diving into upgrades, get familiar with two key terms: spring rate and damping. Spring rate refers to how much force is needed to compress a spring, affecting how stiff or soft your ride feels. Damping, controlled by your shocks, regulates how quickly the suspension compresses and rebounds, influencing both comfort and responsiveness.
Entry-Level Suspension Modifications
If you’re just starting out, a good first step is a leveling kit or a mild 2–3-inch suspension lift. A leveling kit raises the front of your truck to match the rear, primarily for aesthetics, but it also allows for slightly larger tires. A suspension lift, however, provides actual benefits like better ground clearance and improved wheel articulation.
Investing in quality shocks is essential for a smoother ride. Entry-level options like the Bilstein 5100, priced between $80 and $120 per shock, offer a noticeable improvement over stock shocks. For those planning extended off-road adventures, monotube shocks are a solid upgrade. They respond faster and handle heat better than standard twin-tube shocks, making them ideal for rugged terrain.
For vehicles with independent front suspension (IFS), such as the Toyota Tacoma or Ford Ranger, lifts over 2 inches require aftermarket Upper Control Arms (UCAs). Products like LSK Suspension’s bolt-on control arms are tailored for popular IFS platforms, addressing caster angles and ball joint geometry without the need for custom fabrication. This makes them a great choice for beginners seeking reliability and ease of installation.
| Lift Height | Fits Tire Size | Typical Cost (Installed) |
|---|---|---|
| Stock | 29–32 inches | – |
| 2-inch lift | Up to 33 inches | $400–$1,500 |
| 3-inch lift | 33–35 inches | $1,500–$4,000 |
| 4-inch lift | 35–37 inches | $3,000–$10,000+ |
Beyond lifts and shocks, you’ll need to think about supporting components to ensure your upgrades perform well and last.
Supporting Components and Maintenance
When upgrading your suspension, don’t overlook supporting components that protect your investment. Suspension limiting straps are a must-have to prevent overextension, which can damage CV axles and brake lines. For lifts over 2.5 inches, extended brake lines are crucial to avoid stretching during full suspension droop. These additions not only enhance durability but also improve overall reliability during off-road adventures.
After installing new suspension parts, always schedule a professional four-wheel alignment. This ensures proper handling and even tire wear, and typically costs $100–$200. Post-installation, after driving 10–50 miles, retorque all new bolts to ensure nothing has loosened. Regular maintenance is key – after every off-road trip, inspect bushings for cracks and check fasteners for movement. Catching small problems early can save you from expensive repairs down the line.
Tires, Wheels, and Traction
Choosing the Right Tires for Your Terrain
When it comes to off-road performance, your tires are the most impactful upgrade you can make. The right choice depends on the terrain you encounter most often.
All-terrain (A/T) tires are a great starting point for beginners. They handle gravel roads, light mud, and snow while staying quiet and comfortable on highways. Popular options like the Falken Wildpeak A/T3W ($160–$310 per tire) and the BFGoodrich All-Terrain T/A KO2 ($220–$380 per tire) come with tread life warranties of 50,000–65,000 miles. They also carry the Three-Peak Mountain Snowflake (3PMSF) rating, making them reliable in winter conditions. Thanks to dense siping – thin slits in the tread – these tires outperform mud-terrain options on snow and ice.
Mud-terrain (M/T) tires are designed for deep mud and technical rock crawling. Their aggressive tread and high void ratio (40–50%) help clear mud and debris, while their 3-ply sidewalls resist punctures on sharp rocks. However, they are noisier, with highway noise levels of 78–80 dB compared to 68–74 dB for A/T tires, and they can reduce fuel efficiency by 1–3 MPG. Models like the Nitto Trail Grappler M/T ($260–$410 per tire) and the Mickey Thompson Baja Boss M/T ($300–$460 per tire) are worth the investment if you frequently face challenging terrain.
For a balance between performance and comfort, hybrid (R/T) tires like the Nitto Ridge Grappler ($240–$380 per tire) offer a middle ground. They’re more aggressive than A/T tires but quieter and more road-friendly than M/T options.
As the Forged 4×4 Editorial Team wisely notes:
"A good A/T in the correct size is usually a smarter upgrade than an oversized M/T that rubs, kills fuel economy, and never sees terrain where it can pay you back."
| Terrain | Best Tire Type | Key Feature |
|---|---|---|
| Mud / Sticky Clay | Mud-Terrain (M/T) | High void ratio, self-cleaning lugs |
| Rocks / Technical | Mud-Terrain (M/T) | 3-ply sidewall, soft compound |
| Sand / Desert | A/T or M/T | Flotation via airing down |
| Snow / Ice | All-Terrain (A/T) | 3PMSF rating, dense siping |
| Gravel / Fire Roads | All-Terrain (A/T) | Stone ejector ribs, chip-resistant compound |
Next, let’s talk about wheels and why their specifications matter for clearance and performance.
Wheel Specs and Clearance
Your wheel choice isn’t just about looks – picking the wrong specs can lead to rubbing, suspension stress, or even a popped tire bead on the trail.
A key guideline is the 75% rule: your wheel width should be about 75% of your tire’s section width. For popular off-road setups like 33×12.50" or 35×12.50" tires, the ideal wheel width is between 9.0" and 10.0". Narrower wheels within this range are better for technical trails since they allow the tire sidewall to flex and "balloon" more naturally when aired down.
Backspacing and offset are also critical. Negative offset pushes the tire outward, often necessary for larger tires on lifted trucks, but it adds stress to wheel bearings and steering components. After installing new wheels, always perform a full steering check and cycle the suspension to ensure there’s no rubbing.
Most off-road builds stick to 15- to 17-inch diameter wheels. While 20-inch wheels may look aggressive, they reduce tire sidewall height, which limits the cushioning effect needed for airing down on rocky trails.
Tire Pressure Management
Adjusting tire pressure before hitting the trail is one of the simplest ways to improve traction. With the right tools, it’s easy and effective.
For moderate trails, lowering your pressure to 15–20 PSI enlarges the tire footprint and enhances traction. On technical rock crawling, dropping to 8–15 PSI can increase your contact patch by up to 40%. Interestingly, most of this improvement – about 80% – comes from the increased length of the footprint, not the width. This means even narrower tires can outperform wider ones if aired down correctly.
"Airing down increases your traction by giving your tire a larger contact patch, more sidewall deflection to conform around rocks, and a smoother, more comfortable ride." – OK4WD
Two tools make airing down a breeze:
- Pre-set screw-on deflators: These let you deflate all four tires at once without constant monitoring, making them perfect for beginners.
- E-Z fast deflators: These release air at about 1 PSI per second, giving you precise control, but they handle only one tire at a time.
For airing back up, a portable 12V compressor is a practical, beginner-friendly option. It doesn’t require installation and can be shared between vehicles.
Never drive on pavement with low off-road pressure. Low PSI compromises steering, braking, and handling at highway speeds. Always inflate back to the manufacturer’s recommended pressure before returning to paved roads. Additionally, if you drop below 15 PSI on non-beadlock wheels, you risk de-beading the tire, which means it could pop off the rim entirely.
Protection, Safety, and Recovery Gear
Vehicle Armor and Protection
When you’re just starting out in off-roading, safeguarding your vehicle is just as important as boosting its performance. One of the first steps? Protecting the underside of your rig.
"Protection often beats lift height in the real world."
Skid plates are critical for shielding components like the oil pan, transmission, transfer case, fuel tank, and steering rack from damage caused by rocks and tree roots. Similarly, rock sliders protect the doors and lower rocker panels. These upgrades aren’t just about peace of mind – they can save you from repair bills that can far exceed their initial cost. Expect skid plates to add over 100 pounds to your vehicle, while rock sliders typically weigh between 80 and 180 pounds. Costs range from $400 to $1,800. Keep in mind, the added weight may require suspension adjustments.
When choosing materials, mild steel is a practical option for most beginners. It’s affordable, easy to weld, and simple to repair. On the other hand, chromoly steel is stronger but significantly pricier – three to four times more – and has the downside of splintering on hard impacts, which can be a problem on rocky trails. For installation, use Grade 8 bolts for high-tension areas and ensure the armor is mounted to solid frame points rather than body panels.
Another often overlooked but essential item is limit straps. These inexpensive straps act as a safeguard for your suspension, preventing shocks from overextending when fully stretched. Considering shocks can cost upwards of $300 to replace, limit straps are a small investment with big savings.
"Limit straps are cheap insurance for expensive suspension components." – Bull Strap
Now that your vehicle is armored and ready for the trail, it’s time to focus on recovery gear – because getting stuck is just part of the adventure.
Basic Recovery Gear and Tools
Once your vehicle is protected, it’s time to prepare for recovery situations. Off-road mishaps happen, and a single tow from a remote area can cost you hundreds, if not over $1,000. A solid recovery kit can save you both money and headaches.
Start with rated recovery points at the front and rear of your vehicle. These are essential for anchoring any recovery equipment. A kinetic recovery rope (or snatch strap) is another must-have. It works by storing energy during a pull, reducing stress on both vehicles. Look for a rope rated at 2–3 times your vehicle’s GVWR. A basic strap usually costs about $52.
For situations involving sand, mud, or snow, traction boards are invaluable. They often eliminate the need for a second vehicle and typically cost between $167 and $250. Make sure to mount them externally on your vehicle so they’re easy to grab when you’re stuck.
Soft shackles are another great addition to your recovery kit. They’re safer than steel D-rings in the event of a failure and usually cost around $60 each. That said, steel D-rings are better suited for connecting to sharp or abrasive edges.
One crucial safety tip: never use a tow hitch ball for recovery. Under heavy loads, it can snap off and become a deadly projectile. Always use a dedicated recovery hitch receiver designed for the job.
"Recovery equipment isn’t an accessory, it’s a necessity." – Patrick Nuhfer, Backwoods Adventure Mods
Onboard Accessories and Mounting Solutions
Having the right recovery gear won’t help if it’s buried or scattered when you need it most. Items like traction boards, shovels, and straps can shift around in your truck bed or cargo area, making them hard to access in a pinch.
This is where roll cage mounts and external mounting points come in handy. These solutions keep your gear secure and within reach. For example, LSK Suspension offers weld-it-yourself accessory kits, allowing you to create custom mounting setups tailored to your vehicle. This ensures everything, from your shovel to your traction boards, has a dedicated, easy-to-reach spot.
After every off-road trip, inspect your gear. Check skid plate bolts for tightness, look for fraying or UV damage on limit straps, and confirm that all mounted equipment is still secure. Routine maintenance like this can save you from bigger problems on your next adventure.
Beginner offroad upgrades in order of importance | TIER LIST
DIY Tools and Installation Tips for Beginners
This section is here to help beginners get started with the right tools and techniques for safely improving off-road performance.
Core Tools for DIY Off-Road Mods
Before diving into any modifications, set up your workspace with the right tools. A hydraulic floor jack rated for at least 3 tons, along with sturdy jack stands, is a must for safely elevating your vehicle. Keep a socket and wrench set handy, ensuring it includes both metric and SAE sizes to handle the variety of fasteners you’ll encounter.
For suspension work, a torque wrench is non-negotiable. As Lake City Performance puts it:
"Torque every bolt cold; 25 ft-lbs strips M10S."
If you’re dealing with coil springs, a spring compressor is essential – skipping this tool can be dangerous. You’ll also need a pickle fork, rubber mallet, and pry bar to tackle stubborn ball joints and other seized parts. To manage tire pressure on the trail, a tire deflator and portable air compressor will come in handy. Planning to use LSK Suspension’s weld-it-yourself kits? Add an angle grinder and MIG welder to your arsenal.
With these tools, you’ll be set to tackle most DIY off-road mods safely and effectively.
Safe Installation Practices
Safety starts with your workspace. Always work on a flat, concrete surface – not gravel or uneven ground – to ensure your vehicle stays stable on jack stands. As you remove components, take the time to bag and label bolts with their specific locations (e.g., "front left lower control arm"). Mark brackets before removal to avoid confusion during reassembly.
Follow the torque specifications provided in your kit’s instructions for every fastener. Guesswork here can lead to loose components, especially on rough terrain. While a 2–3 inch suspension lift is manageable for a confident DIYer in 6–10 hours, anything involving welding, drilling, or precise control arm mount alignment is best left to professionals. Long-arm kits, in particular, require expert precision.
Once the installation is complete, make sure to double-check everything to ensure your modifications are secure and functioning properly.
Routine Checks After Modifications
After completing your modifications, regular checks are essential for maintaining safety and performance. Start by re-torquing all new hardware after the first 10 miles. Suspension bolts can loosen under load, so catching this early can save you from bigger issues later. As Lake City Performance advises:
"Pull over after 10 miles. Retorque all new bolts."
Next, turn the steering wheel to its full lock in both directions. Check that the tires aren’t rubbing against the fenders and that brake lines aren’t being stretched or pinched. Finally, schedule a four-wheel alignment as soon as possible. Skipping this step after suspension modifications can lead to uneven tire wear, potentially ruining a set of off-road tires in just a few thousand miles. Alignments typically cost $100–$200, which is far cheaper than replacing a set of tires that can cost $900–$2,000.
Here’s a quick summary of key post-installation checks:
| Component | When to Check | What Can Go Wrong |
|---|---|---|
| Suspension bolts | After first 10 miles | Hardware loosening on rough roads |
| Wheel alignment | Immediately after install | Uneven tire wear, handling issues |
| Brake lines | At full steering lock | Stretching or pinching during movement |
| Tire clearance | At full steering lock | Rubbing that damages tires |
| Steering return | After test drive | Pulling or restricted center return |
Conclusion: Building Your First Off-Road Vehicle
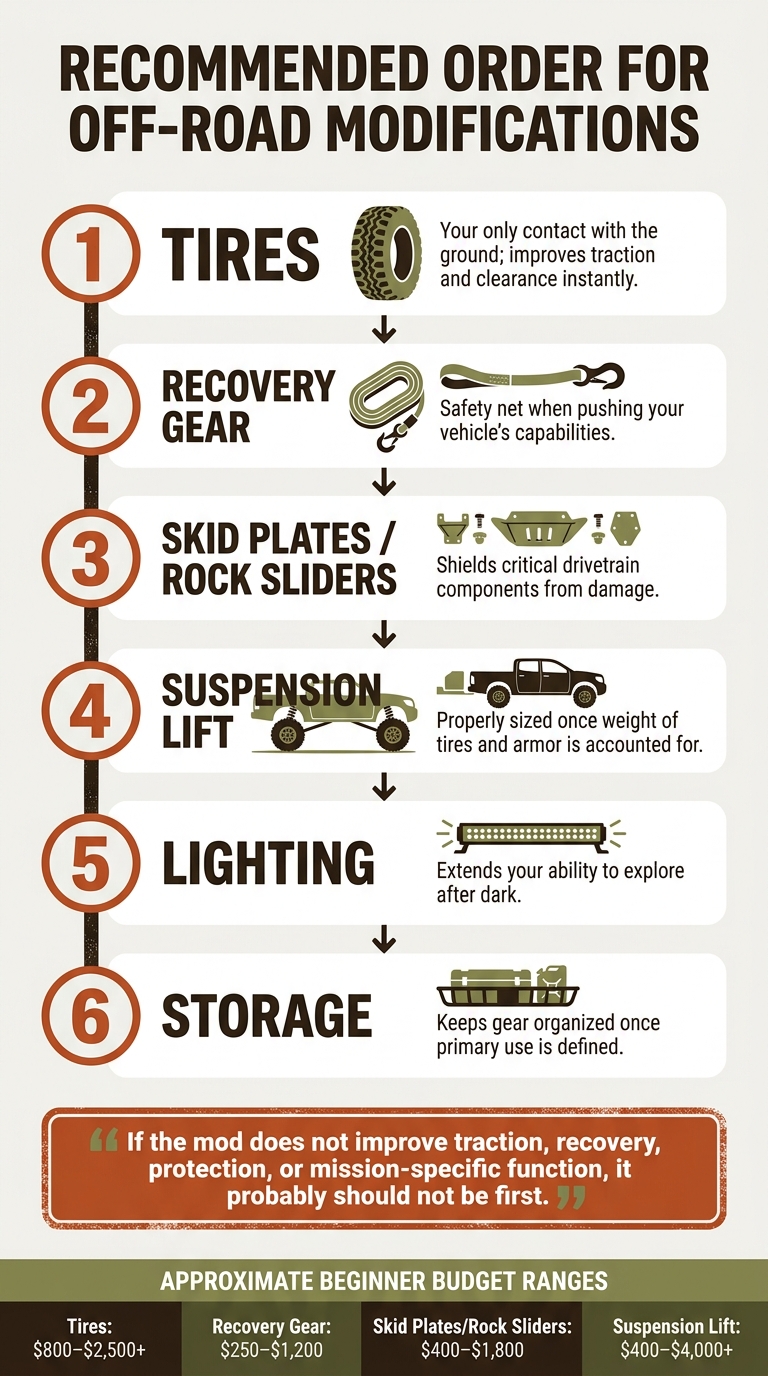
Beginner Off-Road Build Order: Step-by-Step Modification Guide
Creating your first off-road rig becomes much easier when you focus on purposeful upgrades and allocate your budget wisely. Here’s a quick recap of the key steps to guide your initial modifications.
Recommended Order for Off-Road Modifications
A logical approach for beginners is to prioritize upgrades in this order: start with what connects to the ground, then protect the essential components, and finally adjust for additional clearance.
| Priority | Modification | Reason |
|---|---|---|
| 1 | Tires | These are your vehicle’s only contact with the ground, improving traction and clearance instantly. |
| 2 | Recovery Gear | Acts as a safety net when pushing your vehicle’s capabilities. |
| 3 | Skid Plates / Rock Sliders | Shields critical drivetrain components from damage. |
| 4 | Suspension Lift | Properly sized once the weight of tires and armor is accounted for. |
| 5 | Lighting | Extends your ability to explore after dark. |
| 6 | Storage | Keeps your gear organized once you define the vehicle’s primary use. |
As the Forged 4×4 Editorial Team wisely states:
"If the mod does not improve traction, recovery, protection, or mission-specific function, it probably should not be first."
Skipping essential steps, like choosing tires before installing a suspension lift, can lead to costly errors. For example, you might end up buying the wrong lift kit or redoing alignment work entirely.
Building Around a Clear Plan
Every upgrade should align with your goals and driving habits. Modifications aren’t one-size-fits-all. For instance, if your vehicle spends most of its time on paved roads, investing in a durable all-terrain tire with a 50,000–65,000-mile treadwear warranty makes more sense than opting for aggressive mud-terrain tires, which wear out faster and offer a rougher ride on highways. Similarly, a modest lift tailored to your tire size helps you avoid alignment headaches.
The key is to ensure every upgrade serves a purpose – whether it’s enhancing traction, recovery, protection, or a specific function tied to your off-road adventures. Companies like LSK Suspension offer a wide range of options, ensuring your build can evolve as your skills and goals grow. This way, you’re never boxed into a setup that limits your potential.
FAQs
What tire size can I run without rubbing?
The tire size your vehicle can handle without rubbing largely depends on its lift and fender clearance. For most vehicles, including Jeeps, 33-inch tires typically fit fine on a stock suspension. However, if you’re considering 35-inch tires, you’ll usually need a lift of at least 2 to 2.5 inches to prevent any rubbing issues. Always double-check your vehicle’s specific setup and any modifications to ensure compatibility.
Do I need new upper control arms for a lift?
Whether or not you need new upper control arms depends on how much you’ve lifted your vehicle and its overall setup. If your lift is 2 inches or more, it’s usually a good idea to go with aftermarket upper control arms. These help correct the suspension geometry and can prevent early wear and tear. On the other hand, for lifts of 1.5 inches or less, the factory control arms typically do the job just fine – especially if you’re using the vehicle mainly for daily driving.
What recovery gear should I buy first?
For those new to off-roading, some must-have recovery gear includes rated recovery points, a recovery strap or kinetic rope, shackles, traction boards, a shovel, and an air compressor. These items are essential for getting your vehicle out of tricky spots like mud, sand, or when it’s high-centered. The air compressor is especially handy for adjusting tire pressure, allowing you to deflate or re-inflate your tires to suit off-road terrain.
Leave a Reply