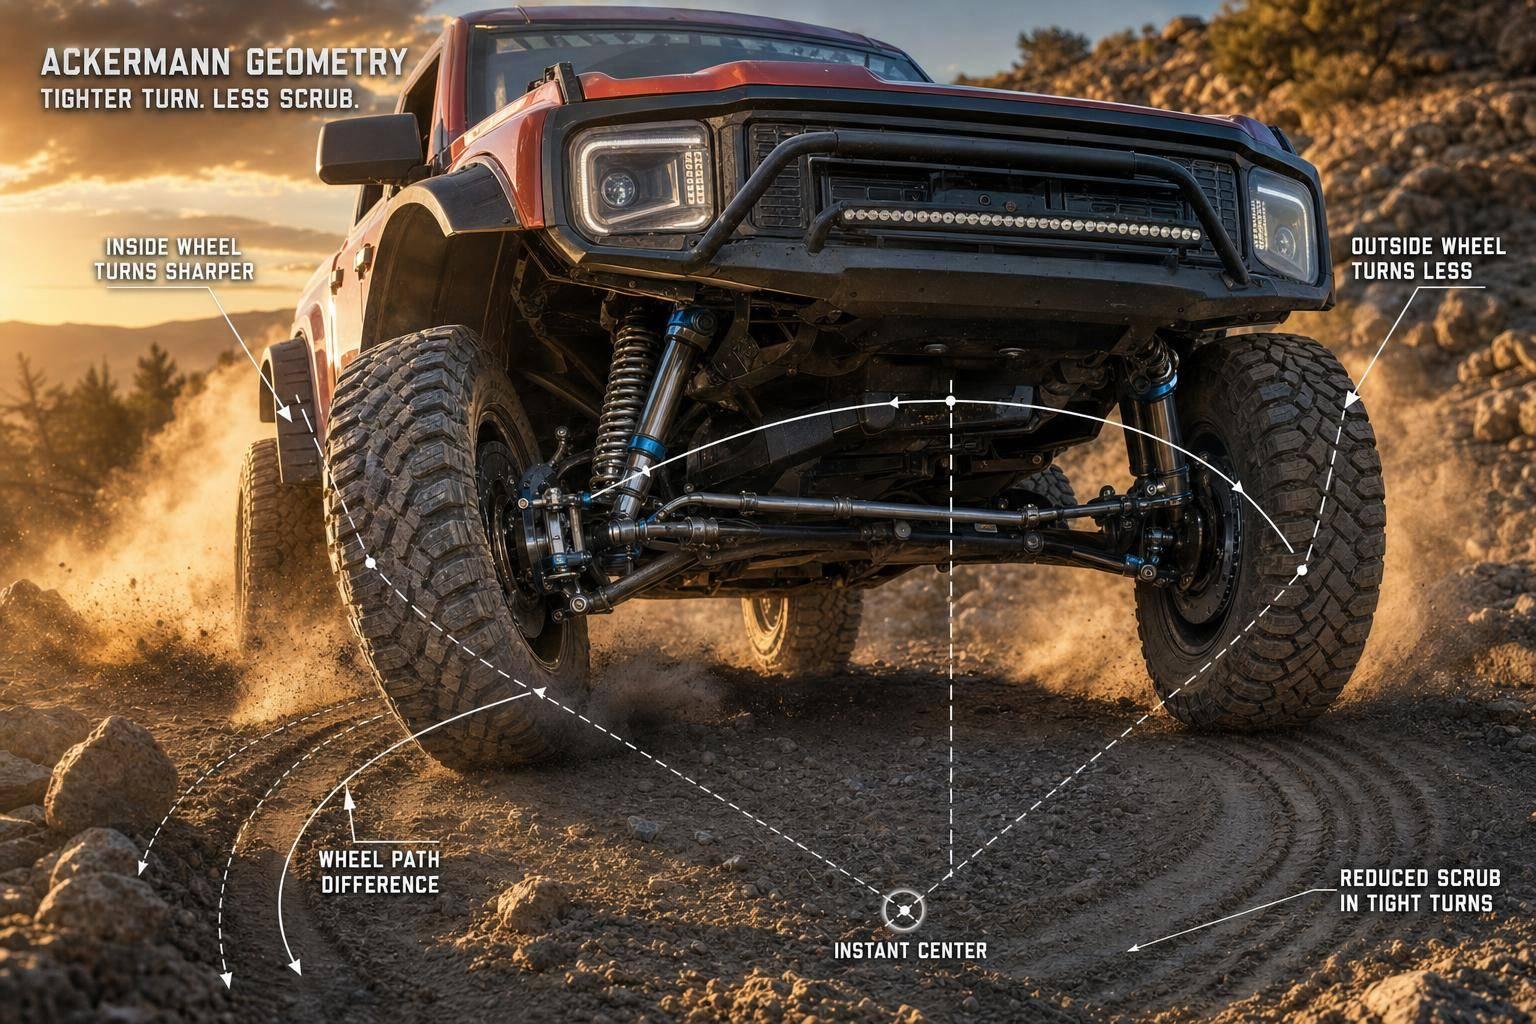
If your off-road rig scrubs tires, feels heavy at low speed, or gets odd at full lock, Ackermann geometry may be part of the problem.
I’d sum it up like this: Ackermann is the difference between the inside and outside front wheel angles in a turn. When that split is close to what the wheelbase and track width call for, steering usually feels smoother, tire scrub drops, and the front end tracks better on dirt, rocks, and sand. When it’s off, you may notice more push, more scrub, and more effort at the wheel.
Here’s the short version:
- Too little Ackermann: more front tire scrub in tight turns
- Too much Ackermann: outside tire can scrub more, and steering can feel nervous
- Best way to check it: measure inner and outer wheel angles at partial lock, mid-turn, and full lock
- Main parts that change it: steering arms, tie-rod pickup points, and rack or steering-box position
- Don’t check Ackermann alone: also check toe change, bump steer, binding, and tire clearance
- Off-road use changes the target: rock crawlers often want more angle split, while desert setups often run less
A few numbers help frame it. In the sample measurements, the inner wheel reached 36.0° at full lock while the outer wheel hit 30.0°, close to a target of 35.5° / 31.0°. That small gap shows why measuring beats guessing. Even a change of 1° to 2° can show up in steering feel, especially with 35-inch or 37-inch tires.
If I were checking a setup today, I’d do three things first:
- Measure wheel angles on a level floor
- Compare them to a target based on wheelbase and track width
- Recheck toe, bump steer, and clearance after each small change
| Check | What I’d look for | Why it matters |
|---|---|---|
| Wheel-angle split | Inner wheel turns more than outer | Cuts scrub in tight turns |
| Steering range | Similar trend from partial lock to full lock | Shows whether geometry stays steady |
| Suspension travel | No bump steer or binding in bump/droop | Keeps steering under control off-road |
| Tire clearance | No contact at full lock | Stops rubbing on arms, shocks, or frame |
| Alignment | Toe, caster, camber, scrub radius still in line | Keeps the whole front end working together |
This guide is about measuring what the front end is doing now, making small changes, and checking the full system before the next trail run.
How does Ackerman Steering actually work? Pro and Anti Ackerman Explained
How Ackermann Geometry Affects Off-Road Handling
Ackermann changes how cleanly the front tires work together in a turn. You notice it most at low speed, where steering feel and tire scrub make problems hard to miss.
What Correct Ackermann Does at Low Speed
When Ackermann is set right, both front tires follow their own natural path through a tight turn. That cuts down on scrub and makes the steering take less effort.
Signs of Too Little or Too Much Ackermann
Too little Ackermann makes the front tires scrub against each other in tight turns. Too much Ackermann can make the outside tire scrub more and leave the steering feeling twitchy.
Use these symptoms as your starting point before you measure wheel angles. Then check the wheel-angle difference to confirm what the vehicle is doing at full lock.
How to Measure Ackermann on Your Off-Road Vehicle
Use the symptoms above as your starting point, then measure the actual split between the wheel angles.
Before you touch any steering parts, get a clear read on where the geometry sits right now.
Tools and Measurements to Record
Work on a level floor. Even a small slope can throw off your angle readings and make side-by-side checks less useful. You’ll need a tape measure, a straightedge, and a good angle finder or digital inclinometer.
Start with the dimensions that set the turn center, then check how the wheels move through the steering range. Record your actual wheelbase and track width, steering-arm pickup points, tie rod end positions, and steering rack or clevis location.
Wheelbase and track width set the target. Steering-arm and tie-rod locations show why you’re getting the result you see.
How to Check Wheel Angles at Full Lock and Partial Lock
Set the vehicle at normal ride height, center the steering, and measure from the same reference points every time. Then turn to a known partial-lock position and measure both the inner and outer wheel angles with your angle finder placed flat against the wheel face or rim.
Repeat the same process at a mid-range position and again at full lock.
Comparing Measured Angles to a Target
Read the result across the steering range, not just at full lock.
Calculate the target from wheelbase and track width. Then compare your measured readings to that target. More inner-wheel angle means pro-Ackermann. Equal angles mean parallel steering. More outer-wheel angle means reverse Ackermann.
The table below shows how measured angles compare to calculated targets across three steering positions:
| Steering Position | Measured Inner | Measured Outer | Target Inner | Target Outer | Result |
|---|---|---|---|---|---|
| 10° (Partial) | 11.5° | 9.5° | 11.2° | 9.8° | Pro-Ackermann (Slight) |
| 20° (Mid) | 24.0° | 18.5° | 23.5° | 19.2° | Pro-Ackermann (Aggressive) |
| Full Lock | 36.0° | 30.0° | 35.5° | 31.0° | Pro-Ackermann |
If the trend shifts hard from one steering position to another, the geometry isn’t staying consistent through the range.
sbb-itb-afc4690
How to Adjust Ackermann and Recheck Alignment
Once you’ve measured the current geometry, change only the parts that affect wheel-angle split. The aim is simple: move the measured angles closer to your target without adding bump steer, binding, or tire clearance issues.
Which Steering Parts Control Ackermann
Ackermann comes mostly from steering-arm angle and length, the tie-rod pickup point, and rack or steering-box position. Change any of those, and you change the inner-to-outer wheel split. But there’s a catch: those same changes can also alter toe curve and bump steer.
Here’s what each part does:
- Steering-arm angle and length at the knuckle or spindle control most of the inside-to-outside wheel-angle difference.
- The tie-rod pickup point changes the tie rod’s arc and how much Ackermann shows up through the steering range.
- Rack or steering-box position changes tie-rod angle and how fast the inside wheel turns more than the outside wheel.
Use those parts to move the measured angles toward your target. Then check the full steering range again.
Step-by-Step Adjustment Process
Start with your baseline numbers. Then make one small change and remeasure at the exact same steering positions. Record wheel angles at center, partial lock, and full lock. Also record toe at ride height, bump, and droop. One change at a time makes it much easier to see what actually caused the result.
After each change, measure both wheel angles again at the same steering points. Then pull the springs and cycle the suspension from full bump to full droop while turning the wheels. Watch for bump steer, binding, and any interference. Make sure the steering stops still keep the tires from hitting control arms, shocks, or the frame at full lock. Only move on to low-speed testing after the geometry checks out through the full suspension travel range.
Once the steering sweep is close, check how the rest of the alignment behaves through suspension travel. That’s where small issues tend to show up.
How Suspension and Steering Kits Affect the Setup
Long-travel and race kits change more than wheel travel. They also change steering geometry. When factory control arms and knuckles are swapped for extended parts, the steering pickup points move too. That means a setup that worked at stock ride height may no longer work after the install.
These parts act like a package deal. If one point moves, the rest of the system reacts. So Ackermann, bump steer, and toe curve all need to be checked together.
Long-travel kits move steering pickup points, so recheck Ackermann, bump steer, and toe after installation.
Next, balance those steering changes with the rest of the alignment settings.
The table below shows how each adjustment method stacks up for off-road builds:
| Modification | Ackermann Effect | Fabrication Effort | Alignment Impact | Common Off-Road Use |
|---|---|---|---|---|
| Changing Steering Arm Angle | High; primary way to set the inner/outer wheel angle split | High; usually requires custom fabricated spindles | Significant; changes steering sweep and toe | Race-spec spindles and long-travel kits |
| Moving Tie Rod Pickup Points | Moderate to high; alters the tie rod’s arc and effective leverage | Moderate to high; involves drilling or welding on knuckles | High; directly affects bump steer and toe curve | Tuning steering quickness and Ackermann in custom builds |
| Repositioning Rack or Steering Box | Moderate; changes tie-rod angle and inside-wheel out-turn rate | Very high; requires frame or chassis modification | Moderate; affects steering center and bump steer | Custom chassis builds and extreme long-travel setups |
Setup Trade-Offs and Key Takeaways
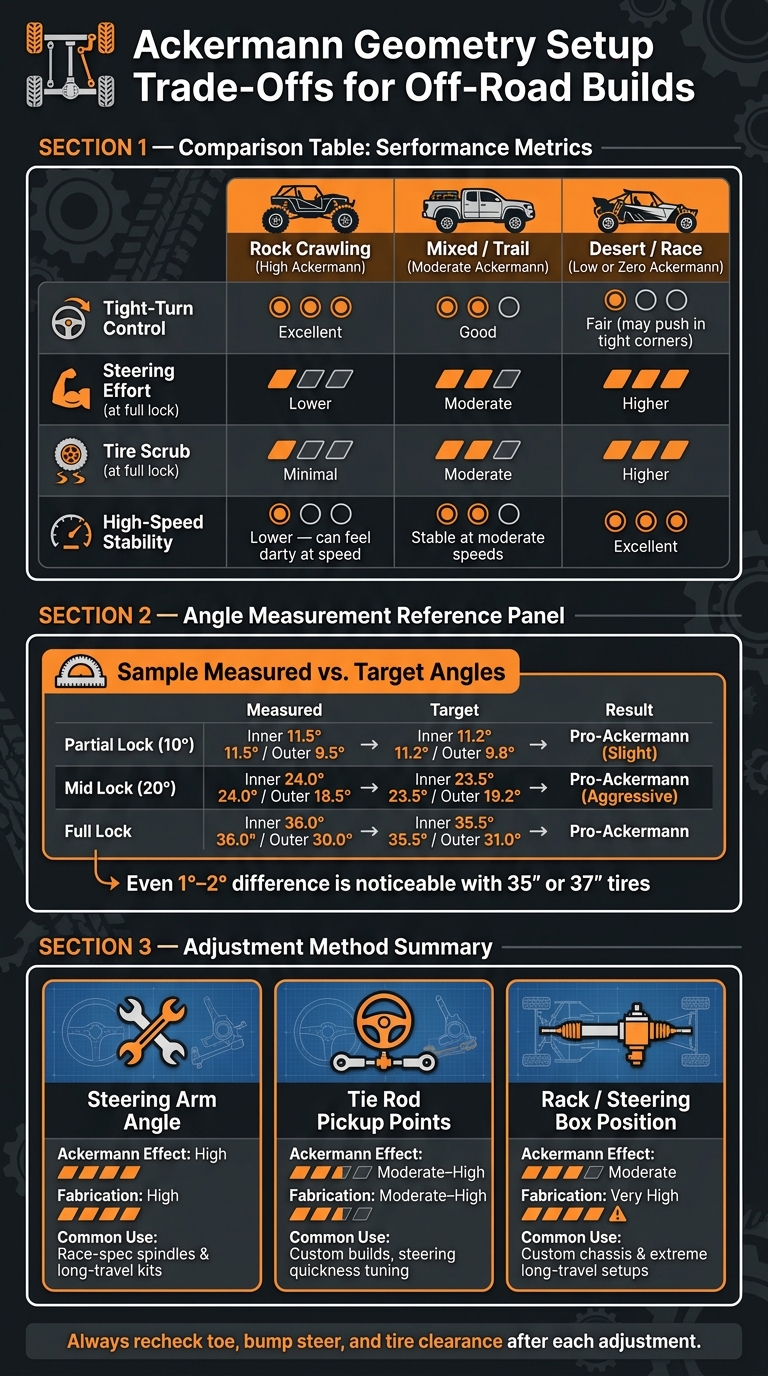
Ackermann Geometry Setup Guide: Off-Road Steering Trade-Offs by Build Type
After you measure Ackermann, pick the trade-off that matches the build. There isn’t one “right” Ackermann number for every rig. It comes down to how and where you drive.
Use the chart below to line up setup goals with driving style.
| Setup Priority | Tight-Turn Control | Steering Effort | Tire Scrub | High-Speed Stability |
|---|---|---|---|---|
| Rock Crawling (High Ackermann) | Excellent | Lower | Minimal | Lower; can feel darty at speed |
| Mixed/Trail (Moderate Ackermann) | Good | Moderate | Moderate | Stable at moderate speeds |
| Desert/Race (Low/Zero Ackermann) | Fair; may push in tight corners | Higher at full lock | Higher at full lock | Excellent |
Balance Ackermann With Toe, Caster, Camber, and Scrub Radius
Once Ackermann is set, check the rest of the alignment again. Static toe, caster, camber, and scrub radius all shape how the vehicle feels on the trail, so one change can ripple through the whole front end.
Camber needs a close look through suspension travel. Check it at ride height and through the full cycle to make sure the tire stays in contact as the suspension moves. A good general target is at least -1° of camber at ride height. Negative caster changes are often used to make room for larger tires, but that extra clearance can come at a cost if return-to-center starts to feel weak on faster terrain.
Scrub radius should stay as small as practical. That helps keep front track width more consistent and supports stability.
Key Points to Check Before the Next Test Drive
Shop measurements get you close. The trail tells you if the setup works.
Before heading out, check the basics on the same kind of terrain the vehicle was built for:
- Camber at ride height, full bump, and full droop
- No bump steer through full suspension travel
- Tire clearance at full lock, especially with 35-inch or 37-inch tires or negative caster
- Brake lines with enough slack for full lock and full droop; some long-travel setups use brake lines 12 inches longer than stock
- Cam lockout plates welded to fix lower control arms in position for permanent off-road setups
FAQs
How do I calculate my Ackermann target?
To calculate your Ackermann target, figure out how much more the inside front wheel needs to turn than the outside wheel when the vehicle goes through a corner.
That means looking at your vehicle’s wheelbase, track width, and the distance between the kingpin axes based on the terrain you drive and the handling you want. If you want help dialing in your setup, contact LSK Suspension at (909) 305-4824.
Can bad Ackermann cause bump steer?
Yes. Improper steering geometry can lead to bump steer when the wheels toe in or out as the suspension moves through its travel.
That’s the core issue: as the suspension cycles, the steering angle changes when it shouldn’t. And off-road, that can make the vehicle feel twitchy and harder to place.
Properly engineered suspension parts, such as long travel kits from LSK Suspension, are built to keep steering geometry in check through wheel travel. That helps reduce or even eliminate bump steer, which makes off-road handling more predictable.
Should I change Ackermann for 35-inch or 37-inch tires?
It depends on your vehicle platform and the suspension kit you’re running. LSK Suspension builds its long-travel kits for each platform to keep the geometry in check, including bump steer and CV angles, within the recommended tire size range.
Check the product page for your truck to see if your tire setup needs any extra adjustments or modifications.
Leave a Reply