
Off-road driving puts your suspension system through extreme stress, leading to wear and tear much faster than on paved roads. Here are five common suspension problems and how to address them:
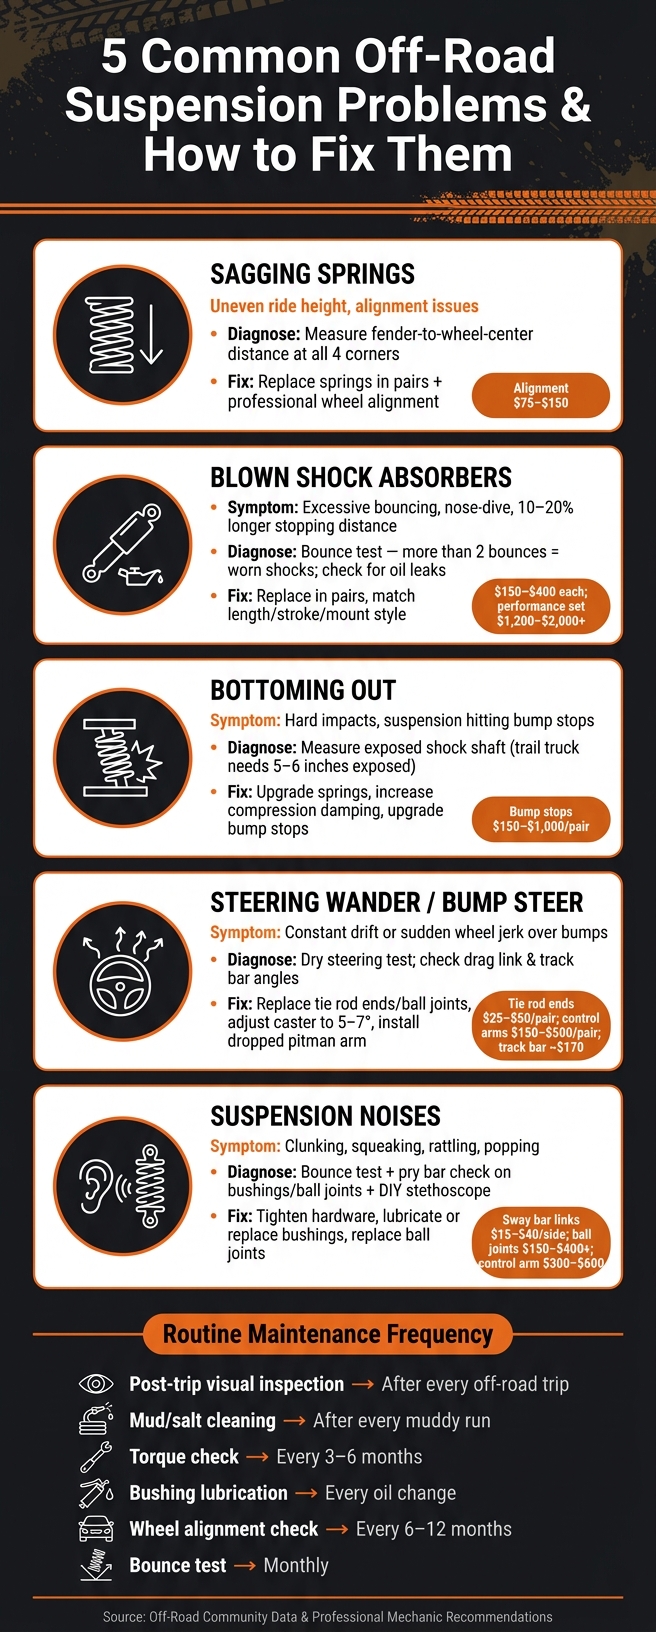
- Sagging Springs: Causes uneven ride height and alignment issues. Diagnose by measuring ride height and inspecting springs for damage. Fix by replacing springs in pairs and aligning wheels.
- Blown Shocks: Leads to excessive bouncing, instability, and uneven tire wear. Check for oil leaks and perform a bounce test. Replace shocks in pairs and ensure compatibility with your vehicle’s lift height.
- Bottoming Out: Happens when suspension travel is insufficient. Measure shock travel and inspect bump stops. Solutions include upgrading springs, shocks, or bump stops.
- Steering Wander/Bump Steer: Caused by worn components or misaligned geometry after a lift. Diagnose with a dry steering test. Fix by replacing worn parts, adjusting caster, and aligning the steering linkage.
- Suspension Noises: Clunks, squeaks, or rattles often signal worn bushings, ball joints, or loose hardware. Inspect components and replace or lubricate as needed.
Key Tip: Regular inspections, cleaning, and maintenance are essential to keep your off-road suspension performing well and avoiding costly repairs.
5 Common Off-Road Suspension Problems: Diagnosis & Fix Guide
Rock Crawler Suspension Mishaps | Let’s Fix It! | Off-Road Repair & Upgrade
Problem 1: Uneven Ride Height and Sagging Springs
If one corner or end of your vehicle sits noticeably lower than the rest, it’s more than just an aesthetic issue. Sagging springs can throw off your vehicle’s alignment angles – like camber, caster, and toe – leading to erratic steering behavior. A reduced ride height also limits suspension travel, making it more likely to hit the bump stops, which can feel jarring, especially on rough terrain.
This issue often stems from metal fatigue, excessive weight from aftermarket modifications, or worn bushings that allow one corner to drop, even if the spring itself hasn’t completely failed. Uneven weight distribution can also lead to a permanent lean.
"A vehicle that leans to one side is more than just an eyesore. It is a visible sign of an underlying problem that affects comfort, handling and safety." – Liam, Midland Road Springs
How to Diagnose Sagging Springs
Start by parking your vehicle on flat, level ground. Make sure your tires are inflated to the manufacturer’s recommended pressure, as underinflated tires can mimic the appearance of a lean. Measure the distance from the wheel center to the fender lip at all four corners. Any noticeable differences suggest spring fatigue or uneven weight distribution.
Next, perform a visual inspection. For leaf springs, look for cracked or flattened leaves, broken clips, or worn shackles. With coil springs, check for coil bind, where the coils touch or sit too close together at the bottom. Examine the bump stops for signs of frequent contact or missing pieces, which indicate the suspension is bottoming out. Additionally, irregular tire wear patterns – like cupping or feathered edges – can signal alignment issues caused by sagging springs. These checks are key to ensuring your vehicle remains reliable, especially off-road.
Once you’ve identified sagging springs, you can move forward with the necessary repairs.
How to Fix Uneven Ride Height
First, confirm that your vehicle isn’t overloaded. Exceeding the Gross Vehicle Weight Rating (GVWR) can strain your springs and compromise performance. If replacement is needed, always replace springs in pairs on the same axle to maintain balance. For vehicles frequently carrying heavy loads, consider heavy-duty coils or multi-leaf packs designed for constant weight rather than standard replacements. For occasional overloads, add-a-leaf kits or progressive bump stops can provide extra support.
After replacing the springs, schedule a professional wheel alignment to restore proper handling and protect your tires. Don’t skip this step – misalignment can lead to rapid tire wear and poor steering response. Additionally, re-torque all related hardware, like U-bolts and shackles, after a few hundred miles to ensure everything has settled correctly. Alignment services typically cost between $75 and $150.
Problem 2: Worn or Blown Shock Absorbers
Shock absorbers play a key role in managing spring energy and ensuring stability, especially when driving off-road. As Thomas Corle, Founder of FatBoysOffroad, explains:
"Contrary to popular belief, [shocks] do not support the weight of the vehicle; that is the job of the coil springs or leaf springs. The shocks are there to control the energy stored in those springs."
When shocks wear out, they fail to properly control spring energy, leading to instability. In severe cases, you might encounter shock fade – a situation where the shock’s oil overheats, becomes foamy, and loses its ability to dampen movement.
How to Identify Bad Shocks
A simple way to check your shocks is with the bounce test. Push down firmly on one corner of your vehicle and release. If the vehicle bounces more than once or twice before settling, the shock’s internal valving is likely worn.
Next, inspect the shock body itself. A light mist of oil near the top seal is normal, but visible oil running down the shock indicates a failed seal that requires replacement. Look out for other damage such as dents, rusted piston rods, or cracked bushings. Another telltale sign is uneven tire wear – specifically a scalloped or wavy pattern, which suggests the shocks aren’t keeping the tires firmly on the ground.
Pay attention to how your vehicle handles. Signs like nose-diving when braking, rear-end squatting during acceleration, or needing constant steering corrections at highway speeds are red flags for worn shocks. Poor shocks can even increase stopping distances by 10–20% and shorten tire lifespan by as much as 25%.
Once you’ve identified failing shocks, replacing them is the next step to restoring your vehicle’s performance.
How to Replace Shock Absorbers
When replacing shocks, always swap them out in pairs on the same axle to maintain balanced handling. To make the process easier, spray the mounting bolts with penetrating oil and let them soak for 15–20 minutes to loosen rusted fasteners. Here’s a basic guide to replacing shocks:
- Lift and Support: Use a heavy-duty jack to raise the vehicle, and secure it with jack stands placed under the frame. Never rely solely on a floor jack.
- Stabilize the Axle: Support the axle or control arm with a floor jack to prevent it from dropping.
- Remove the Old Shock: Start by removing the upper mounting nut (locking pliers may help), followed by the lower bolt.
- Match the Replacement: Ensure the new shock matches the old one in length, stroke, and mounting style.
- Install the New Shock: Mount the new shock finger-tight, then torque it to the manufacturer’s specifications after lowering the vehicle. Use blue thread-locker on the bolt threads for added security.
After installation, re-check and re-torque all hardware after driving the first 500 miles. Also, make sure the new shocks are compatible with your vehicle’s lift height. Shocks that are too short can "top out" and suffer internal damage.
Replacement shocks typically cost between $150 and $400 each. For a full set of performance shocks, such as FOX 2.0 models, expect to spend $1,200 to $2,000 or more. If you often drive on long desert trails or rough washboard roads, remote reservoir shocks are worth considering. These shocks hold more oil, which helps them dissipate heat better.
Problem 3: Bottoming Out and Hard Impacts
Bottoming out happens when your suspension uses up all its travel, causing the axle housing to hit the bump stops or frame. Like uneven ride height and worn shocks, this issue can reduce your vehicle’s control and must be fixed quickly. The usual culprits are springs that are too soft for the vehicle’s weight or insufficient up-travel to handle heavy impacts. Adding weight from aftermarket bumpers, winches, or heavy gear only makes the problem worse by compressing the springs even further and cutting down on available travel.
How to Diagnose Bottoming Out
Start by measuring the exposed shock shaft to see how much travel remains. The length of the exposed shaft shows how much room the suspension has before it bottoms out. As a rule of thumb:
- A trail truck should show 5–6 inches of exposed shaft.
- A desert truck or prerunner should have about 50% of its total travel exposed.
If the exposed shaft is less than these guidelines, your suspension is nearing its limit.
| Vehicle Type | Recommended Exposed Shaft at Ride Height |
|---|---|
| Technical Rock Crawler | 4–5" of shaft |
| Trail Truck / Snow | 5–6" of shaft |
| Desert Truck / Prerunner | 50% of total travel |
| Dune Buggy / Sandrail | 66% of total travel |
| Mud / Monster Truck | 50%–66% of total travel |
Another sign of bottoming out is worn bump stops. Excessive wear indicates frequent contact. As Timbren highlights:
"Factory bump stops – designed for on-road driving – have proven to be inadequate when taken off road."
Lastly, if your springs require more than 4 inches of preload, it’s a clear sign they’re too soft for your setup. Once you’ve identified the issue, you can move on to fixing those hard impacts.
How to Fix Hard Impacts
One solution is to install progressive-rate springs tailored to your vehicle’s corner weight. These springs provide better support and prevent bottoming out. Additionally, increasing shock compression damping can help absorb impacts without making the ride overly stiff.
"Compression valving controls how the shock resists upward movement – bumps, potholes, landing hard, weight transfer under braking. When compression valving is wrong, your truck feels harsh." – My Store Admin, Obsidian Forged Auto Supply
Upgrading your bump stops is another effective fix. Hydraulic bump stops from brands like Bilstein or King (priced at $700–$1,000 per pair) offer excellent performance with adjustable nitrogen/oil-filled designs. If you’re on a tighter budget, consider Timbren Active Off-Road Bumpstops (around $300 per pair), which are maintenance-free and come with a lifetime warranty. Another affordable option is Wheeler Superbumps (approximately $150 per pair), which are taller than factory bump stops and easy to install.
For vehicles frequently driven on rough terrain, upgrading to 2.5" or 3.0" shock bodies can greatly improve heat dissipation and provide more consistent damping during demanding conditions.
sbb-itb-afc4690
Problem 4: Steering Wander and Bump Steer
Steering instability is another common challenge, with two major culprits: steering wander and bump steer. While they feel different behind the wheel, they often stem from similar issues – worn steering components or changes in suspension geometry after a lift.
Steering wander feels like constant drifting, requiring you to make frequent corrections to stay on course. Bump steer, on the other hand, is a sudden, sharp jerk of the steering wheel when the suspension reacts to hitting rocks, ruts, or bumps, even if you don’t touch the wheel. Installing a lift kit can be a big factor in both problems. For instance, a 3.5-inch lift can reduce the caster angle by 3 or more degrees from the factory range of 5–7 degrees positive. This change can make highway driving feel loose and unpredictable, especially in a Jeep Wrangler.
Bump steer happens when the drag link and track bar angles no longer match after a lift. This misalignment causes the steering linkage to move the wheels unintentionally as the suspension compresses or extends. Add larger tires into the mix, and the extra rotational mass increases stress on key components like tie rod ends, drag links, and ball joints. This can shorten the lifespan of factory ball joints from 80,000–120,000 miles to just 50,000–80,000 miles on a lifted vehicle. Diagnosing these issues requires a thorough inspection to pinpoint worn or misaligned parts.
How to Diagnose Steering Problems
Start with a dry steering test: On flat ground, have someone turn the steering wheel about 1/8 of a turn while you watch the track bar, tie rod ends, drag link, and pitman arm for any movement. If you notice any play, it signals a problem.
Next, lift the front axle and check for looseness in the ball joints and tie rod ends by moving each tire at the 12/6 and 9/3 o’clock positions. For lifted vehicles, visually inspect the angles of the drag link and track bar. If they’re not roughly parallel, bump steer is almost guaranteed.
"Death wobble persists because the solid axle stores and releases energy as a standing wave. The oscillation frequency matches the natural resonance of the steering linkage… Only eliminating mechanical play does that." – Expert Note, GearFixes.com
Avoid relying on a steering stabilizer to solve these issues. As Ultimate Rides explains, "A steering stabilizer can help, but it’s not a complete fix for loose steering. Think of it as a supportive bandage rather than a cure". While it may reduce symptoms, it won’t address the actual root causes like worn components or misaligned geometry.
How to Fix Steering Wander
Once you’ve identified the problem, the next step is to replace or adjust the faulty parts:
- Worn tie rod ends and ball joints: Replace these with aftermarket options featuring greaseable, metal-on-metal designs. These are better suited for the added stress from larger tires. Expect to pay $25–$50 for a pair of tie rod ends, while dropped pitman arms range from $60–$150.
- Low caster angle: Adjustable upper or lower control arms can restore caster to the recommended factory range of 5–7 degrees positive for Wranglers. These typically cost $150–$500 per pair.
- Bump steer due to misaligned linkage: Install a dropped pitman arm or a track bar relocation bracket to realign the drag link and track bar. An adjustable track bar generally costs around $170.
After replacing components, it’s essential to get a four-wheel alignment tailored to your lifted vehicle. Factory alignment specs are designed for stock ride heights, control arm angles, and tire sizes. As an expert explains:
"A lifted truck should not be aligned to factory specs. Factory specs assume factory ride height, control arm angles, and tire size." – My Store Admin, Obsidian Forged Auto Supply
Request a "lifted-spec" alignment that adjusts caster and toe settings based on your vehicle’s current height and tire size. Skipping this step can leave your vehicle handling poorly, even after replacing worn parts.
Problem 5: Clunking, Squeaking, and Other Suspension Noises
Suspension noises are often an early warning sign of potential suspension issues. As Obsidian Forged Auto Supply explains, "Suspension failures almost always announce themselves through noise long before parts visually wear out". Ignoring these sounds – whether it’s a clunk, squeak, or rattle – can lead to costly repairs later and even pose safety risks. For instance, a failing ball joint could cause a wheel to detach from the suspension while driving.
The specific type of noise can usually help pinpoint the issue. Clunking or knocking over bumps often signals worn ball joints, loose sway bar end links, or failing shock mounts. Squeaking or creaking during dips is usually caused by dry or cracked rubber bushings. Rattling on rough roads might come from loose bolts, sway bar links, or skid plates. Finally, popping or snapping during turns often points to worn CV joints or binding in the upper control arm, a common issue in lifted trucks.
How to Find the Source of Suspension Noise
If you’re hearing suspension noises, start your inspection with the sway bar end links. These small parts are frequently the cause of clunks, as their rubber or ball-socket connections wear out over time. The good news? Replacing them is relatively inexpensive, costing about $15–$40 per side.
Use this three-step process to track down the noise:
- Step 1: Perform a bounce test. Push down firmly on each corner of the vehicle and listen for any noises as it settles.
- Step 2: Inspect bushings and ball joints. With the car on jack stands, use a pry bar to check for excessive movement in control arm bushings and ball joints.
- Step 3: Use a DIY stethoscope. Place one end of a broomstick against your ear and the other end on suspected components like strut mounts or control arms to locate the source of the noise.
If you detect any vertical or horizontal play in a ball joint during these tests, treat it as a critical issue. Early detection not only saves money but also ensures safety. Pinpointing the problem allows you to address it directly.
How to Stop Suspension Noises
Fixing suspension noises typically involves tightening, lubricating, or replacing components.
- For loose hardware, tighten all mounting bolts and U-bolts to the manufacturer’s torque specifications. Always tighten suspension bolts with the vehicle at its normal ride height, as this prevents bushing bind and avoids creating new noises.
- For squeaking bushings, lubrication is often the easiest solution. Start with a silicone spray or high-quality grease. If the bushings are cracked or collapsed, replace them. Greaseable polyurethane bushings are a great upgrade for off-road vehicles since they handle stress better than factory rubber bushings.
Replacing ball joints can cost anywhere from $150 to $400+ depending on whether they’re bolt-on or pressed into the control arm. If you need to replace the entire control arm, expect to pay $300–$600, which includes parts, labor, and alignment.
"A clunking noise over bumps almost always points to a worn or loose suspension component, and it typically gets worse the longer you wait." – AutoRacing1
After completing any major suspension repair, especially when replacing ball joints or control arms, always schedule a wheel alignment. Skipping this step can lead to uneven tire wear, reducing their lifespan by up to 20%.
Conclusion: Keeping Your Off-Road Vehicle Running Well
Catching suspension issues early and sticking to a regular maintenance schedule can save you from expensive repairs and headaches on the trail. The five common problems we’ve discussed – sagging springs, blown shocks, bottoming out, steering wander, and suspension noise – are much easier and cheaper to fix when addressed promptly. By staying proactive, you’ll keep your vehicle dependable, even when you’re far from help. Regular inspections and timely fixes ensure your rig is always ready for the next adventure.
Routine Maintenance Tips for Off-Road Vehicles
One of the best habits you can develop is performing a visual inspection of your suspension after every trail run. Look for telltale signs like oily streaks on shocks, torn ball joint boots, or cracked bushings. As Sean Witherspoon of TEQ Customs explains:
"Regular checks and cleaning ensure smoother rides and reliable trail performance."
In addition to post-trip inspections, there are a few ongoing maintenance tasks that can make a big difference over time. For instance, pressure washing your suspension after muddy outings helps remove debris that can wear down components. Re-torquing control arm bolts and shock mounts every few months is another must-do, as the vibrations from off-road driving can loosen fasteners much faster than regular highway driving. Also, don’t overlook wheel alignment – especially on lifted vehicles – since even minor geometry changes can lead to rapid tire wear. Keep a log of all inspections, lubrication, and torque checks. This record can help you spot patterns and predict potential failures before they happen.
| Maintenance Task | Recommended Frequency |
|---|---|
| Post-trip visual inspection | After every off-road trip |
| Cleaning (mud/salt removal) | After every muddy or salty run |
| Torque check on fasteners | Every 3–6 months |
| Bushing lubrication | Every oil change |
| Wheel alignment check | Every 6–12 months |
| Bounce test | Monthly |
If you notice that routine checks and adjustments aren’t solving your suspension issues anymore, it might be time to think about upgrading.
When to Upgrade Your Suspension
If your vehicle is consistently bottoming out on moderate trails or you’re dealing with sagging from heavy accessories like a bumper or winch, your factory suspension may no longer be up to the task. Persistent problems like shock fade, excessive sag, or regular bottoming out are clear signs that your current setup has hit its limits. Factory components are often not designed to withstand the wear and tear of severe off-road conditions.
Upgrading your suspension can make a world of difference, especially if you’ve added a lift, larger tires, or heavy gear. Components like LSK Suspension’s long-travel kits and remote reservoir shocks are designed for demanding conditions. These upgrades improve heat management, reduce shock fade during extended use, and are tailored to your specific vehicle platform instead of a one-size-fits-all approach. By investing in platform-specific parts, you’ll maintain proper suspension geometry and avoid the headaches of trying to make factory components work with modifications they weren’t designed to handle.
FAQs
How do I know if I need new springs or just an alignment?
If your vehicle shows signs like sagging ride height, an uneven stance, visible cracks, broken leaf springs, or if it bottoms out easily and bounces excessively, it’s likely time to replace the springs. However, if you notice issues like uneven tire wear, your car pulling to one side, or steering vibrations, these are typically signs of alignment problems. If the ride height looks normal but the handling feels off, it’s a good idea to begin by checking the alignment.
What shock length do I need for my lift height?
To determine the correct shock length for your lift height, it’s best to measure your suspension travel rather than relying on guesses. Safely cycle your suspension through its full range – both fully extended (droop) and fully compressed (bump). Then, measure the distance between the shock mounts at these two points.
When selecting a shock, ensure it won’t bottom out by subtracting about 0.5–1 inch from the compressed length. Also, make sure it won’t overextend to maintain proper performance and durability.
When should I upgrade to long-travel or reservoir shocks?
If you’re dealing with shock fade due to fluid overheating during demanding driving or rugged trails, upgrading to reservoir shocks can make a big difference. These shocks are designed to improve cooling, making them perfect for high-speed driving, extended descents, or carrying heavy loads.
For those looking to push their off-road capabilities, long-travel upgrades are worth considering. They offer increased wheel travel and a wider track width, enhancing performance on challenging terrain.
If your ride feels too harsh or unstable, switching to premium shocks with advanced valving can help you regain both control and comfort.
Leave a Reply