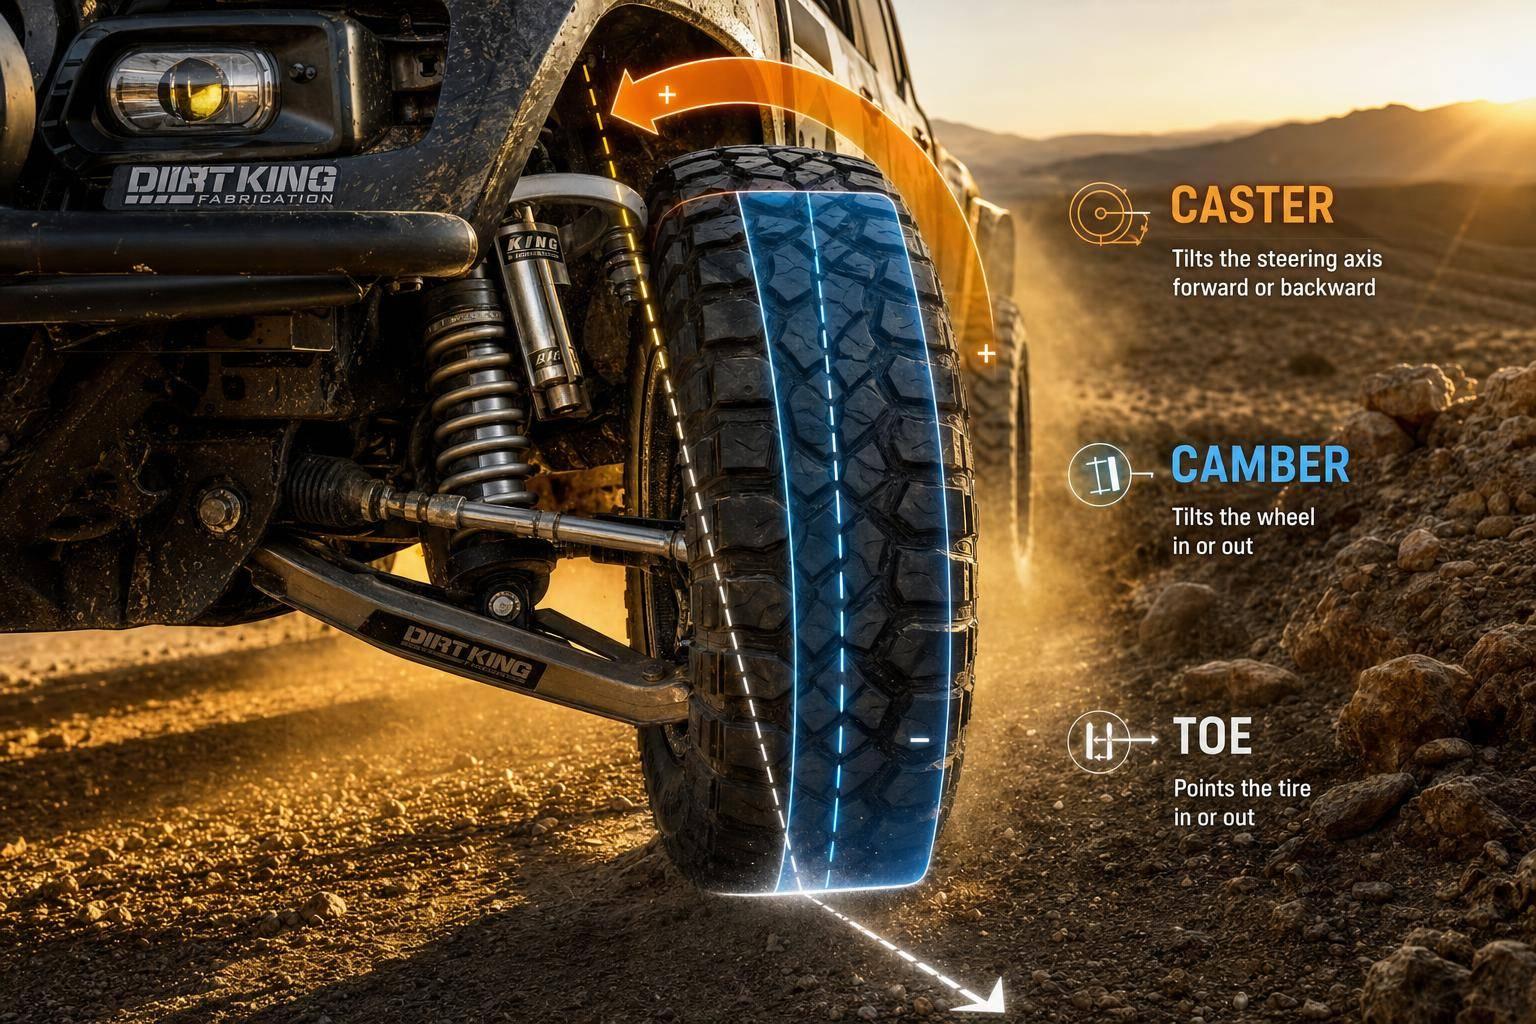
If your off-road truck feels twitchy, wanders at speed, or eats tires, alignment is one of the first things I’d check. Once suspension travel jumps to 13.5 to 17 inches and track width grows by 4.5 inches per side, factory settings often stop being a good target.
Here’s the short version:
- I set caster first, camber second, and toe last
- I check the truck on level ground with matched tire pressure
- I inspect for play in ball joints, tie rods, wheel bearings, and bushings before I measure
- I aim for camber near 0° on many off-road builds
- I use more positive caster when I want better straight-line tracking and return-to-center
- I keep toe close to neutral or slight toe-in for better stability
- I match settings to use:
- Desert running: slight negative camber, high positive caster, neutral to slight toe-in
- Rock crawling: near-zero camber, moderate positive caster, neutral toe
- Overlanding: zero to slight negative camber, near-factory positive caster, slight toe-in
A few things matter more than chasing stock numbers. I want left-to-right consistency, a centered steering wheel, and parts that stay put after hard hits. On long-travel builds, that matters even more than copying factory specs.
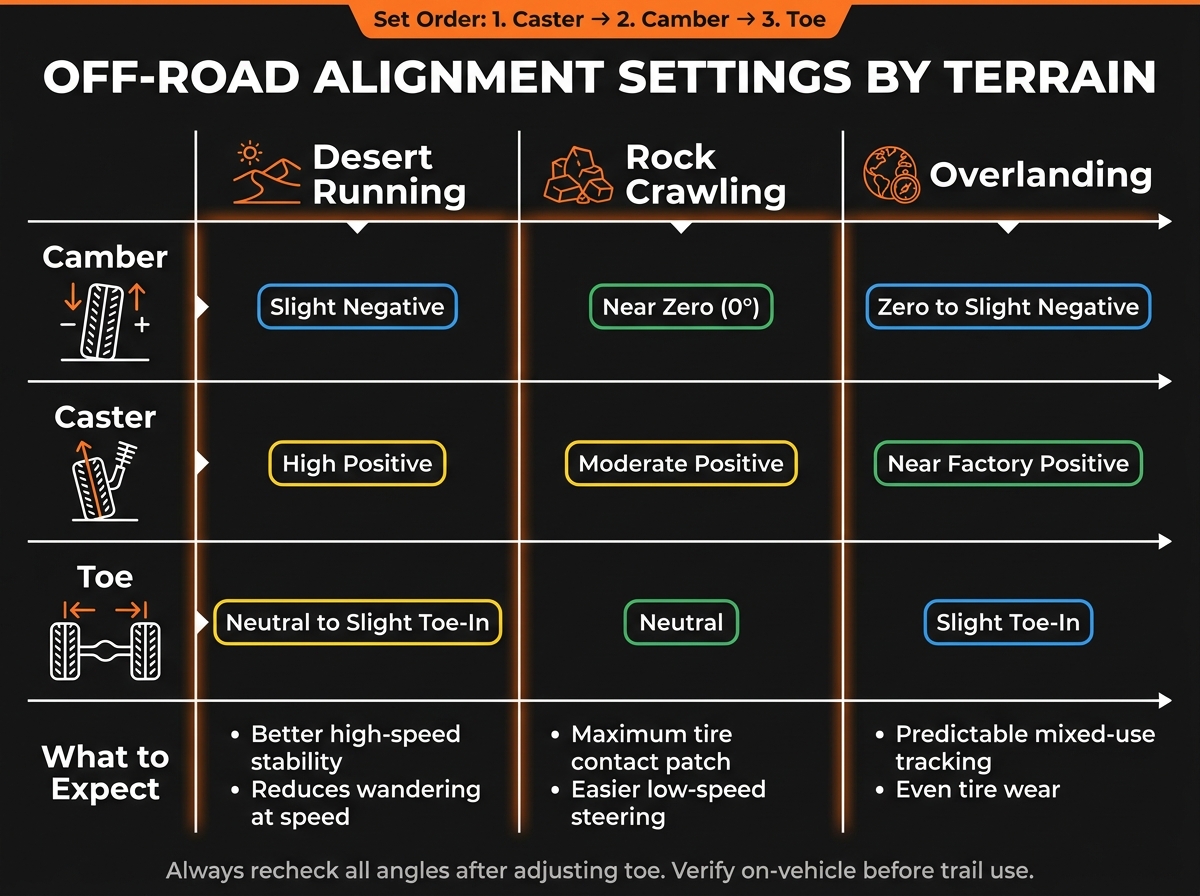
Off-Road Alignment Settings by Terrain: Camber, Caster & Toe Guide
DIY Alignment Basics – Caster, Camber Toe on any vehicle
sbb-itb-afc4690
Quick Comparison
| Angle | What it changes | Usual off-road direction |
|---|---|---|
| Camber | Tire contact patch | Near 0° or slight negative |
| Caster | Tracking and steering return | More positive |
| Toe | Stability and steering feel | Neutral to slight toe-in |
I’d treat the article as a step-by-step tune: inspect first, measure your baseline, adjust in order, then test and recheck after any weight or suspension change.
1. What Camber, Caster, and Toe Do on an Off-Road Vehicle
Before you change anything, it helps to know what each alignment angle does. These settings affect how the truck steers, tracks, and puts tire to ground when the trail gets rough.
Camber and Tire Contact on Uneven Ground
Camber is the inward or outward tilt of the wheel when you look at the vehicle from the front. Zero camber means the tire stands straight up and down. Negative camber means the top of the wheel leans inward. Positive camber means it leans outward.
As the suspension cycles, camber can change. And when it does, the tire can lose some of its contact patch on uneven ground.
Caster and Straight-Line Stability
Caster is the tilt of the steering axis when viewed from the side. More positive caster means the top of the steering axis leans toward the rear of the truck. That helps the steering return to center and helps the vehicle track straighter.
Toe and Steering Response
Toe describes whether the fronts of the tires point toward each other, called toe-in, or away from each other, called toe-out, when viewed from above. It’s measured in inches or degrees.
Toe is set at the tie rods, and it needs to stay the same after hard hits off-road. Bigger tires add more load to the steering linkages, which makes toe control even more important.
Next, measure your current alignment before making any changes.
2. Prepare the Vehicle and Gather the Right Alignment Tools
Good alignment numbers start before you touch a single adjustment bolt. If the vehicle isn’t set up the right way, the numbers you get won’t mean much.
Inspection Checklist Before You Adjust Anything
Worn or loose parts can give you bad readings. A ball joint with play, a loose tie rod end, or a binding bushing can throw the whole job off before you even begin. Start by checking the steering and suspension from end to end.
Look over ball joints, tie rod ends, wheel bearings, and control arm bushings for play or damage. If the rig runs uniballs, check for vertical play and make sure they move smoothly. Delrin bushings should be greased. If they’re squeaking, they may be binding, and that can change how the suspension settles at ride height.
Also make sure all Grade 8 hardware is torqued to spec. A loose bolt on a control arm or shock tower can let the alignment move in the middle of measurement. Clean adjustment hardware and tie rod threads too, so your tools fit right and the threads turn without a fight.
Before measuring, make sure tire pressure matches on all four tires. Inspect the wheels and tires for bent rims or uneven wear, since either one can skew a manual toe reading. Check that ride height, limit straps, and bump stops are set the way they should be, because they shape the working range of the suspension and affect static ride height. Once everything is tight and ride height is set, you’re ready to measure.
Basic Tools for Measuring Camber, Caster, and Toe
You don’t need a shop-grade alignment rack to get solid numbers at home. A camber/caster gauge or digital angle finder handles the angle checks, with readings in inches and degrees. For toe, use toe plates, a tape measure, and a string line along both sides of the vehicle to give yourself a steady reference. Write down your baseline numbers before making any changes.
Where Off-Road Vehicles Are Adjusted for Alignment
The adjustment points depend on whether the vehicle uses independent front suspension (IFS) or a solid-axle setup.
On IFS trucks, camber and caster are usually adjusted with cam bolts on the lower control arm or with adjustable upper control arms that use rod ends or uniballs. Toe is adjusted at the tie rods. On solid-axle rigs and UTVs, radius rods and trailing arms with adjustable rod ends handle much of the alignment work. Lifted and long-travel builds often go past the factory adjustment range, so check how much adjustment you actually have before you start. After you locate the adjustment points, measure the current settings before turning anything.
3. Measure Current Alignment Before Making Changes
Before you touch an adjustment, get your baseline numbers. That gives you a clean left-to-right comparison and shows where the truck sits right now. Start with camber and caster. Then check toe.
How to Measure Camber and Caster
Park the vehicle on a flat, level surface and center the steering wheel. Then use a camber and caster gauge or a digital angle finder to measure both sides. Write down the left and right readings separately.
This matters even more on long-travel setups. Many kits sit outside factory specs, especially when they add 4.5 inches per side of track width and move the wheelbase forward by 1.25 inches. In that case, matching side-to-side readings can matter more than chasing stock numbers.
How to Measure Toe with Simple Shop Methods
You don’t need fancy equipment to check toe. Toe plates or even a tape measure can do the job.
Measure the distance between the front tires at the front edge, then measure again at the rear edge. The difference tells you if the vehicle has toe-in or toe-out. Before you start, make sure tire pressure is equal on both sides.
Record Your Baseline Numbers Before Adjusting
Write down:
- Camber and caster in degrees for the left and right sides
- Toe in inches
- Tire size
- Wheel backspacing
Also note any added front-end weight, like a winch, heavy front bumper, or other accessories. Extra weight changes ride height at rest, and that shifts static alignment numbers. Those baseline notes help you decide what to adjust first.
4. Adjust Caster, Camber, and Toe in the Right Order
Start with caster, then set camber, and finish with toe. That order matters. Change one angle, and the others can shift with it.
Use the left-right numbers you recorded earlier as your baseline for each change. Work step by step so each adjustment carries cleanly into the next.
Set Caster for Tracking and Return-to-Center
On lifted off-road vehicles, adding more positive caster helps the steering wheel come back to center after a turn. It also helps the vehicle hold a straighter line on the road or trail.
If you’re working with factory cam tabs, weld-on cam lockout plates can help keep them from slipping during hard impacts or heavy landings. Once caster is set, recheck your numbers before you move on.
Set Camber for Tire Footprint and Grip
After caster, move to camber. Rotate the cam bolt or adjust the arm to tilt the top of the wheel inward or outward.
For most off-road builds, camber should be close to 0°. That helps keep more of the tire on the ground when the terrain gets rough and uneven. Some IFS setups may still need a slight amount of negative camber, depending on ride height and how the vehicle is used. Check your readings again before the next step.
Set Toe Last and Recheck Everything
Set toe last by threading the heim-jointed tie rods in or out. As you do that, keep the steering wheel centered.
When toe is dialed in, go back and recheck camber and caster. This final pass helps confirm that the steering wheel is centered and that the vehicle tracks straight.
| Adjustment | Hardware Used | Method |
|---|---|---|
| Caster | Cam bolts / Adjustable UCAs | Rotate cam bolt or adjust rod end on the control arm |
| Camber | Cam bolts / Uniball cups | Rotate cam bolt or adjust uniball position |
| Toe | Heim-jointed tie rods / Clevis | Thread tie rod in or out of the steering clevis |
Use these settings as your base tune. In the next section, you can fine-tune them for the terrain you drive most often.
5. Fine-Tune for Desert Running, Rock Crawling, or Overlanding
Base settings get you close. This is where you dial things in after you’ve set the baseline alignment. From here, the goal is simple: match the final numbers to your main terrain – desert, rock crawling, or mixed-use overlanding.
Comparison Table: How Each Angle Affects Off-Road Behavior
| Angle | Setting | Effect |
|---|---|---|
| Camber | Negative | Slightly better grip and contact under compression |
| Camber | Zero | Maximum contact patch at low speed; ideal for crawling |
| Caster | High Positive | Stronger return-to-center; better straight-line tracking in sand |
| Toe | Toe-In | Better straight-line stability; less wandering on rough roads |
| Toe | Toe-Out | Quicker turn-in; can feel twitchy at speed |
That table gives you the basic tradeoffs. If your rig spends most of its time charging through sand at speed, you’ll want a different setup than a truck that mostly picks its way over rocks.
Settings Table by Off-Road Use Case
| Use Case | Camber | Caster | Toe | What to Expect |
|---|---|---|---|---|
| Desert Running | Slight Negative | High Positive | Neutral to Slight In | Better high-speed stability; reduces wandering at speed |
| Rock Crawling | Near Zero | Moderate Positive | Neutral | Maximum tire contact patch; easier low-speed steering |
| Overlanding | Zero to Slight Negative | Near factory positive caster range | Slight Toe-In | Predictable mixed-use tracking; even tire wear |
Use the row that fits your main terrain as your starting point. Then check it on the vehicle, because numbers on paper only get you so far.
Key Takeaways and Final Checks
Once you’ve dialed in the settings, test the vehicle on pavement and on the terrain you drive most. Pay close attention to steering feel and tire wear, then check again if anything feels off.
Some changes always call for a new alignment check. Added weight is a big one. Overlanding builds with heavy gear or a camper shell can change ride height and shift suspension geometry enough to knock your settings out of spec. Suspension changes do the same thing. If you swap spring rates or weld cam lockout plates, you need to start the measurement process over.
FAQs
How often should I recheck off-road alignment?
There isn’t a set recheck interval listed here.
That said, off-road driving puts a lot of strain on suspension parts, and trail conditions can change from one trip to the next. So it’s smart to check your alignment on a regular basis, especially after hard runs or anytime you notice handling feels off or your tires are wearing unevenly.
If you want setup advice or service timing for your specific LSK Suspension system, contact the LSK Suspension sales team at 909-305-4824 or orders@lsksuspension.com.
What symptoms point to bad camber, caster, or toe?
Bad camber, caster, or toe usually shows up in a few clear ways:
- Uneven tire wear
- Wandering or unstable steering, especially over bumps
- Pulling, constant correction, or less predictable grip in corners
You might also notice more vibration or a harsher feel at speed. In some cases, the tires can seem to scrub across the road instead of tracking cleanly through ruts and turns.
Can I set off-road alignment at home?
You can do basic alignment checks at home. But dialing in camber, caster, and toe on a high-performance off-road setup usually takes precision tools and the right parts.
Many LSK Suspension long-travel kits use fabricated spindles, heimed steering, and weld-on cam lockouts. That means alignment isn’t something to guess at. If it’s off, you can end up with poor stability and extra wear on parts.
For the best result, work with a professional fabrication shop that knows off-road suspension geometry.
Leave a Reply