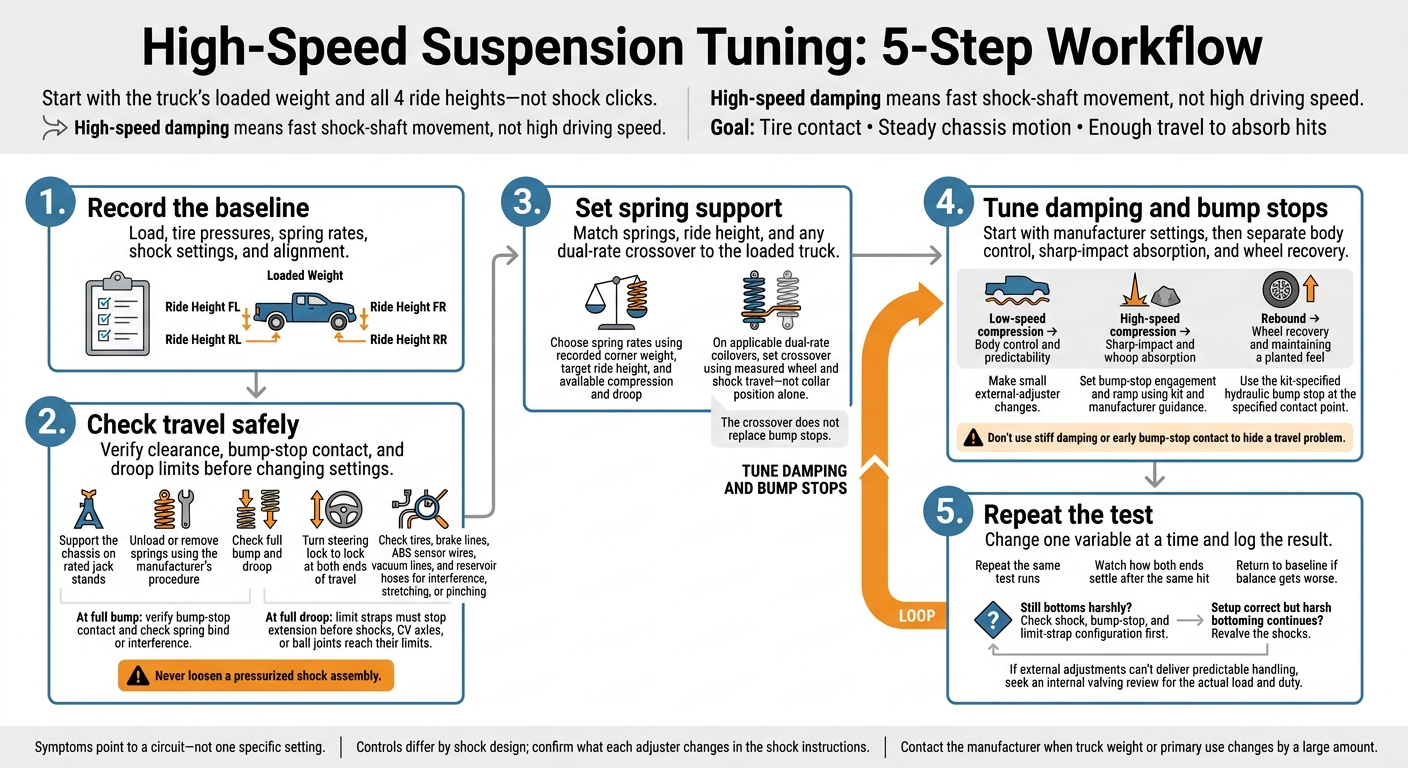
I start suspension tuning with the truck’s loaded weight and all 4 ride heights – not shock clicks. My goal is tire contact, steady chassis motion, and enough travel to absorb hits. High-speed damping means fast shock-shaft movement, not high driving speed.
Here’s the order I follow:
- Record the baseline: Load, tire pressures, spring rates, shock settings, and alignment.
- Check travel safely: Verify clearance, bump-stop contact, and droop limits before changing settings. Never loosen a pressurized shock assembly.
- Set spring support: Match springs, ride height, and any dual-rate crossover to the loaded truck.
- Tune damping and bump stops: Start with manufacturer settings, then separate body control, sharp-impact absorption, and wheel recovery.
- Repeat the test: I change <u>one variable at a time</u> and log the result. If adjustments can’t settle the truck, I check the setup and seek a valving review – not just stiffer damping.
High-Speed Suspension Tuning: 5-Step Workflow
Check Travel and Set Spring Support
Cycle the Suspension and Check Clearance
With the loaded baseline recorded, check that the suspension moves through its travel without interference before tuning springs or shocks.
Support the chassis on rated jack stands. Then unload or remove the springs using the manufacturer’s procedure. Never loosen a pressurized shock assembly to cycle the suspension. Move each corner through full bump and droop, and turn the steering from lock to lock at both ends of travel. Check tire clearance against the body, frame, and control arms. Inspect brake lines, ABS sensor wires, vacuum lines, and reservoir hoses for stretching or pinching.
Set mechanical travel limits before tuning shocks. At full bump, verify bump-stop contact and check for spring bind or other interference. At full droop, confirm that limit straps stop extension before the shocks, CV axles, or ball joints reach their limits. Usable travel depends on suspension geometry and the strap, bump-stop, and shock setup – not shock stroke alone.
Choose Spring Rates and Set Ride Height
Choose spring rates based on the recorded corner weight, target ride height, and available compression and droop at that height. The springs need to suit the truck’s actual load and use.
Set the Dual-Rate Crossover
On applicable dual-rate coilovers, use measured wheel and shock travel to set the crossover – not collar position alone. This keeps the suspension compliant over small bumps while adding support before it uses the remaining compression travel. The crossover does not replace bump stops.
Next, use damping and bump stops to control the remaining travel.
sbb-itb-afc4690
Shock Tuning and Testing Prerunners in Barstow w/ KDM | DESERT TRIP
Tune Damping and Bump Stops
With spring support and crossover set, tune damping and bump stops to control the remaining travel. Start with the manufacturer’s recommended shock setup. Use the loaded baseline to set valving when ordering shocks or having them revalved.
If the shocks have external adjusters, make small changes. Repeat the same test runs and watch how both ends settle after the same hit. Record each adjustment so you can return to the baseline if the balance gets worse.
Set the bump-stop engagement point and ramp using the kit and bump-stop manufacturer’s guidance. Use the kit-specified hydraulic bump stop, mounted at the contact point the kit calls for.
Don’t use stiff damping or early bump-stop contact to hide a travel problem. If the truck still bottoms harshly, check the shock, bump-stop, and limit-strap configuration before adjusting anything else. If the setup is correct but harsh bottoming continues, revalve the shocks.
Contact the manufacturer when the truck’s weight or primary use changes by a large amount. If external adjustments can’t deliver predictable handling, have the internal valving reviewed for the actual load and duty.
Once the chassis settles predictably, tune compression and rebound separately.
Separate Compression and Rebound Functions
Once spring support and bump stops are set, tune damping by function – not symptoms alone. Treat body control, impact absorption, and wheel recovery as separate jobs. The behaviors below can help you spot an imbalance.
| Damping function | Primary effect | Representative input | Too little damping | Too much damping |
|---|---|---|---|---|
| Low-speed compression | Body control and predictability | Cornering, braking, slow undulations | Excessive body roll; truck feels floaty or unpredictable | Harsh ride over small chatter; lack of traction |
| High-speed compression | Sharp-impact and whoop absorption | Square-edge bumps, jump landings | Frequent bottoming out; harshness from hitting bump stops | Deflection off sharp obstacles; stiff feeling in rough terrain |
| Rebound | Wheel recovery and maintaining a planted feel | Extension after impact | Truck bucks or feels unsettled after impacts; tires lose contact with the ground | Suspension packs down and fails to return for the next bump |
These symptoms point to a circuit, not one specific setting. A single whoop can engage compression, rebound, and multiple damping circuits. Position-sensitive bypass damping also changes with suspension travel, not just shaft speed.
Match the symptom to the circuit, then check the shock instructions to confirm which adjuster controls it. Controls differ by design: bypass-zone settings aren’t the same as dedicated high-speed compression adjusters. Know what each control changes before turning it to address a symptom.
FAQs
How can I tell if bottoming comes from springs or damping?
Pay attention to how the suspension responds during compression. If the truck feels soft, wallows, or uses too much travel on moderate hits, the spring rate is likely too low. If it feels harsh or skips over bumps yet still bottoms out on larger impacts, the damping may not be controlling the spring’s energy well enough.
For predictable handling at speed, match the shock valving to the spring rates and vehicle weight. This helps balance spring rate and damping.
Should I recheck alignment after changing ride height?
Yes, always recheck your alignment after changing ride height. Changing ride height alters the suspension geometry, which affects your alignment settings. An alignment check is a standard part of the adjustment – it helps keep your car handling properly and your tires wearing evenly.
How do I choose a repeatable suspension test route?
Choose a stretch of terrain where you can safely test your truck at speed. Match it to the conditions your truck is built for, whether that’s whoops, sand, or rough desert trails.
Use the same stretch for every test session. This keeps your data consistent and helps you accurately measure how suspension adjustments, including valving or spring-rate changes, affect handling and predictability.
Leave a Reply