
If I air down the wrong way, I trade traction for heat, sidewall damage, and a higher chance of losing a bead. For most desert setups, I start with a cold target pressure, stay in the 10–25 PSI range, and change pressure based on sand, silt, hard-pack, rocks, vehicle weight, wheel type, and speed.
Here’s the short version:
- Lower PSI adds grip and flotation in soft sand and silt by making the tire footprint longer.
- Too little PSI can cause trouble fast, especially below 10–12 PSI on non-beadlock wheels.
- Heavier trucks often need about 18–20 PSI, while lighter UTVs and buggies can often run less.
- I use more pressure for hard-pack and whoops, and less for sand and rocky sections.
- I check pressure on level ground, inspect the tires first, and match tires on the same axle to within 1 PSI.
- I fine-tune in 1–2 PSI steps, then do a short roll to let the tire settle.
- I keep aired-down speed low. The article points to a 35 MPH ceiling and a simple field rule: don’t drive faster in MPH than your PSI.
- Before pavement, I air back up to the door-placard street pressure and inspect the tread, sidewall, bead, and valve area.
A few starting points from the article:
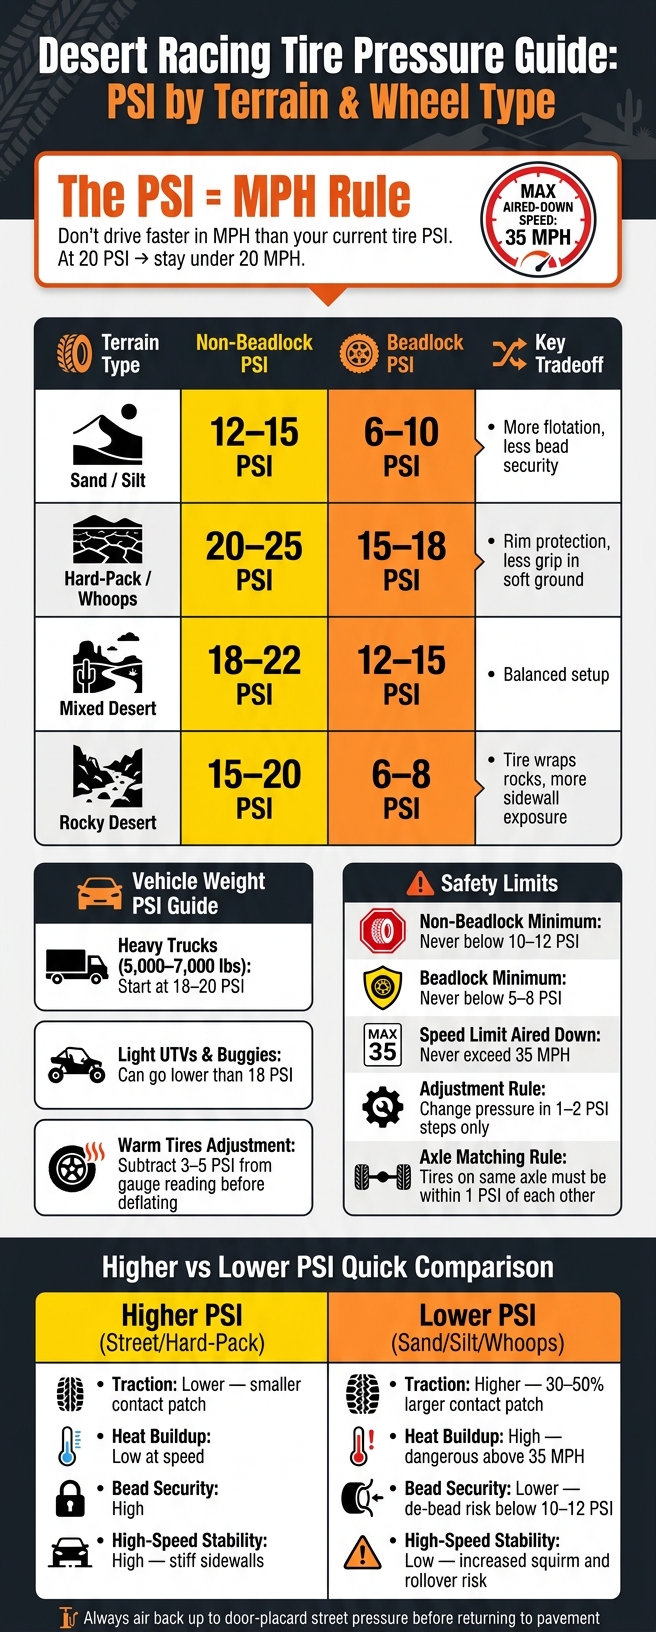
- Sand / silt: about 12–15 PSI on non-beadlocks, 6–10 PSI on beadlocks
- Hard-pack / whoops: about 20–25 PSI on non-beadlocks, 15–18 PSI on beadlocks
- Mixed desert: about 18–22 PSI on non-beadlocks, 12–15 PSI on beadlocks
- Rocky desert: about 15–20 PSI on non-beadlocks, 6–8 PSI on beadlocks
Quick Comparison
| Condition | Non-Beadlock Start | Beadlock Start | Main Tradeoff |
|---|---|---|---|
| Sand / Silt | 12–15 PSI | 6–10 PSI | More flotation, less bead security |
| Hard-Pack / Whoops | 20–25 PSI | 15–18 PSI | More rim protection, less grip in soft ground |
| Mixed Desert | 18–22 PSI | 12–15 PSI | Balanced setup |
| Rocky Desert | 15–20 PSI | 6–8 PSI | More tire wrap on rocks, more sidewall exposure |
My takeaway: I don’t guess. I pick a starting PSI before I touch the valve stem, use a good gauge, make small changes, and air back up before I drive home.
Desert Racing Tire Pressure Guide: PSI by Terrain & Wheel Type
2. Plan Your Target PSI Before You Deflate
Match pressure to terrain, wheel type, and vehicle weight
Set a cold target PSI before you let any air out. That gives you a clear starting point instead of guessing at the valve stem.
Go lower in sand and silt to get more flotation. Run more pressure on hard-pack and whoops to help protect the rims. If the course is a mix of surfaces, start somewhere in the middle.
Vehicle weight matters a lot here. Heavier trucks in the 5,000–7,000 lb range usually need to stay around 18–20 PSI to help maintain sidewall integrity, while lighter buggies and UTVs can often go lower. That should be your baseline before you touch anything.
If your tires are warm from the drive to staging, don’t use that number at face value. Subtract 3–5 PSI from the gauge reading before you start.
How suspension setup and race pace affect tire pressure
Tire pressure doesn’t work on its own. It works with your suspension setup.
Lower PSI lets the tire soak up small, repeated hits before they make it into the suspension. That can smooth things out in chop and rough sections. Long-travel suspension also helps with control and makes lower-PSI testing safer.
Speed changes the equation too. A common field guideline is the "PSI equals MPH" rule: don’t drive faster in MPH than your current tire pressure in PSI. So if you’re at 20 PSI, stay under 20 MPH.
It’s not a hard law. But it’s a useful rule of thumb, especially when you’re trying to avoid heat buildup that can hurt sidewalls at low pressure and higher speed.
Starting PSI by desert condition: comparison table
Use these as cold-start numbers, then fine-tune after testing on course.
| Desert Condition | Non-Beadlock Starting PSI | Beadlock Starting PSI | Practical Use Notes |
|---|---|---|---|
| Sand / Silt | 12–15 PSI | 6–10 PSI | Maximum flotation; avoid hard cornering at speed. |
| Hard-Pack / Whoops | 20–25 PSI | 15–18 PSI | Higher pressure protects rims and limits bottoming. |
| Mixed Desert | 18–22 PSI | 12–15 PSI | Balanced starting point for mixed terrain. |
| Rocky Desert | 15–20 PSI | 6–8 PSI | Helps the tire conform to rocks; watch for cuts. |
Adjust on course only after testing. Next, gather your gauge, deflators, and compressor before lowering pressure.
sbb-itb-afc4690
3. Tools and Setup for Airing Down
Deflators, gauges, and multi-tire tools
Once you know your target PSI, pick the tool that gets you there with the best mix of speed and accuracy.
Manual deflators with built-in gauges let air out fast and show pressure as it drops in real time. Preset deflators do it a different way: thread them on, wait, and they stop when they hit the preset PSI. They’re handy for fast staging, but they’re not as exact as checking with a final gauge afterward.
A multi-tire manifold lets you air down all four tires at the same time. That helps keep left-to-right pressures even, which matters if you want stable handling at speed.
No matter which deflator you use, finish with a separate high-accuracy gauge. Deflators can drift over time.
Compressor, spares, and basic pit gear
Bring a portable 12V compressor so you can air back up to street pressure after the run and return to pavement safely. It’s smart to keep the engine running while using it so you don’t drain the battery.
It also pays to carry a few small parts that can save the day:
- Spare valve cores
- A valve core removal tool
- Valve caps
Desert silt can clog an open valve stem, so put a cap back on every stem right after airing down.
Airing-down tools and best use: comparison table
| Tool Type | Speed | Precision | Best Use in Desert Racing | Typical Pit Location |
|---|---|---|---|---|
| Manual Valve Tool | Low | High | Emergency or minimalist kit | Trailhead |
| Standalone Gauge | Low | Very High | Fine 1–2 PSI adjustments | Staging Area |
| Single-Tire Deflator w/ Gauge | Moderate | High | Precise terrain-matched pressure | Staging Area |
| Preset Deflator (Staun) | High | Moderate | Rapid hands-free staging | Staging Area |
| Multi-Tire Manifold | Very High | Very High | Matched pressures across all four tires | Pit / Staging |
With the right gear on hand, the next step is simple: deflate each tire to your target PSI.
4. How to Air Down Tires for Desert Racing: Step by Step
Once you’ve picked your target PSI, air down one tire at a time and confirm every reading as you go. It sounds basic, but this is where small mistakes can turn into handling problems later.
Inspect tires and set a target PSI before bleeding air
Before you touch a valve stem, park on level, firm ground. If the vehicle is sitting on a slope, weight shifts from side to side and your pressure readings can be off.
Then give each tire a close look. Check for cuts, bulges, exposed cords, cracking, missing tread blocks, and embedded debris. Take a quick look at each valve stem too and make sure nothing is damaged.
Record the cold PSI and your target front and rear PSI. Put that target somewhere easy to see. A note on your phone works. So does a piece of tape on the dash.
Deflate each tire, re-check with a gauge, and match side to side
Remove the valve cap and wipe the stem to clear off trail grit before attaching your deflator. Bleed air out slowly, then check pressure every 30 seconds so you don’t go past your number.
When all four tires are at target PSI, check each one again with a digital gauge. At low pressure, even a 3–4 PSI mistake can increase de-beading risk on standard wheels. Tires on the same axle should be within 1 PSI of each other so the vehicle doesn’t pull or react in odd ways.
Once all four match, roll forward for a short test.
Test, fine-tune in 1–2 PSI steps, and log the result
After the pressures match, drive 200 to 300 yards so the tire carcass can settle before you start pushing speed. During that short run, watch for how the tire moves over the terrain. You want it to conform instead of bouncing. If it’s still skipping around, pressure is likely too high.
Make changes in 1–2 PSI steps only. Small moves matter here. When you land on the right PSI, log the final PSI, temperature, terrain, tire and wheel setup, and how the steering and traction felt. That record gives you a baseline you can use for the next race.
5. Safety Limits, Post-Run Checks, and Key Takeaways
Watch for heat, de-beading, sidewall damage, and handling problems
After your last test run, take a minute and check the tires before heading back onto pavement. Pay attention to heat, any change in handling, and signs of bead movement. On standard wheels, stay above 10–12 PSI. On beadlocks, stay above 5–8 PSI. Keep your speed down to cut heat and lower the chance of de-beading.
There’s also a hard speed limit worth respecting here: keep aired-down speeds below 35 MPH. Once you go past that, heat can build fast in the flexed sidewall. That can lead to internal damage you may not see right away, and the tire might fail later with little warning.
Keep an eye on sidewall ballooning too. Lower pressure pushes the sidewall outward, which leaves it more exposed to sharp rocks and debris. If the tire starts to feel loose or unusually hot, stop and check pressure before you keep going.
Air back up for pavement and inspect the full tire and wheel package
When the run is done, air the tires back up before you drive out. Bring them to the manufacturer’s recommended street pressure listed on the door placard. Highway driving on aired-down tires can damage them fast.
Before you reinflate, do a full walk-around. Check the tread, sidewall, bead, and valve area. You’re looking for:
- New cuts, nicks, bulges, or rocks stuck in the tire
- Sand or dirt around the bead that could lead to a slow leak
- Missing valve caps or damage around the valve core
A small sidewall nick at 15 PSI might not look like much in the dirt, but it can turn into a blowout once the tire is back at highway pressure. Also inspect the bead area for trapped sand or dirt, since that can cause slow leaks. Then reinstall the valve caps to help keep dust out of the valve core.
Higher PSI vs. lower PSI in desert racing: comparison table
| Feature | Higher PSI (Street/Hardpack) | Lower PSI (Sand/Silt/Whoops) |
|---|---|---|
| Traction | Lower; smaller contact patch | Higher; 30–50% larger contact patch |
| Heat Buildup | Low at speed | High; dangerous above 35 MPH |
| Bead Security | High | Lower; de-bead risk below 10–12 PSI |
| High-Speed Stability | High; stiff sidewalls | Low; increased squirm and rollover risk |
Use an accurate gauge, make changes in 1–2 PSI steps, and air back up before returning to pavement.
FAQs
How do I know if my PSI is too low?
Your PSI is probably too low if you can see sidewall squirm. That’s when the tire starts to buckle under the vehicle’s weight or while you’re turning the wheel.
On standard non-beadlock wheels, dropping below 10 to 12 PSI raises the chance that the tire bead can unseat, especially during hard cornering or aggressive steering. If the vehicle pulls to one side or starts to feel unpredictable, uneven tire pressure may also be part of the problem.
Should front and rear tires use the same PSI?
Yes. After deflating, all four tires should be within 1 PSI of each other.
Matching tire pressure helps keep traction even and handling predictable. It can also help stop the vehicle from pulling to one side.
Before your run, check that all four tires are set to the same target PSI.
What changes if I’m running beadlock wheels?
Beadlock wheels let you safely run single-digit tire pressure. That’s something standard wheels usually can’t handle, because the tire can debead.
A beadlock wheel uses a mechanical clamp to hold the tire bead against the rim. In rough terrain or hard cornering, that helps keep the tire from popping off or spinning on the wheel.
The payoff is simple: a larger tire footprint and better traction when you need focused off-road performance.
Leave a Reply