If you want the short answer: bolt-on bumpers fit most drivers, while weld-on bumpers fit rigs built for hard, permanent use.
If I were choosing between the two, I’d look at five things first: strength, install time, repair work, cost, and how the bumper handles recovery loads. In the source article, bolt-on setups usually install in 3–4 hours, often use Grade 8 hardware, and commonly support 8,000–12,000 lb winches on the standard 10" x 4.5" pattern. Weld-on setups can handle heavy use well, but the result depends a lot on weld quality, heat control, and frame prep.
Here’s the plain-English takeaway:
- Choose bolt-on if you want easy install, easy removal, and simpler service
- Choose weld-on if your rig is built for a fixed, long-term setup
- Bolt-on is often the better fit for daily driving, overlanding, and mixed street/trail use
- Weld-on is often the better fit for trail-only rigs, race builds, and older frames that need extra support
- Maintenance is different: bolt-on means torque checks; weld-on means crack and rust checks
- Cost is different too: weld-on labor can run 2–3x higher than a similar bolt-on install
One more thing matters: on newer trucks and SUVs, welding to the frame can affect crash behavior, sensors, and sometimes warranty questions. That alone can make the choice simple for a lot of owners.
Quick Comparison
| Factor | Bolt-On | Weld-On |
|---|---|---|
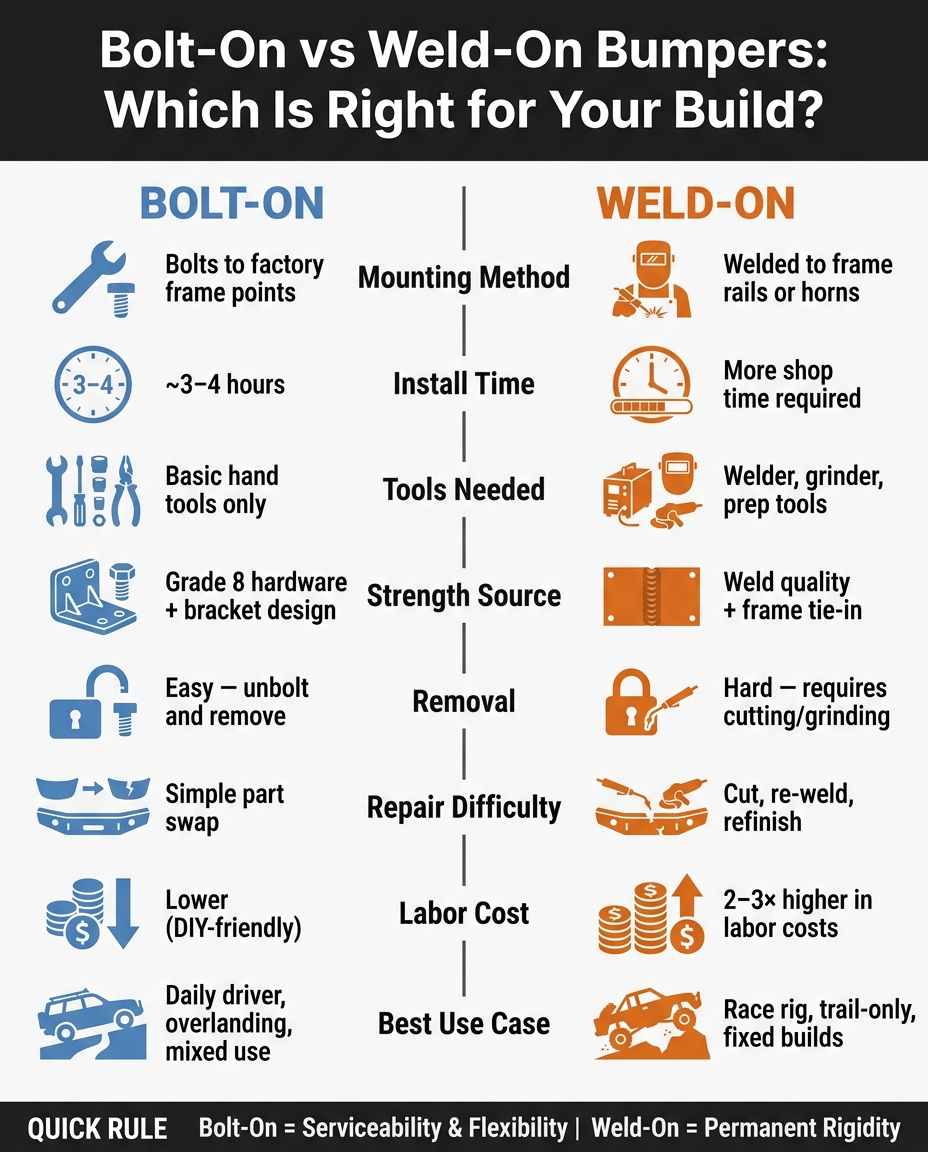
| Mounting method | Bolts to frame points | Welded to frame rails or horns |
| Install time | About 3–4 hours | More shop time |
| Tools needed | Basic hand tools | Welder, grinder, prep tools |
| Strength source | Hardware and bracket design | Weld quality and frame tie-in |
| Removal | Easy | Hard; often needs cutting |
| Repairs | Simple part swap | More labor |
| Maintenance | Re-torque bolts | Inspect welds for cracks/rust |
| Best use | Daily driver, overland, mixed use | Race rig, trail-only, fixed build |
| Cost | Lower | Higher |
So if I had to sum it up in one line, I’d say this: bolt-on gives you serviceability; weld-on gives you permanence.
Bolt-On vs Weld-On Bumpers: Side-by-Side Comparison
Move Bumper Build – Weld – Install – Enjoy | It’s Easier Than You Might Think!
sbb-itb-afc4690
Bolt-On Bumpers: Design and Installation
Bolt-on bumpers use vehicle-specific brackets that attach to factory frame points without cutting or welding. For most owners, that means the easiest path to a clean install and simpler service down the road.
How Bolt-On Mounting Works
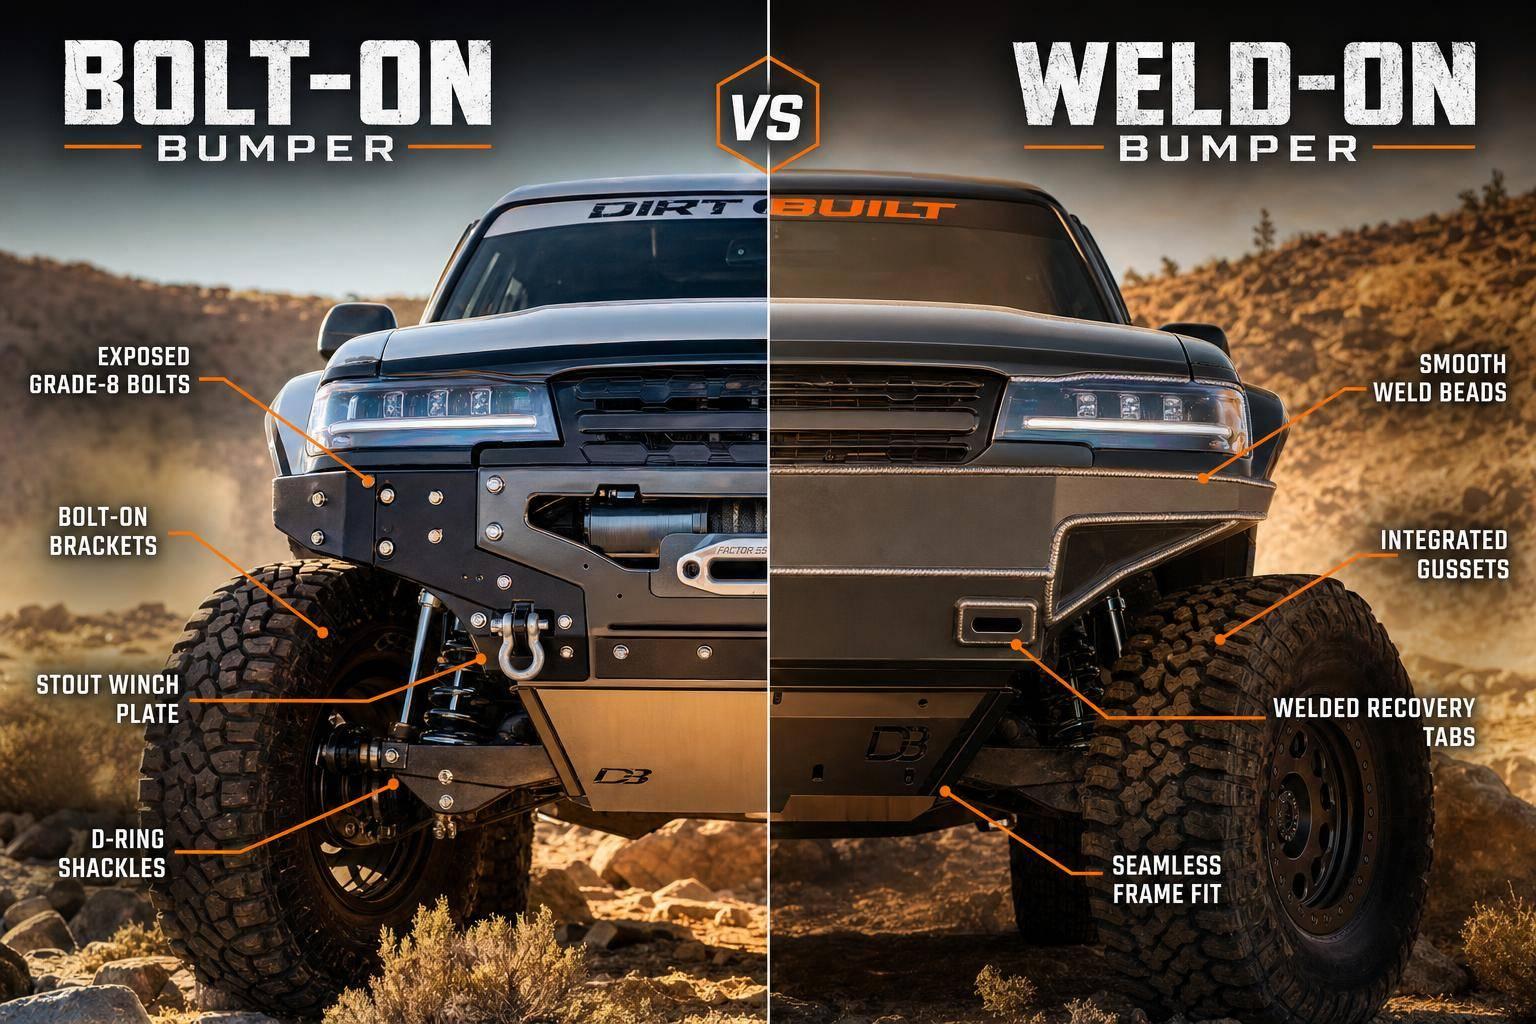
The heart of a bolt-on system is the bracket layout. Thick steel mounting plates spread recovery and impact loads across the chassis instead of dumping force into one spot. That load spread is the whole point.
Hardware matters too. Use Grade 8 bolts. In many setups, 1/2-inch hardware torques to at least 90 ft-lb, which becomes a big deal during hard recoveries.
Fitment is usually tight by design. Most bolt-on bumpers are made around factory mounting geometry, so makers can offer close, vehicle-specific fitment on the models they list. There’s one catch: if your truck has been in a past accident, those factory mounting points may be a little out of line, and that can create fitment problems.
Before you buy, check for support for factory tech like:
- Parking sensors
- Adaptive cruise control
- Front cameras
Many 2025–2026 bumper designs now include dedicated mounts or cutouts for those features.
Installation, Removal, and Future Upgrades
A bolt-on install usually takes 3 to 4 hours with basic hand tools like wrenches and a jack. No welder, grinder, or fab shop needed.
That also makes later changes much easier. You can unbolt the bumper for inspection, swap damaged parts after a trail hit, or add extras like a winch, light tabs, or a bull bar later. A lot of bolt-on bumpers already come with an integrated winch plate sized for standard 8,000–12,000 lb winches, using the common 10" x 4.5" bolt pattern.
After your first few off-road trips, re-torque the mounting bolts. Vibration can loosen hardware, and it’s better to catch that in the driveway than out on the trail.
Weld-on bumpers go the other way, using a permanent frame connection and more fabrication.
Weld-On Bumpers: Design and Installation
Weld-on bumpers take the opposite route from bolt-on setups. You give up easy removal in exchange for a permanent frame connection. Instead of using hardware to clamp the bumper in place, the bumper is welded right to the frame rails or frame horns.
How Weld-On Mounting Changes the Frame Structure
A weld-on bumper spreads impact and recovery loads through the weld and across more of the frame, rather than focusing that force at bolt locations.
That can help on older vehicles with thin front frame horns, like early Broncos or Jeep CJs. In those cases, a weld-on setup can give you a tougher base for winch recovery and other hard-use jobs.
That said, welding isn’t just about making things stronger. Proper welds can be very strong, but too much heat or too much weld can weaken the frame. Stitch welding helps reduce distortion.
In plain English: the end result depends a lot on prep, heat control, and tight fitment.
Fabrication Requirements and Vehicle Considerations
Every mounting surface needs to be ground down to bare metal. Paint, rust, and factory coatings can get in the way of weld penetration. The usual process starts with bare metal prep, then tacking, fitment checks, and final welding.
Weld-on installation also tends to take more time and cost more than bolt-on installation.
There’s another piece to think about on newer vehicles. A rigid weld-on mount can change how the vehicle handles impact energy, which may affect factory crumple zones and airbag deployment timing. Before welding on a modern truck or SUV, check where the sensors sit and how the crumple zones are laid out.
After the welding is done, corrosion protection matters just as much as strength. Welding burns away the factory coating, and bare steel can rust fast, especially around weld joints where heat has changed the metal. Seal exposed metal right away with primer or powder coat.
A couple of shop-safety steps matter here too:
- Disconnect the battery before welding.
- Keep the welder’s ground clamp close to the work area to help protect electronics from stray current.
For builders who want a head start, LSK Suspension also sells weld-it-yourself kits with CNC-cut parts. Those kits can give you a solid starting point without forcing you to build every piece from scratch.
Direct Comparison: Strength, Durability, Cost, and Maintenance
Strength and Recovery Load Performance
Once the bumper is on the truck, the differences get a lot more practical. This is where load handling, corrosion, and repair time start to matter day to day.
Both mounting styles can take serious off-road loads. The main difference is where that strength comes from and how easy it is to check. With a bolt-on setup, strength is simpler to verify because the hardware spec is known. With a weld-on setup, strength depends on weld quality and penetration, which makes the result less predictable.
For winch mounting, the plate should be built for at least twice the winch rating. If you’re running a heavier winch, you also need thicker plate and added gussets no matter which mount style you choose.
That shifts the conversation straight into maintenance and repair.
Long-Term Wear, Corrosion, and Repairability
Bolt-on bumpers need torque checks from time to time because vibration can loosen hardware. The upside is simple: if a part fails, you can unbolt it, swap it out, and get back on the road. They also often come with professional, factory-applied finishes, which give better out-of-the-box corrosion protection than bare-metal weld kits.
Weld-on bumpers need visual checks for stress cracks around each weld. And when cracks or bare welds show up, rust can move in fast. The hidden pain point here is repair cost. Taking off a welded bumper usually means cutting, grinding, and welding it back in place. That kind of work often costs 2–3 times more in labor than a similar bolt-on install.
| Maintenance Factor | Bolt-On | Weld-On |
|---|---|---|
| Corrosion Risk | Surface rust on hardware | Seam rust in cracked or unpainted welds |
| Inspection Routine | Periodic torque checks | Visual weld and crack detection |
| Repair Difficulty | Easy – unbolt and replace | Hard – requires cutting and re-welding |
| Finish Quality | Professional factory powder coat | Depends on shop quality or DIY paint |
| Installation Cost | Lower (DIY-friendly) | 2–3× higher due to specialized labor |
At that point, the tradeoff comes down to what the vehicle is expected to do.
Choosing the Right Bumper Mount for Your Build
Best Fit for Daily Drivers, Trail Rigs, and Race Builds
After looking at strength, wear over time, and cost, the choice mostly comes down to one thing: how permanent you want the build to be.
Your setup should match how you use the vehicle, how much fab work you can do, and whether a permanent mount makes sense for the project.
For daily drivers and overland rigs, bolt-on is usually the smart pick. It goes on fast, stays easy to service, and is much easier to remove later if you ever want to return the vehicle to stock. It can also help preserve the factory warranty since it uses existing mounting holes.
That’s the split, plain and simple: one path leans toward convenience, the other leans toward a more fixed race-style setup.
For dedicated trail rigs and race builds – especially cage-tied or heavily modified vehicles – weld-on mounting usually fits better. It gives you maximum rigidity and works well for stronger recovery points or added frame reinforcement. The downside is obvious: once it’s on, it’s on. Taking it off usually means cutting or grinding.
Some builders split the difference. They use bolts during mock-up, then stitch-weld the high-stress areas later.
Final Takeaways
The simplest rule is this:
- Choose bolt-on for serviceability and flexibility.
- Choose weld-on for permanent rigidity on purpose-built rigs.
FAQs
Which bumper type is safer for newer trucks?
For newer trucks, safety has less to do with choosing bolt-on vs. weld-on and more to do with build quality and how well the bumper works with modern vehicle tech.
That matters a lot. New trucks rely on factory sensors, cameras, and adaptive cruise control. A bumper that doesn’t play nicely with those systems can create problems fast.
Bolt-on bumpers are often the safer bet here because they’re usually easier to match with factory tech when compatibility has been verified. They tend to fit the truck’s existing setup with less hassle.
Weld-on bumpers can give you more rigidity. But for most off-road driving, bolt-on bumpers are generally strong enough and make more sense if you want to keep key safety features working the way they should.
Can a bolt-on bumper be as strong as a weld-on?
Yes. A bolt-on bumper can be just as strong as a weld-on version. It comes down to steel thickness, build quality, and the way the bumper is engineered as a whole.
A weld gives you a rigid, permanent connection. But a well-designed bolted joint, paired with high-quality hardware, can also handle off-road recovery loads and impact forces.
How do I know if my frame is a good fit?
Check your frame for structural integrity, past damage, and whether it matches your bumper’s mounting style. Even a small past accident can throw factory mounting points out of line and make a pre-fabricated bumper much harder to fit.
You’ll also want to make sure the frame isn’t badly twisted or eaten up by rust. Bolt-on setups depend on the factory holes already being in the right place. Weld-on mounts, on the other hand, can help strengthen areas that are weak or worn down.
Leave a Reply