A shock that bolts on can still be the wrong shock. If I want a setup that works, I check compressed length, extended length, stroke, mount style, clearance, motion ratio, valving, load, and shock type before I buy anything.
Here’s the short version:
- Length comes first. I match the shock to full bump and full droop, not just ride height.
- Stroke has to fit suspension travel. On IFS, shock travel is often less than wheel travel because of motion ratio.
- Mounts must match. Eyelet, stud, and clevis mounts measure differently, and hardware size has to fit the brackets.
- Clearance matters at every point in travel. I cycle the suspension and check tires, frame, brake lines, steering, and springs.
- Valving must match springs and weight. Added gear, bumpers, winches, and cargo change how much damping the truck needs.
- Shock type matters. Twin-tube fits basic street use, monotube works better with heat, coilovers fit mid- and long-travel builds, and bypass shocks are for high-speed setups.
- Factory shocks stop working when the build changes too much. Lifts, extra weight, and hard off-road use can push them past their travel and heat limits.
A few numbers stand out in this guide:
- Many monotube IFP shocks run about 135 to 200 psi nitrogen pressure.
- Some coilover setups use about 1/3 droop and 2/3 compression at ride height.
- A common install buffer is about 1 in. at full bump.
- On some IFS setups, a 0.85 motion ratio means 14 in. of wheel travel needs about 11.9 in. of shock stroke.
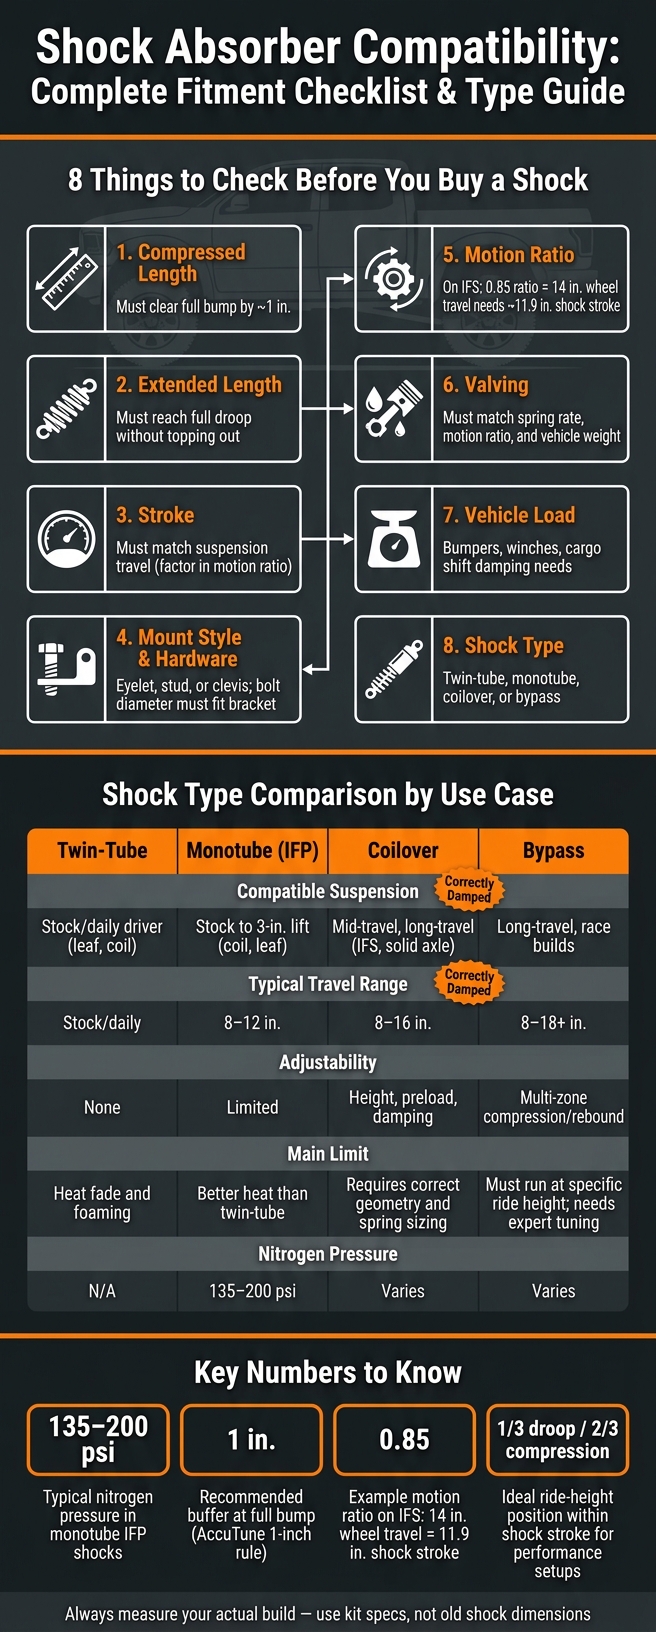
Shock Absorber Compatibility: Complete Fitment Checklist & Type Guide
How to Measure for the Right Shock Fit on Your Car or Truck
sbb-itb-afc4690
Quick Comparison
| What I Check | What It Tells Me | Common Problem If Wrong |
|---|---|---|
| Compressed length | Whether the shock survives full bump | Bottoming out the shock |
| Extended length | Whether it survives full droop | Topping out the shock |
| Stroke | Whether travel matches suspension movement | Lost travel or internal damage |
| Mount style and hardware | Whether it installs and moves freely | Binding, rubbing, wrong bolts |
| Motion ratio | How much shock travel the suspension needs | Wrong stroke on IFS or angled mounts |
| Valving | How the vehicle handles bumps and rebound | Bouncy, harsh, or unstable ride |
| Vehicle load | How much damping and body size I need | Poor control with gear or towing |
| Shock type | Whether it fits the use case and heat load | Fade, poor ride, short life |
If I had to sum it up in one line, it would be this: measure first, then match the shock to travel, load, and use.
Core Measurements That Determine Shock Fitment
Once you know your suspension travel, the next step is simple: make sure the shock’s installed dimensions line up with that movement.
Shock Length, Stroke, Ride Height, and Travel Range
Before you compare shock options, measure three things: full-bump distance, full-droop distance, and stroke.
Compressed length is the distance between mounting points when the suspension is fully stuffed, with the axle against the frame or bump stops. Extended length is that same mounting-point distance at full droop. The gap between those two numbers is your usable travel.
A good rule is to set collapsed length about 1 in. shorter than the full-bump distance. If the bump stop is still installed while you measure, subtract another 0.5 in.. On the other end, extended length should match full droop or be a touch longer so the shock doesn’t top out.
At static ride height, the shock should sit close to the middle of its stroke. Some performance setups lean toward about 1/3 droop and 2/3 compression. So measure the ride-height distance between mounts, then check where that number sits within the shock’s stroke range.
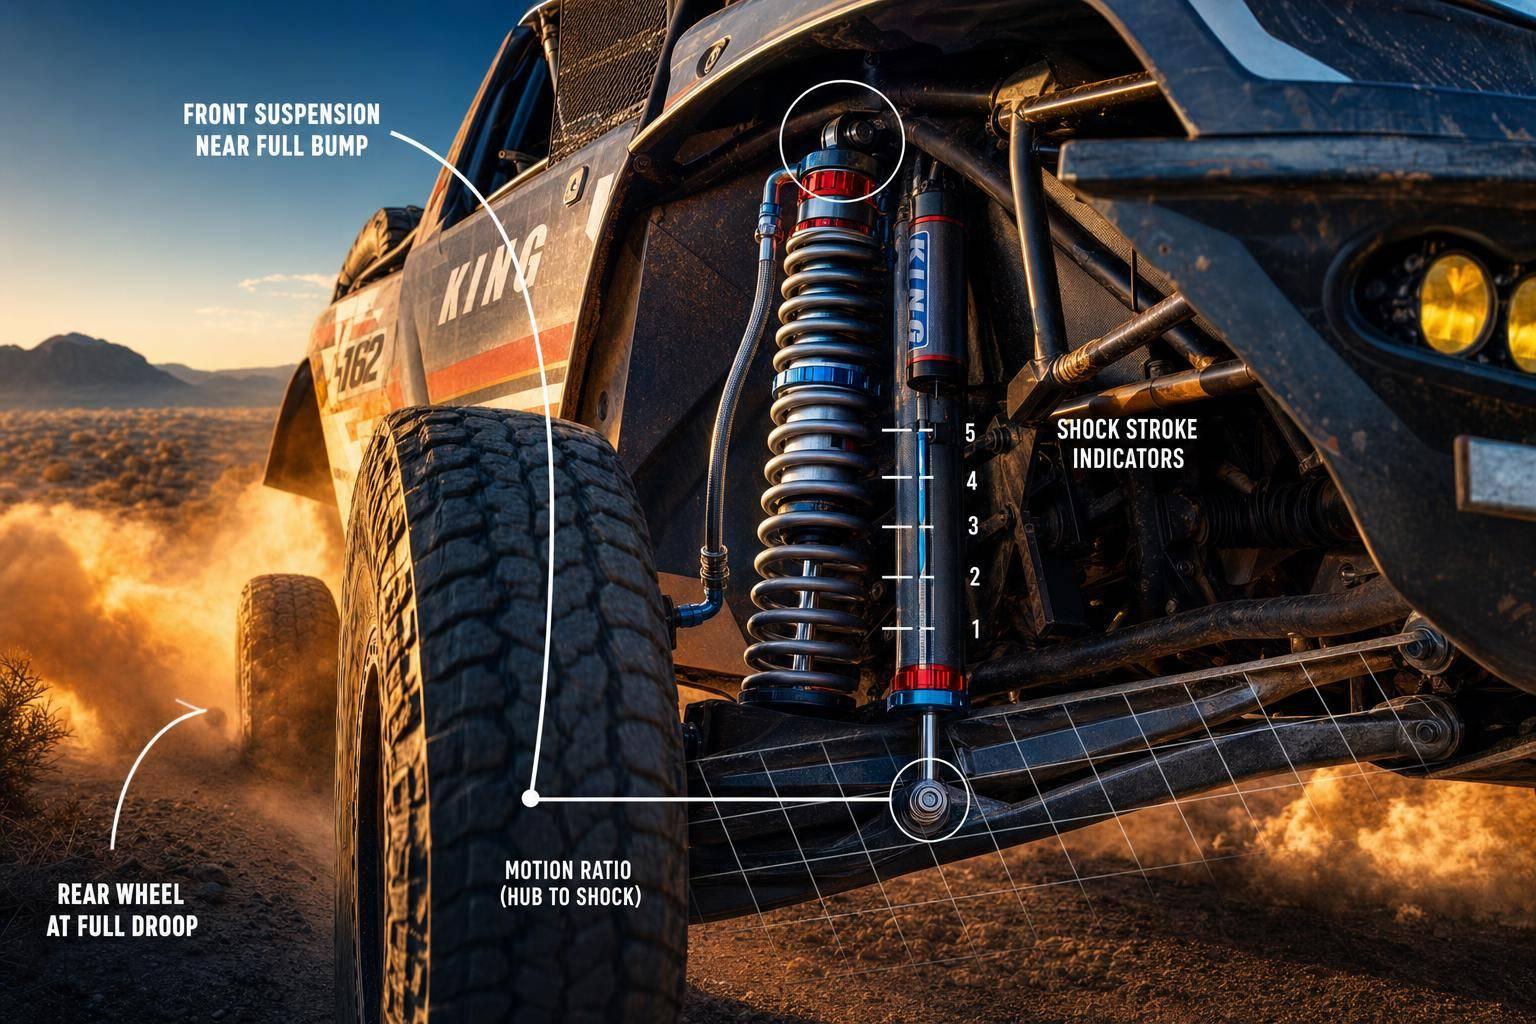
One more thing can trip people up: motion ratio. That’s the ratio between shock shaft travel and actual wheel travel. If the shock is mounted at an angle, shaft travel won’t match wheel travel one-to-one. This shows up most often on IFS setups and angled mounts.
Mount Styles, Hardware Size, and Clearance Checks
Mount style changes both how you measure and what hardware will fit. The most common types are eyelet/loop, stud/stem, and clevis mounts.
| Mount Type | Measurement Start Point | Measurement End Point |
|---|---|---|
| Eyelet / Loop | Center of the bolt hole | Center of the bolt hole |
| Stud / Stem | Base of the stud (where threading starts) | Center of the opposite eyelet |
| Clevis | Center of the thru-bolt hole | Center of the opposite mount |
The bushing sleeve or spherical bearing inner diameter needs to match the mounting bolt diameter. The total eyelet hardware width also has to fit inside the vehicle’s mounting bracket without rubbing or binding.
Then do the check that saves headaches later: cycle the suspension through its full range, one side at a time, and turn the steering lock-to-lock. You want to confirm that the shock body and spring don’t hit the frame, tires, control arms, fenders, or brake lines.
Comparison Table: Shock Dimensions vs. Suspension Travel
Use these center-to-center dimensions as a fitment reference only:
| Shock Travel | Collapsed Length | Extended Length |
|---|---|---|
| 8 in. | ~15.0"–17.5" | ~23.0"–24.4" |
| 10 in. | ~16.1"–19.5" | ~26.1"–29.4" |
| 12 in. | ~19.1"–21.5" | ~31.1"–33.4" |
| 14 in. | ~21.1"–24.5" | ~35.1"–38.4" |
| 16 in. | ~23.6"–26.5" | ~39.5"–42.4" |
Use the table as a shortcut, not a substitute for measuring your own build. Mount spacing on the vehicle is what decides fitment, so always check your actual numbers before buying.
Once the dimensions work, the next step is damping and load match.
Matching Damping, Spring Rate, and Vehicle Load
A shock can look right on paper and still work badly on the trail. Once you’ve confirmed length and stroke, the next test is damping. In plain English, that means making sure the shock’s valving matches the spring rate, motion ratio, and the vehicle’s actual weight.
Compression and Rebound Valving for Coil, Leaf, and Torsion Setups
Springs store energy, and shocks turn suspension movement into heat through fluid displacement. If spring rate and damping don’t line up, things get messy fast. The suspension can feel unsettled, bouncy, or harsh.
Compression damping controls how fast the suspension compresses when it hits something. Rebound damping controls how fast it extends after that hit. Both need to match the spring rate and motion ratio, not just the vehicle’s static weight.
Motion ratio has a direct effect on shaft speed. And shaft speed decides how much of the shock’s damping range gets used during suspension travel. Most independent suspension platforms aim for a motion ratio between 0.7 and 0.9.
How Added Weight Changes Shock Requirements
Added weight does more than lower ride height. It changes how much the springs compress and how much rebound control the shock needs. Steel bumpers, winches, cargo, towing, and passengers all shift the center of gravity and add more force for the shocks to control.
A front-heavy setup puts more load on the front suspension under braking and on impacts. That often means more compression damping up front to help control nose dive. A rear-heavy build usually needs more rebound damping to keep the rear from bouncing after a hit.
If the vehicle switches between daily driving and fully loaded trips, external compression adjusters can make life a lot easier. You can firm things up for extra weight, then back it off when the truck is empty.
Comparison Table: Under-Damped, Correctly Damped, and Over-Damped Behavior
| Damping Condition | Body Control | Tire Contact | Braking/Cornering | Ride Quality |
|---|---|---|---|---|
| Under-Damped | Poor; excessive swaying and "floating" | Inconsistent; tires bounce off terrain | Poor; significant nose dive | Soft but "wallowy" |
| Correctly Damped | Controlled; minimal oscillation after hits | Maximum; tires follow terrain contours | Stable; controlled weight transfer | Firm but compliant |
| Over-Damped | Rigid; vehicle moves with every pebble | Poor; tires "skip" over washboard | Skittish on uneven surfaces | Very harsh |
Use this table as a quick gut check. After a bump, the vehicle should settle fast, not keep bobbing up and down. That’s usually the clearest sign that the shock, spring, and load are working together.
Shock Type Compatibility with Common Off-Road Suspension Layouts
Once length and valving are in the right range, shock design becomes the next filter. And this part matters more than a lot of people think.
A shock can look right on paper and still be the wrong fit for the suspension. If you pick the wrong type of shock, it may ride poorly off-road, lose damping under heat, or wear out sooner than expected.
Monotube and Twin-Tube Shocks for Stock and Mildly Lifted Suspensions
Twin-tube shocks are the common factory-style option on stock vehicles and daily drivers. They cost less and usually deliver a soft, compliant feel on pavement. That said, once you start hitting rough terrain over and over, twin-tubes tend to cavitate, or foam, sooner. When that happens, damping drops off.
Monotube shocks with an Internal Floating Piston (IFP) deal with that problem better. The IFP keeps the oil and nitrogen gas separated, which helps stop foaming and gives you more consistent damping on the trail. These shocks usually run higher nitrogen pressure – about 135 to 200 psi – to help prevent cavitation. That makes monotube IFP shocks a strong match for stock, leveled, and mildly lifted rigs. They also handle heat better and resist fade more than twin-tubes.
As travel and tuning demands go up, monotubes often give way to coilovers.
Coilovers and Bypass Shocks for Mid-Travel and Long-Travel Builds
A coilover combines the spring and damper into one unit. That setup lets you adjust ride height and fine-tune spring preload for added weight, like bumpers, armor, or gear. Coilovers are common on mid-travel and long-travel builds, and they work on both IFS and solid-axle setups.
Spring size has to match the shock body size. 2.0-inch bodies use 3.5-inch outer diameter springs, while 2.5-inch bodies use 4.0-inch outer diameter springs. Just as important, you need enough clearance through the entire suspension cycle – not just at full extension and full compression.
AccuTune Off-Road follows a specific "1-inch rule" for coilover installs. After you measure mounting distance at full bump, subtract 1 inch for the internal bump stop and exposed shaft so the shock does not bottom out inside the body.
Bypass shocks play a different role. They do not support vehicle weight; the coil springs do. Their external tubes let fluid bypass the piston at set points in the stroke, so the shock can stay soft over small chatter and then build force before bottom-out. That position-sensitive damping is why bypass shocks show up on high-speed, long-travel builds. They also need exact ride-height setup to work as intended.
Comparison Table: Shock Type by Suspension Style and Use Case
| Shock Type | Compatible Suspension Style | Typical Travel Range | Adjustability | Main Limit |
|---|---|---|---|---|
| Twin-Tube | Stock / daily driver (leaf, coil) | Stock / daily driver | None | Prone to heat fade and foaming |
| Monotube (IFP) | Stock to 3" lift (coil, leaf) | 8"–12" | Limited | Better heat management than twin-tube |
| Coilover | Mid-travel, long-travel (IFS, solid axle) | 8"–16" | Height, preload, damping | Requires correct mounting geometry and spring sizing |
| Bypass | Long-travel, race builds | 8"–18+" | Multi-zone compression/rebound | Must be run at specific ride height; needs expert tuning |
Use this table to narrow down the right shock family before you check exact mount dimensions. Then confirm the kit specs and mounting points so the parts fit the suspension the way they should.
Vehicle-Specific Compatibility Checks and Final Shock Selection
Once you’ve picked the right shock family, the last step is making sure it fits your exact vehicle setup. This is where a lot of people get tripped up. The right shock on paper can still be the wrong shock if the travel numbers or mount specs don’t line up.
Using Suspension Kit Specs to Confirm Shock Match
Every suspension kit gives you the numbers you need: compressed length, extended length, hardware, and travel range. Use those kit specs to confirm the final mount-to-mount distance and usable travel window, not the old shocks.
That last check matters a lot on IFS setups and angled mounts, where wheel travel and shock shaft travel don’t move in a one-to-one way. With long-travel kits, the shock dimensions, mount points, and motion ratios are set very precisely. So stock replacement specs no longer mean much.
On independent suspension systems, motion ratio tells you how much shock stroke is needed for a given amount of wheel travel. For example, a motion ratio of 0.85 means 14 inches of wheel travel needs only about 11.9 inches of shock stroke. Run that math first, then compare shocks.
When Factory Shocks Still Work and When They Do Not
The cutoff is pretty simple: factory shocks stop making sense when their travel, valving, or heat handling no longer fits the build.
A lift changes mounting distance, and factory shocks will often top out before the suspension reaches full droop. Add bumpers, a winch, tools, and camping gear, and you’re now outside the factory valving range. At that point, a re-valved or larger-diameter shock is often the better move – many heavier trail rigs end up in the 2.5-inch range.
Heat is another big issue. High-speed desert driving works a shock hard, and that heat can make the oil foam and the damping fade. Factory-style shocks just don’t deal with that well over time. For that kind of use, dedicated performance shocks with remote reservoirs are the right fit.
Conclusion: A Short Checklist for Correct Shock Compatibility
Before you buy or install any shock, check these points:
- Mount type and hardware size – eye-to-eye, stud-to-eye, or loop-to-loop; measure stud mounts from the base, not the tip
- Length limits – compressed length measured at full bump minus 0.5–1 in. buffer; extended length confirmed at full droop with limit straps stopping travel 1–2 in. before full extension
- Travel ratio – calculate needed shock stroke from wheel travel using the kit’s motion ratio
- Clearance at full bump and droop – check for contact with the frame, tires, and brake lines
- Valving and spring rate – match them to vehicle weight, added load, and intended terrain
- Shock diameter – 2.0 in. for lightweight and technical builds, 2.5 in. for mixed-use and heavier rigs, 3.0 in. or larger for desert racing
Get these details right before purchase so you don’t end up with a bad fit.
FAQs
How do I measure shock length correctly?
Measure the vehicle’s mounting points directly, not the existing shocks.
- For eyelet mounts, measure center to center
- For stud mounts, measure from the base of the stud where it meets the bracket, not the tip
At full bump, measure the distance between the mounts and subtract 1 in. for internal bump stops.
At full droop, measure between the mounts again and make sure nothing binds.
Can I use factory shocks with a lift?
Some factory shocks might bolt on to a lifted vehicle, but that doesn’t mean they’re a good fit. They’re built for the stock ride height, and in most cases, they just don’t have enough stroke length to work well with a lift.
Once you add a lift, stock shocks often end up running close to the end of their travel. That’s where problems start. You can get overextension, blown seals, and damage inside the shock.
For lifts of 3 inches or more, aftermarket shocks are usually needed. They give you the suspension range, ride quality, and control that stock shocks usually can’t handle at that height.
What shock type fits my suspension setup?
Measure your suspension’s travel limits instead of trusting the size of your old shock. Fully cycle the suspension, then check the eye-to-eye length at full droop and again at full compression.
From there, pick the biggest shock that still lets the suspension reach full compression without bottoming out. Leave about 0.5 to 1 inch of cushion at full compression to help prevent internal damage.
Leave a Reply