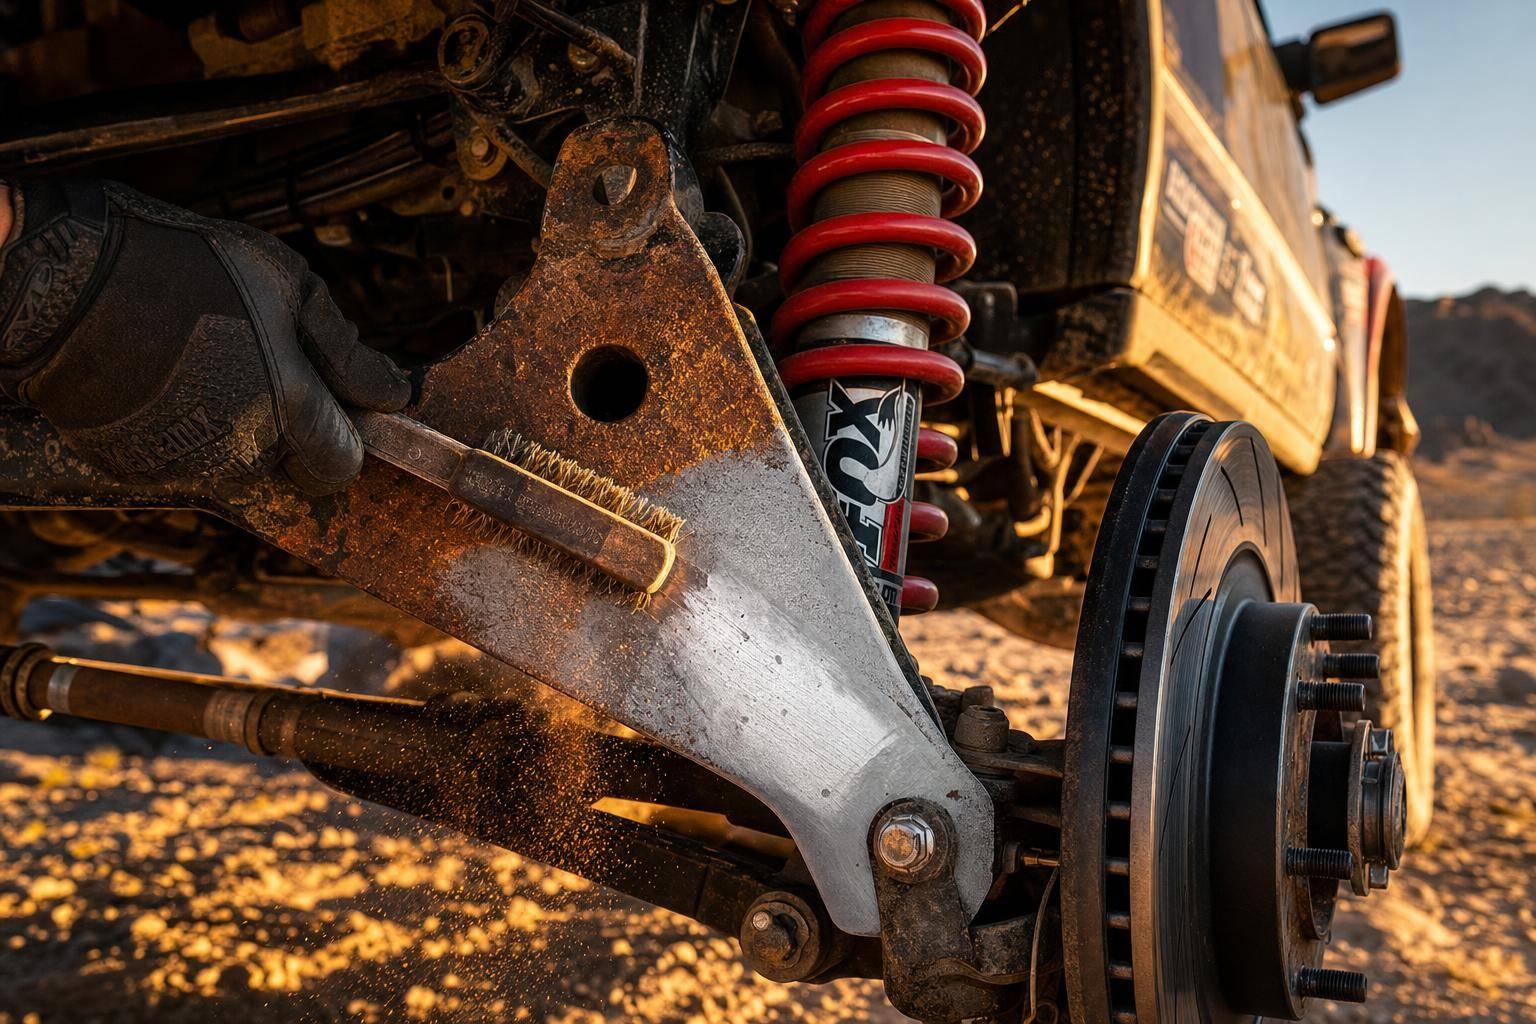
If rust on a suspension part is deep, flaky, cracked, or has started to pit the metal, I would not clean and paint it – I would replace it or have it checked before driving. If it’s only surface rust, I can usually handle it with four steps: inspect, clean, strip the loose rust, and seal the metal.
Here’s the short version:
- Check the part first. Surface rust is often fixable. Deep pitting, cracked welds, seam swelling, and leaking shocks are not.
- Wash before sanding or brushing. Dirt, salt, and grease block rust removers and wear down tools.
- Use the right removal method. I use hand brushes, wire wheels, flap discs, or small rotary tools based on the part shape and rust level.
- Use chemicals where tools can’t reach. Soaks work for removed hardware. Brush-on converters work for parts still on the vehicle.
- Prime and paint right away. Bare steel can start to flash-rust in hours, especially in humid air.
- Check it every 3 to 6 months. That matters even more if the vehicle sees road salt, mud, or water crossings.
A few numbers matter here. Pressure washing is usually safest around 1,500 to 2,000 psi for underbody cleaning, and removable rusty parts may need a soak for 12 to 24 hours before scrubbing. For coatings, I stick to 2–3 medium coats and let each one cure as the label says.
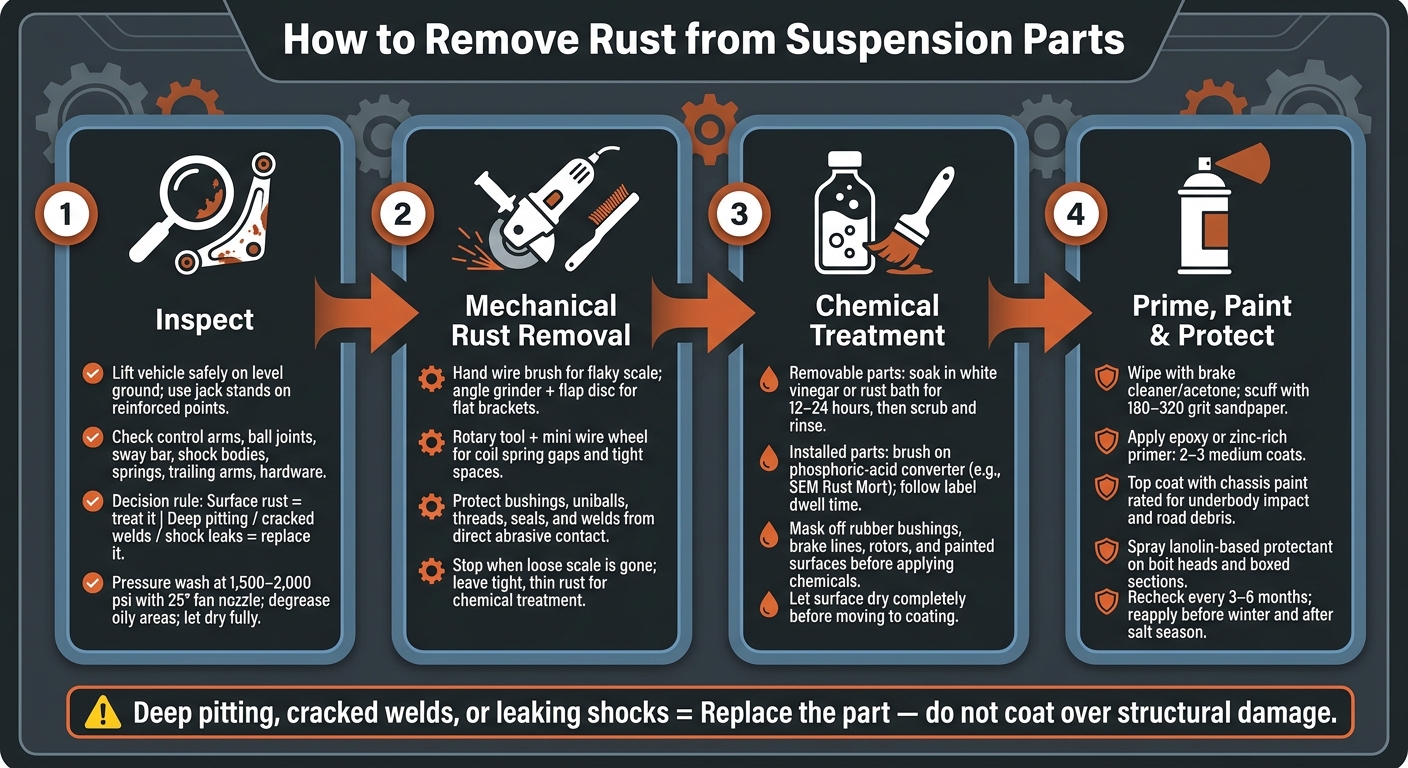
How to Remove Rust from Suspension Parts: 4-Step Process
How to restore rusty metal suspension with Eastwood Rust Remover
Quick check
| What I see | What I do |
|---|---|
| Light orange surface rust | Clean, treat, prime, and paint |
| Tight rust after brushing | Use converter, then coat |
| Deep pitting or flaking | Replace or get it checked |
| Cracked welds or seam swelling | Replace now |
| Shock body leak | Repair or replace |
The main idea is simple: don’t coat over damage that weakens the part. Clean rust early, protect nearby bushings and brake parts, and seal exposed metal before water and salt get back to it.
1. Inspect the Suspension and Set Up Your Work Area
Lift the vehicle safely and use the right protective gear
Start on level pavement or concrete. Set the parking brake, put the transmission in Park or first gear, and chock the wheels on both sides. Then check the owner’s manual for the approved lift and support points. Put the floor jack and jack stands ONLY on reinforced areas, lift the vehicle, set the stands, and lower the vehicle onto them. Before you go underneath, push on each corner to make sure it’s stable.
For PPE, wear safety glasses, gloves, and a dust mask or respirator. If you’ll be using wire wheels or an angle grinder, add hearing protection too.
At this stage, you’re trying to sort surface rust you can clean up from damage that calls for replacement. Once the vehicle is secure, inspect every rusted part before you touch a brush or remover.
Check rusted parts for damage before you start cleaning
Do a full visual sweep of the front suspension first: control arms, ball joint areas, sway bar and brackets, shock bodies, and lower mounts. Then move to the rear and check trailing arms, link arms, spring perches, springs, shackles, and the related brackets. Don’t skip the hardware either. Look at bolts, nuts, U-bolts, and washers.
Use this guide:
| What You See | Likely Action |
|---|---|
| Surface rust | Clean and treat |
| Deep pitting | Replace or have a professional assess |
| Flaking rust | Replace or have a professional assess |
| Cracked welds | Replace immediately |
| Swelling at seams | Replace immediately |
| Shock leak | Replace or repair |
On load-bearing parts, deep pitting, scaling, or cracked welds are a hard stop. Get a professional inspection before driving.
Once you’ve separated repairable parts from damaged ones, clear off the loose grime before moving into rust removal.
Wash off mud, grease, and debris before removing rust
Rinse away mud, dirt, and salt first. For caked-on buildup, use a hose or a pressure washer set to 1,500 to 2,000 psi with a 25-degree fan nozzle. Keep the nozzle moving, and don’t aim a tight stream at rubber bushings, brake lines, ABS sensors, or seals.
Spray a water-based automotive degreaser on oily spots around pivots, mounts, and frame rails. Let it sit for the time listed on the label, scrub with a stiff nylon or brass brush, and rinse it all off. Then let the undercarriage dry all the way. Wet metal gums up abrasives and makes rust remover less effective.
A clean, dry surface helps your tools and rust remover bite into the rust instead of sliding over mud and grease.
sbb-itb-afc4690
2. Remove Rust with Mechanical Tools
Use wire brushes, wire wheels, and flap discs on heavy rust
Once the surface is dry, knock off the loose rust before you move on to chemicals. Start with a hand wire brush to strip away the flakiest scale. On flat brackets and boxed control arms, an angle grinder with a flap disc usually gets the job done fastest.
That said, don’t go full send everywhere. Around weld seams or thinner sections, use a lighter touch. A hand wire brush or a less aggressive abrasive pad works better in those areas. Grind too hard near welds, and you can thin the metal around them and weaken the joint.
Clean springs, shock bodies, and tight spaces without causing damage
Coil springs, shock bodies, and mounting hardware have awkward shapes. A big wire wheel just won’t reach a lot of those spots. For the gaps between spring coils, use small abrasive pads or a rotary tool with a mini wire wheel. They give you better control and help you get into tight curves without skating past rust pockets.
Be extra careful on shock bodies, especially around threads and seals. Aggressive grinding here can remove metal you can’t put back, which may cause fitment issues or seal failure. A hand wire brush is the safer move.
Use that same caution around welds on spindle gussets and shock hoops. In those spots, a small rotary attachment is much safer than a full-size angle grinder. If your suspension has uniballs, rod ends, or Delrin bushings, either remove them first or wrap them in heavy-duty tape. Keep bushings, uniballs, threads, seals, and welds away from direct abrasive contact.
Stop at clean metal or tight, light rust that won’t flake before applying a coating
The goal here is simple: remove loose, flaking scale until you get down to solid metal. If the rust left behind is thin, tight, and not peeling up, stop there. Don’t keep grinding just for the sake of it. Treat that area with a chemical rust converter in the next step instead.
When you’re done with mechanical cleaning, blow off the dust and grit with compressed air or wipe everything down with clean rags. After that, move on to the chemical rust remover or converter.
3. Use Chemical Rust Removers and Converters Where Needed
Choose between soaking solutions and brush-on rust converters
After you knock off the loose rust, chemicals help with the stuff your tools can’t fully reach.
They’re most useful on pitted metal and in tight spots where mechanical cleaning falls short. If the part can come off the vehicle, soak it in white vinegar or a rust bath for 12 to 24 hours, then scrub and rinse it clean. If the part needs to stay on the vehicle, use a phosphoric-acid-based rust converter like SEM Rust Mort. Brush it on, let it sit for the dwell time listed on the label, then clean the surface so it’s ready for primer or paint.
The choice is pretty simple: soak removable parts, brush on product for installed parts.
| Chemical Type | Application Method | Best Used For |
|---|---|---|
| White Vinegar / Rust Baths | Soaking | Removable brackets, hardware, and small arms |
| Phosphoric Acid (e.g., SEM Rust Mort) | Brush-on or spray | Pitted surfaces and tight contours on installed parts |
Protect bushings, brake parts, and painted surfaces during treatment
These products can wander into places you don’t want them. And that can turn a rust fix into a new repair job.
Before applying anything, mask off rubber bushings, brake lines, rotors, and brake pads with tape or plastic sheeting. Painted surfaces should be covered too.
Delrin bushings and uniballs need extra care. Use a tight, controlled application. Apply only a small amount, wipe off drips right away, and stick to the product label for dwell time, rinsing, or neutralizing. Too much contact time can leave residue and hurt adhesion.
Let the part dry all the way before primer or coating. Once the surface is clean and dry, move on to primer and chassis coating.
4. Prime, Paint, and Keep Rust from Coming Back
Apply rust-inhibiting primer and a durable chassis coating
Once the rust is gone and the surface is fully dry, seal it right away. Start by wiping the area with brake cleaner or acetone. Then scuff it with 180–320 grit sandpaper or Scotch-Brite, blow out the seams, and let everything dry. A coating helps clean, structurally sound parts last longer. It does not repair cracked parts or parts with deep pitting.
On bare steel, use an epoxy primer or a zinc-rich primer. Apply 2–3 medium coats, then top it with chassis paint made for underbody impact and road debris. Let each coat dry, and follow the label for flash and cure times. Reassemble only after the coating has fully cured. It also helps to pick a finish that makes chips easy to see, so exposed bare metal never slips by unnoticed.
Use rubberized undercoating on wheel wells and sheet metal. Don’t use it on moving suspension parts, bushings, or brake friction surfaces. It can hide cracks and trap moisture.
Add follow-up protection for off-road and wet conditions
After the base coating cures, protect the hardware that takes the most abuse and the areas that are easy to miss. Spray a lanolin-based protectant on bolt heads, exposed threads, and inside boxed sections or tube ends. These products stay tacky, which helps them push out water and hold up better after wash-off.
Check high-exposure parts every 3–6 months, and reapply protectant before winter and after salt season. If you spot a rock chip or scratch that exposes bare metal, deal with it early: sand it lightly, clean it with solvent, spot-prime it, and recoat it before rust starts spreading.
Conclusion: Address Rust Early and Inspect Suspension Parts Regularly
If rust has turned into deep pitting, cracking, or flaking, replace the part instead of coating over it. For surface rust, the job is pretty simple: figure out whether the rust is cosmetic or structural, clean the part safely, remove rust with mechanical and chemical methods as needed, and seal the surface with the right primer and coating.
On long-travel control arms and other exposed parts, keep welds and mounting points clean and coated. Regular underbody washing after trail runs or driving on salted roads is what stops rust from coming back. Clean it, inspect it, coat it, and check it again before rust gets another shot.
FAQs
How can I tell if rust is only cosmetic?
Inspect the rust closely and check whether the metal still feels solid. Surface rust is usually just a thin, flaky, or powdery layer. In most cases, it comes off with light sanding or a chemical treatment, and you’re left with smooth, solid steel underneath.
If you notice deep pitting, heavy flaking in layers, or metal that feels thin or weak, that’s a different story. At that point, the rust has likely damaged the part’s structural strength.
Can I remove rust without taking the suspension apart?
Yes. In most cases, you can treat surface rust on suspension parts without taking the whole vehicle apart. The main job is to clean and prep the rusted area well before you coat it.
If the corrosion is heavy, or the part shows structural damage, that’s a different story. At that point, removal and professional service may be the safer move.
Once the surface is clean, you can use direct-to-metal coatings like LSK Suspension’s Stealth Satin Black or Stainless Steel Shield to seal the area and help slow more corrosion.
What should I avoid damaging while cleaning suspension rust?
Avoid damaging sensitive parts like uniballs, rod ends, Delrin bushings, shock shafts, and seals.
Keep abrasive tools, dirt, and chemical cleaners away from pivot points. They can wear down seals and make joints feel rough instead of smooth. It also helps to check that any cleaner you use is safe for your suspension materials, such as billet aluminum or high-grade steel.
Leave a Reply