Installing a long travel suspension transforms your vehicle’s off-road performance, offering more wheel travel, better handling, and improved stability on rugged terrain. This guide covers everything you need to know, from tools and components to step-by-step instructions.
Key Takeaways:
- What it does: Replaces factory suspension parts with longer control arms, extended shocks, and other specialized components to increase wheel travel (14–18 inches) and support larger tires.
- Why upgrade: Improves traction, reduces rollovers, and allows for high-speed stability even on rough surfaces.
- What’s needed: Tools like a hydraulic jack, torque wrench, and possibly a welder. Kits include control arms, tie rod extensions, and extended brake lines.
- Installation process: Involves removing stock parts, installing new components, and ensuring proper alignment.
- Post-installation: Test for clearance, re-torque hardware after 100 miles, and schedule professional alignment.
Quick Tip:
This is a technical project involving cutting, welding, and precise alignment. If you’re not confident in your skills, consult a professional installer. Proper setup ensures safety and maximizes performance.
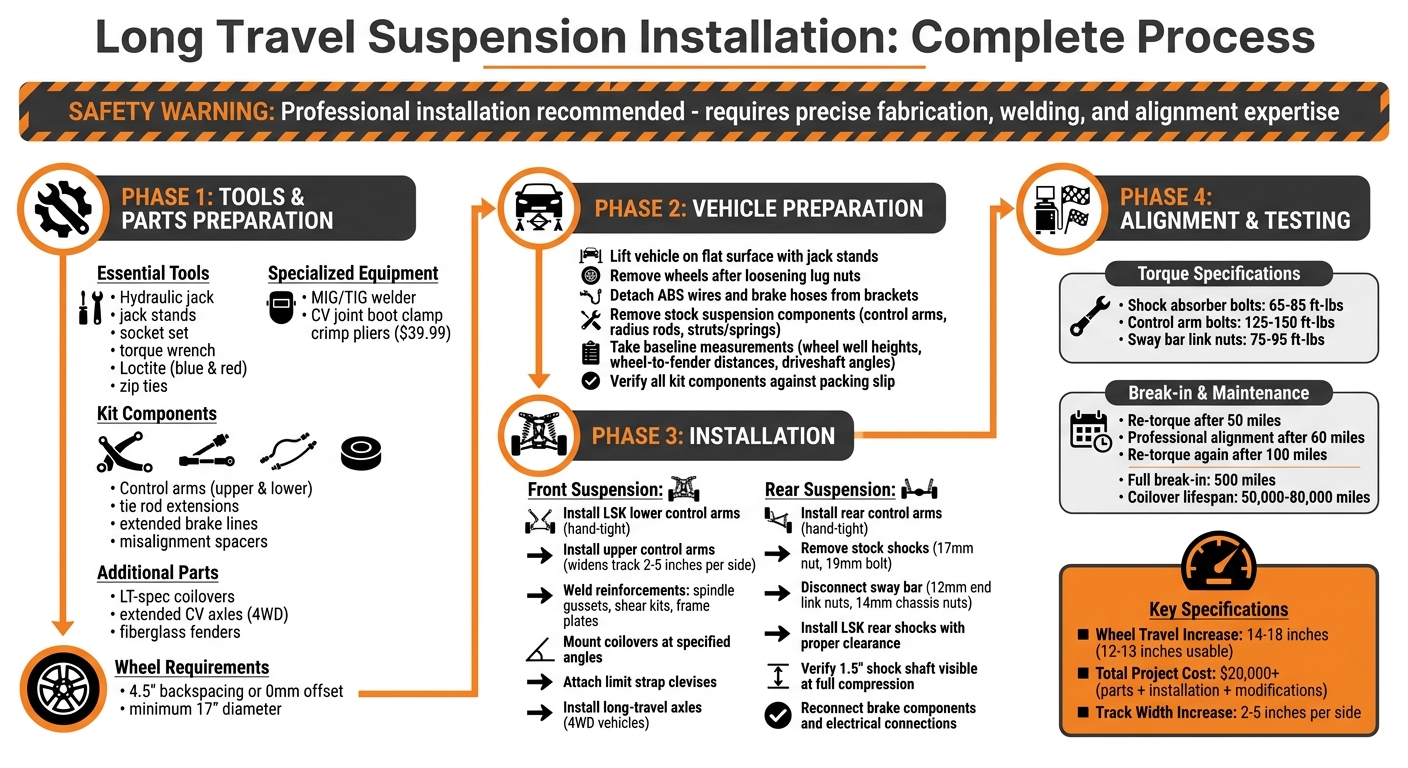
Long Travel Suspension Installation Process: 4-Phase Guide
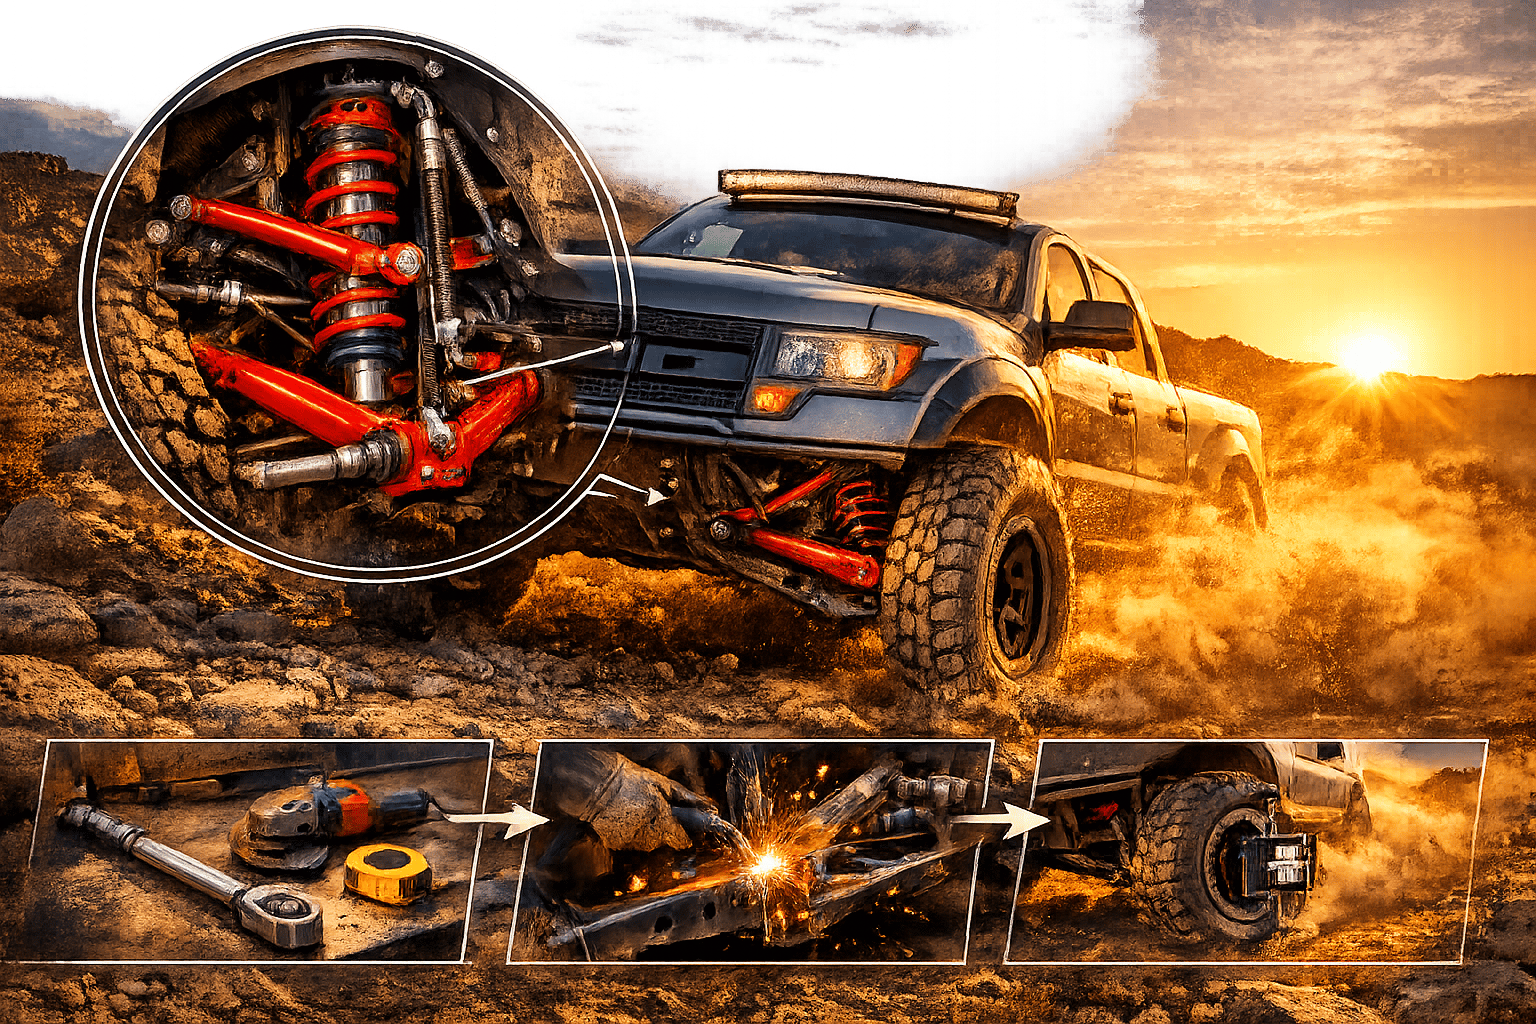
How to Install a Long Travel Kit on Your Prerunner Offroad Truck.
sbb-itb-afc4690
Tools and Parts Needed for Installation
Before you begin, make sure you’ve gathered all the necessary tools and parts. Installing a long travel suspension involves both standard and specialized equipment, so preparation is key.
Tools You’ll Need
Start with the basics: a hydraulic jack and heavy-duty jack stands to safely lift and support your vehicle. A socket set, wrenches, and channel locks will cover most disassembly and assembly tasks. For precise work, a torque wrench is essential since suspension fasteners need to be tightened to specific torque values for safety and performance. You’ll also need blue and red Loctite to prevent bolts from loosening due to vibrations, and zip ties to secure brake lines and sensor wires away from moving parts.
If your kit includes bypass hoops or limit strap tabs, you’ll need access to a MIG or TIG welder. If welding isn’t in your skillset, consider outsourcing this part to a professional. For vehicles with extended axle shafts, CV joint boot clamp crimp pliers (priced around $39.99) are required to properly install CV boots.
Kit Components
LSK Suspension kits come equipped with upper and lower control arms, tie rod extensions, extended brake lines, and critical hardware like 17-4 stainless misalignment spacers. These kits are designed for bolt-on installation, though optional upgrades may require welding. Before starting, organize your tools and carefully review the kit’s components to ensure everything is accounted for.
Pre-Installation Checks
Before disassembling anything, take a moment to inventory all components against the packing slip. Check that uniballs and ball joints are correctly seated and inspect powder-coated surfaces for any shipping damage. This quick step can save you time and prevent headaches during the installation process.
Additional Components to Consider
Long travel setups often require more than what’s included in the kit. For example:
- LT-spec coilovers are a must since standard shocks won’t fit or function properly.
- Extended CV axles are necessary for 4WD vehicles to accommodate the widened track width.
- Fiberglass fenders might be needed to prevent tire interference during full suspension compression, as long travel kits significantly widen the vehicle.
Lastly, verify your wheel backspacing. Many LSK kits require wheels with 4.5" backspacing or 0mm offset and a minimum 17" diameter to clear the new suspension components.
Once everything is ready, you can move on to preparing your vehicle for the installation. Proper organization and preparation will make the process smoother and more efficient.
Preparing Your Vehicle for Installation
Lifting the Vehicle and Setting Up Your Workspace
Start by parking on a flat, stable surface and engaging the parking brake. Before lifting the vehicle, loosen all the lug nuts on the wheels. Use a hydraulic jack to lift one corner at a time, and immediately place a rated jack stand under the vehicle for support – never rely solely on the jack to hold the vehicle’s weight. Once all corners are securely supported by jack stands, remove the wheels. Always wear safety glasses and gloves for protection. If you need to weld bypass hoops, ensure you’re working in a well-ventilated space.
Removing Stock Suspension Components
Detach the ABS wire harnesses and brake hoses from their mounting brackets on the shocks or struts. Carefully unclip or unbolt these components without disconnecting any hydraulic lines. For vehicles with separate springs and shocks, use a floor jack to support the spring bucket before unbolting it. Slowly lower the jack to release the spring’s tension safely. If bolts are stubborn, apply penetrating oil to loosen them, and use a breaker bar or impact gun for removal. As you remove parts like control arms, radius rods, and other suspension links, the wheel hub will become more mobile, making it easier to take out the strut or spring assembly. Be cautious with brake lines and sensor wires – avoid overstretching them during this process.
Checking Kit Components
Before installing the new parts, lay out all kit components and compare them to the packing slip to ensure nothing is missing. Check the powder coating for any damage and confirm that uniballs and ball joints are properly seated. Take baseline measurements, such as wheel well heights, distances between wheel centers and fenders, and driveshaft/pinion angles. These numbers will come in handy later when adjusting alignment and verifying suspension travel. After the initial test drive, make sure to re-torque all fasteners. With your vehicle prepped and all components accounted for, you’re ready to move on to the installation process.
Step-by-Step Installation Process
Installing Front Suspension Components
Start by installing the LSK lower control arms. Position each arm in place and insert the factory bolts through the frame mounts, but only tighten them by hand for now. Next, attach the upper control arms. Long travel systems typically use extended control arms that widen the track by 2 to 5 inches per side. This adjustment changes the mounting angle of the front coilovers, making them more angled compared to the stock near-vertical orientation to accommodate the longer control arms.
If your LSK kit includes extras like spindle gussets, upper arm shear kits, or frame plate reinforcements, this is the time to install them. As Michael Salvador, Off-road Contributor, explains:
"Though a lot of these kits are a direct bolt-on, there are things like limit strap clevis’, spindle gussets, shear kits, frame plates… that need to be done."
These reinforcements, which require welding, help handle the added leverage and stress from the wider stance. Be sure to weld in a well-ventilated area and allow the parts to cool before moving forward.
Next, install the coilovers. Mount them at the specified angles and connect the limit strap clevises to prevent over-extension, which could damage the coilovers or CV joints. For 4WD vehicles, you’ll need specialized long-travel axles to accommodate the increased distance between the differential and the hubs. Once the front suspension components are installed and reinforced, you can move on to updating the rear suspension.
Installing Rear Suspension Components
Begin with the rear control arms, again installing the bolts hand-tight. Remove the 17mm shock nut and the 19mm lower head bolt, as the latter is typically reused. To make spring removal and installation easier, disconnect the rear sway bar by removing the 12mm end link nuts and 14mm chassis nuts.
Use a jack to lift one end of the axle, compressing the suspension slightly to simplify the coil spring installation. Then, install the LSK rear shocks, ensuring there’s proper clearance when the suspension is fully compressed. Cycle the axle through its full range – from full compression to droop – to check for any binding and to confirm full shock travel. At full compression, you should see about 1.5 inches of shock shaft visible between the compression boot and the shock body. Reconnect the brake components, and make sure all electrical connections and breather lines are extended to handle the increased wheel travel. After completing the rear installation and verifying shock travel, proceed to alignment and testing.
Final Steps: Assembly, Alignment, and Testing
Tightening Fasteners and Alignment
Securing every component to the manufacturer’s specifications is a critical step to ensure your long travel suspension performs as intended. Start by lowering the vehicle and gently bouncing each corner to settle the suspension before performing final torque checks. Avoid fully tightening suspension bolts until the vehicle is at its natural ride height. Once the vehicle is on the ground, torque all fasteners to the correct specifications:
- Shock absorber bolts: 65–85 ft-lbs
- Control arm bolts: 125–150 ft-lbs
- Sway bar link nuts: 75–95 ft-lbs
Also, double-check that brake lines are adequately routed and long enough to accommodate the new suspension setup.
After a 60-mile break-in period, have a professional alignment performed. Choose a shop familiar with eccentrics and heim joints, as these systems demand precision. When setting the final ride height, measure from the wheel hub center to the fender lip for accuracy. For example, drizzoh, a Tacoma3G Forum member, shares this alignment tip:
"To make sure Tacoma’s specifically are properly aligned, my shop will perform an initial alignment to perfect spec and then pull the truck off the rack to unweight/cycle the suspension and then pull it back onto the rack and perform a second alignment."
Once the alignment is complete, you can move on to testing the suspension’s performance.
Testing Suspension Travel and Performance
After alignment, it’s time to evaluate how the suspension performs under real-world conditions. Start by checking for tire clearance and shock limits. Look for any signs of tire rubbing when turning to full lock in both directions or during compression over bumps. Ensure the limit straps are doing their job by preventing the shocks from overextending and protecting axles during extreme articulation.
If your LSK kit includes adjustable coilovers, begin with the manufacturer’s recommended mid-range settings. From there, fine-tune the coilovers in small increments – 2–3 clicks at a time – and test drive after each adjustment to assess handling and ride comfort.
Drive gently for the first 50 miles to allow seals and bushings to seat properly. A full break-in generally takes about 500 miles. After both the 50-mile and 500-mile marks, re-torque all suspension fasteners to ensure everything remains secure.
Maintenance and Care
To keep your suspension performing at its peak, stick to a consistent maintenance routine. Regularly grease the bushings on the Upper Control Arm (UCA) and Lower Control Arm (LCA) to prevent squeaking and premature wear. Use silicone spray on adjustment threads every few months to guard against corrosion. Additionally, inspect the shock bodies for any signs of oil leaks, which may indicate a need for rebuilding.
High-quality coilovers typically last between 50,000 and 80,000 miles before requiring a rebuild or replacement. However, race components like uniballs, heims, and bushings experience greater stress and may need more frequent checks and replacements. Keeping up with these maintenance tasks will help ensure your suspension continues to perform as designed.
Conclusion
Upgrading to a long travel suspension system can dramatically improve your vehicle’s off-road capabilities – when done correctly. This isn’t a simple bolt-on project; it requires precise fabrication, careful assembly, and professional alignment. As Truck Brigade explains, "Installing long travel suspension requires precise fabrication, welding, and alignment work that demands professional expertise". Skipping steps or cutting corners could jeopardize both safety and handling, especially at higher speeds.
After installation, it’s crucial to re-torque all hardware after the first 100 miles and stick to a strict maintenance schedule. Keep in mind, a complete long travel build – including parts, installation, and supporting modifications – can cost upwards of $20,000.
When it comes to alignment, standard shops may not have the expertise needed for long travel geometry. Work with a technician experienced in this type of setup to ensure everything is dialed in properly. After the initial break-in period, re-torque the hardware again and schedule a follow-up professional alignment to maintain peak performance and safety.
If installed and maintained properly, LSK Suspension kits offer incredible off-road performance. Their kits include high-quality components like 1.25" FK Uniballs and 3/16" boxed control arms, providing 12–13 inches of usable wheel travel while accommodating larger tires built for durability. Whether you’re building a weekend adventurer or a full-blown race truck, LSK’s bolt-on and race kits provide a reliable foundation for tackling rugged terrain.
Ready to take your vehicle to the next level? Explore LSK Suspension’s full lineup of long travel kits, control arms, and supporting components designed specifically for your truck or SUV.
FAQs
Do I need to weld anything to install a long travel kit?
Yes, installing a long travel suspension kit often involves welding, particularly when it comes to attaching mounting brackets and other structural components. This usually includes fabricating custom parts and ensuring everything is aligned correctly during the process. Many kits specifically mention welding as a required step, so it’s crucial to carefully read the instructions for your specific kit before beginning the installation.
What wheels, offset, and tire size will clear long travel?
When it comes to clearing long-travel suspension, the right combination of wheels, offset, and tire size depends heavily on your specific vehicle and setup. Generally, wider wheels paired with a lower offset – often reduced by around 8mm – are a popular choice. This setup helps accommodate larger tires and provides better clearance.
For tires, focus on options that enhance off-road performance while steering clear of interference with fenders or suspension parts. To nail down the precise specifications, it’s best to check with your long-travel kit manufacturer or consult a suspension expert.
How do I know my shocks and CV axles have enough travel?
To make sure your shocks and CV axles have enough travel, you’ll need to measure the suspension’s maximum compression and extension. Here’s how:
- Safely support your vehicle: Use jack stands or a lift to keep the vehicle stable while you work.
- Remove the springs: This allows you to move the suspension freely without resistance.
- Test full compression and extension: Manually move the suspension to its limits – fully compressed and fully extended.
- Measure distances: Check the shortest distances between mounting points during compression and extension. Pay attention to ensure no components bind, hit, or interfere with each other at these extremes.
By following this process, you can confirm that your shocks and axles can handle off-road conditions without risking damage.
Leave a Reply