Most off-road exhaust mistakes happen before you buy. I’d match the exhaust to terrain, vehicle fitment, pipe size, material, sound, and install work first – not to the loudest clip or the biggest horsepower claim.
If I were picking one today, I’d keep it simple:
- Rock crawling: choose a tucked-up, high-clearance layout
- Mud, water, salt, or coastal use: lean toward 304 stainless steel
- Mixed trail + highway use: a resonated cat-back is often the safest bet
- Naturally aspirated rigs: stay near 2.5–3.0 inches to protect low-end pull
- Diesel or turbo builds: a turbo-back may make more sense
- Long trips or overlanding: use a rear exit to cut drone and help keep fumes away from camp areas
- Before buying: check clearance at full compression and full droop, not just at ride height
A few numbers matter here. The article notes cat-backs often bring about 5–12 hp, while axle-backs are often closer to 1–3 hp. It also points out that 304 stainless can last 15+ years, while 409 stainless often lands around 8–10 years, depending on use and climate.
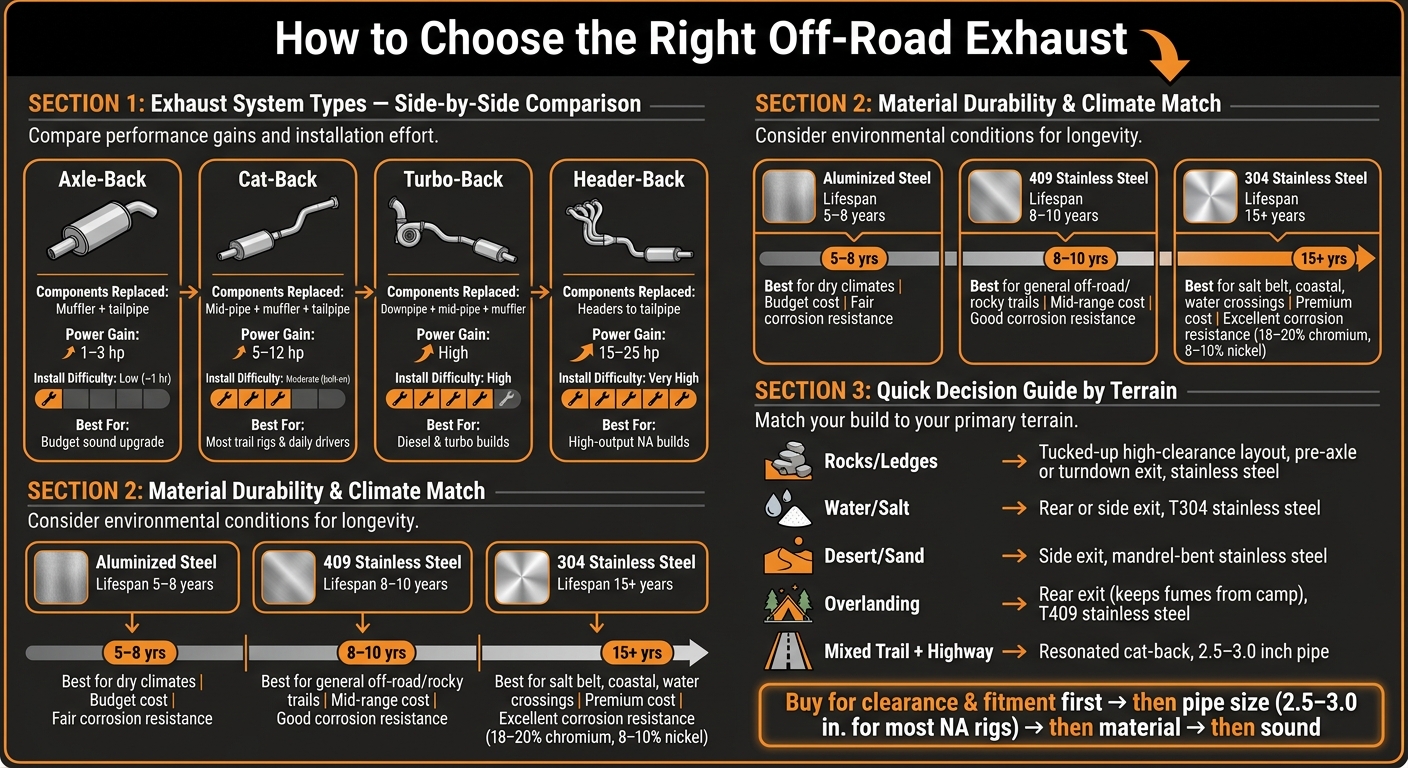
Off-Road Exhaust Systems Compared: Type, Material & Performance
4X4 Off Road Exhaust Selection / Styles | AnthonyJ350

sbb-itb-afc4690
Quick Comparison
| Choice | Best for | Main tradeoff |
|---|---|---|
| Axle-back | Sound change on a budget | Little power gain |
| Cat-back | Most trail rigs and daily drivers | Mid-level cost |
| Turbo-back | Diesel and turbo setups | More install work, may need tuning |
| Header-back | High-output NA builds | High cost and labor |
| 409 stainless | General off-road use | Surface patina over time |
| 304 stainless | Water, salt, coastal use | Higher price |
| 2.5–3.0 in. pipe | Most NA trucks, SUVs, Jeeps | Not ideal for big turbo power |
| Oversized pipe | High-output builds | Can hurt low-end response |
My short take: buy for clearance and fitment first, then pick the smallest pipe size that supports your build, then choose the material that fits your climate, and only after that worry about sound.
That’s the core of the article in plain English.
Step 1: Choose for Terrain, Clearance, and Vehicle Fitment
How Trail Conditions Affect Exhaust Layout
| Trail Type | Priority | Recommended Exit Style | Recommended Material |
|---|---|---|---|
| Rocks/Ledges | Ground clearance | Pre-axle or turndown | Stainless steel |
| Mud/Water | Corrosion resistance | Rear or side exit | T304 stainless steel |
| Desert/Sand | Thermal management | Side exit | Mandrel-bent stainless steel |
| Overlanding | Low noise/durability | Rear exit | T409 stainless steel |
| Deep Ruts | Underbody clearance | Tucked-up high clearance | Stainless steel |
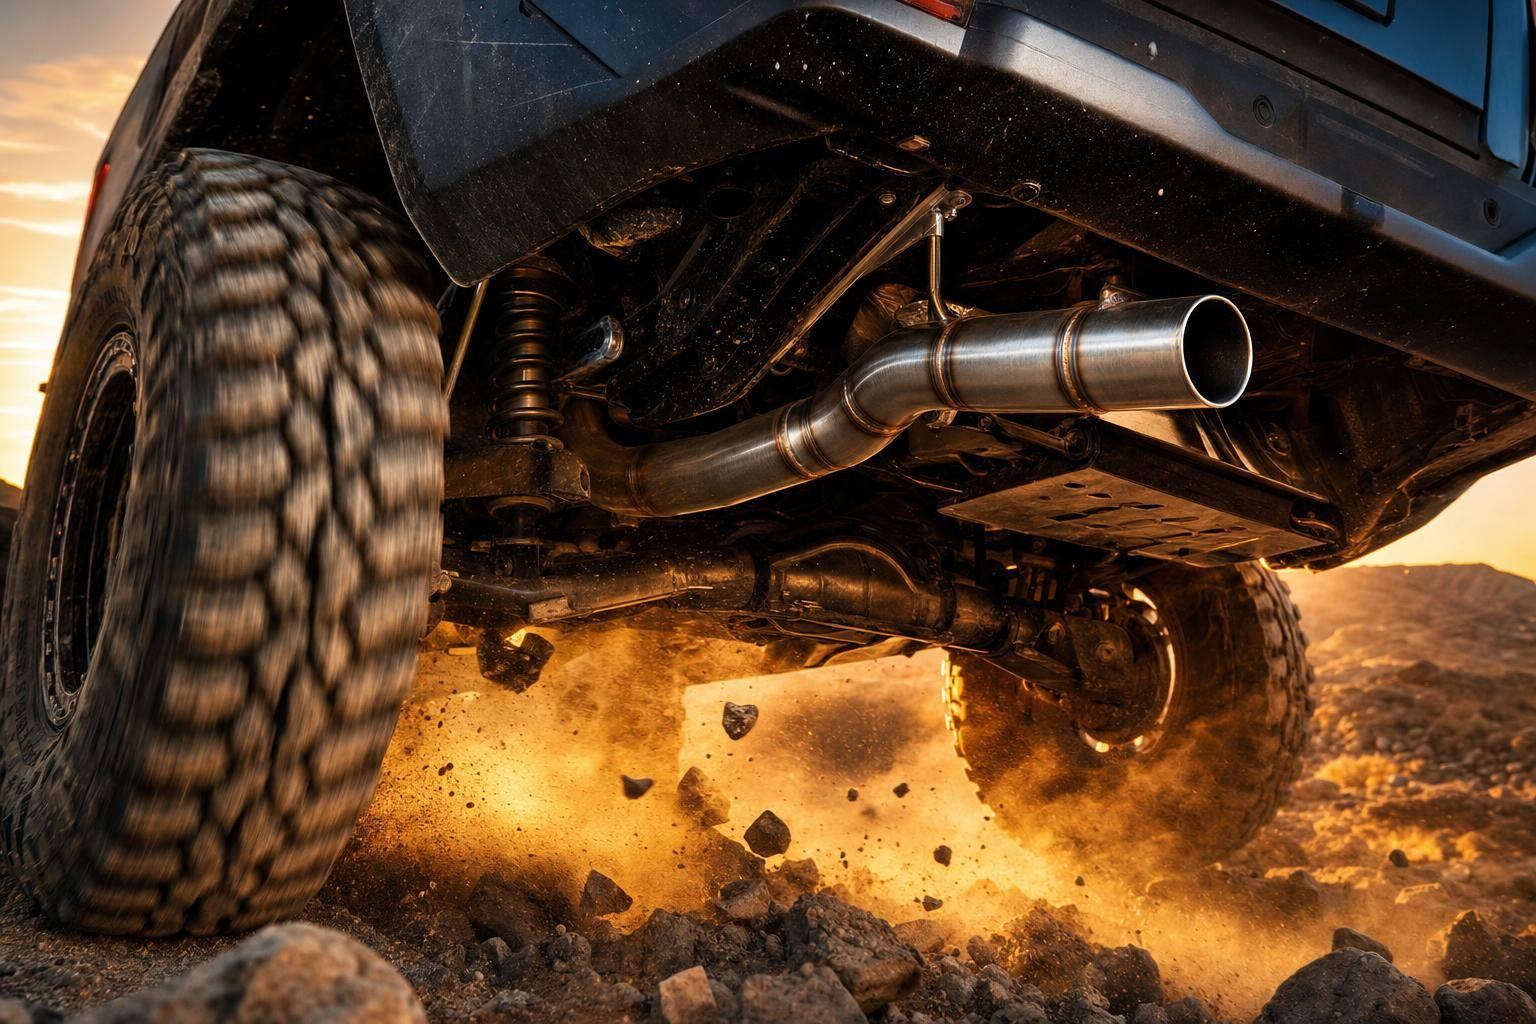
Rocks and ledges favor a tight, tucked-up layout. You want the pipes close to the frame rails, not hanging down where they can get smashed. A pre-axle or turndown exit helps protect the tip when the rear drops hard on steep descents.
Mud and water are a different story. Here, corrosion matters more, so T304 or T409 stainless steel makes more sense.
For overlanding, exit location isn’t just about sound. A pre-axle exit can send exhaust fumes toward sleeping areas, including rooftop tents, so a rear exit is often the safer pick. In that case, exhaust routing affects comfort and safety just as much as trail clearance.
Why Fitment Differs Across Trucks, SUVs, Jeeps, and UTVs
Fitment changes a lot from one chassis to another. A full-size truck might have a long wheelbase, tall frame rails, and a big fuel tank that limit pipe routing. A Jeep or SUV with more axle travel can move through a much larger arc and hit pipes that looked fine while parked. UTVs are even tighter, with very little room between the frame, drivetrain, and exhaust parts.
That’s why you should always check fitment against your exact year, make, model, and trim, not only the engine. If your rig has long-travel suspension, control arms, bumpers, or a roll cage, start that fitment check over. Factory exhaust routing often runs right into aftermarket underbody parts.
Check Suspension and Underbody Clearance Before Buying
Ride-height clearance can fool you. What counts is clearance at full compression and full articulation, when the suspension is pushed to its limits.
At full compression, the rear axle can move up far enough to shove a pipe into the floorboard or a control arm. At full droop, the driveshaft can shift sideways and hit tubing that seemed clear before. Leave space between the exhaust and moving parts like the driveshaft at full suspension compression.
Once fitment checks pass, choose the exhaust type and pipe size.
Step 2: Pick the Right Exhaust Type and Pipe Size
Cat-Back, Axle-Back, Header-Back, and Turbo-Back: Which One Fits Your Build
Once fitment is locked in, the next job is picking the exhaust setup that lines up with how you use the rig. This choice affects price, clearance, sound, and power.
| System Type | Components Replaced | Install Complexity | Performance Impact | Off-Road Suitability |
|---|---|---|---|---|
| Axle-Back | Muffler and tailpipe | Low (about 1 hour) | Minimal (1–3 hp) | Sound-focused; minimal power change |
| Cat-Back | Mid-pipe, muffler, and tailpipe | Moderate (bolt-on) | Moderate (5–12 hp) | Best balance for most off-road rigs |
| Turbo-Back | Downpipe, mid-pipe, and muffler | High | High | Best for turbo and diesel builds |
| Header-Back | Headers/manifolds to tailpipe | Very High | Maximum (15–25 hp) | Dedicated high-output builds only |
For most off-road trucks and Jeeps that split time between the trail and the street, a cat-back setup is the sweet spot. It gives you a solid mix of cost, sound, and moderate power gains without turning the install into a major project.
An axle-back is the simple route. It mostly changes the sound and does little for power. If that’s all you want, fine. But if you’re hoping to feel a real difference, it’s usually not enough.
A turbo-back system makes more sense for diesel and turbo rigs. It can free up more power, but install work goes up fast, and in many cases you’ll also need a tune.
A header-back system is aimed at dedicated naturally aspirated builds. It offers the most gain, but it also brings the highest cost and the most install work. For a mixed-use trail rig, that’s often more exhaust than you need.
How to Choose Pipe Diameter for Torque, Flow, and Drivability
This is where a lot of buyers get carried away. Bigger pipe sounds good on paper, but it isn’t always better.
Larger tubing helps high-RPM flow. The tradeoff is that it can slow exhaust gas velocity at lower RPMs. When that happens, low-end response takes a hit. And for an off-road truck or SUV, low-end torque is usually the whole game.
For most naturally aspirated off-road trucks and SUVs, 2.5- to 3-inch tubing is the right range. Bigger diameters are a better fit for high-output turbo builds, not rigs that need strong pull down low.
Diameter isn’t the only thing to watch. Go with mandrel-bent tubing if you can. It keeps the pipe size the same through bends, which cuts turbulence and backpressure compared with non-mandrel bends. That matters even more on off-road builds, where steady flow and clean routing both count.
After you settle on size, look at materials and routing next, since those shape durability and trail noise.
Step 3: Select Materials, Construction, and Sound Level
Once fitment and pipe size are locked in, material and muffler choice shape two big things: how long the exhaust lasts and how pleasant it is to live with day to day.
Stainless Steel vs. Aluminized Steel: Cost and Durability Compared
Material choice has a direct effect on lifespan and long-term cost. Pick the wrong one, and the exhaust can wear out much sooner than expected.
| Material | Corrosion Resistance | Expected Life | Cost | Best For |
|---|---|---|---|---|
| Aluminized Steel | Fair; trail debris can damage the coating | 5–8 years in dry climates; much less in salted regions | Budget | Dry climates; low-budget builds |
| 409 Stainless Steel | Good; develops a surface patina | 8–10 years | Mid-range | General off-road use; rocky trails; flexing chassis |
| 304 Stainless Steel | Excellent; best for salt and corrosion | 15+ years | Premium | Salt Belt states; coastal areas; frequent water crossings |
For most trail rigs, 409 stainless is the practical pick. It forms a surface patina instead of rusting through, and it deals well with chassis flex and vibration. That matters when the suspension is cycling hard over rough ground.
If you drive in the Rust Belt, near the coast, or through water on a regular basis, 304 stainless can earn its higher price. It contains 18%–20% chromium and 8%–10% nickel, which gives it the strongest resistance to salt and corrosion of the three.
What to Look for in Bends, Welds, and Pipe Routing
How the system is made will decide whether it holds up through a full trail season. Focus on mandrel bends, clean welds, and flanged sections you can service later. Crush bends pinch the pipe and limit flow. Flanged connections make repairs much less of a headache since you can pull one section off without taking apart the whole exhaust.
Hanger design and pipe routing don’t get enough attention, but they should. Heavy-duty rubber bushing hangers help soak up constant vibration and suspension movement. For routing, look for terms like "high-clearance" or "tucked". That usually means the pipe stays above the frame rails and out of the way of rocks and trail obstacles during full articulation.
Once the tubing and hangers check out, the next call is sound.
Choose a Sound Level You Can Live With
Cabin drone is one of the most common complaints after an exhaust upgrade. A system that sounds great for ten minutes can get old fast on a two-hour drive.
Chambered mufflers give off a deep, aggressive tone and can work well for shorter trips. Straight-through mufflers focus on flow and louder volume, which makes them a better fit for builds centered on output. For trail rigs that also see daily driving, a resonated system helps cut drone and keeps the sound easier to live with.
Route the tailpipe so it exits behind the vehicle. That helps keep fumes out of the cabin and can reduce corrosion under the body.
Next, confirm whether the kit is bolt-on or if it needs cutting, welding, or custom hangers.
Step 4: Confirm Installation Needs and Make the Final Choice
Installation Complexity and When to Hire a Professional
Once fitment and pipe routing are locked in, the next question is simple: can you install it yourself, or should a shop handle it?
That usually comes down to how much work the system needs. Many modern cat-back kits are bolt-on, so they can often be installed with basic sockets, wrenches, and penetrating lubricant. For a lot of owners, that puts the job in weekend-DIY territory.
Headers and turbo-back systems are a different story. Header installation can take 4 to 8 hours of labor, and turbo-back parts deal with heavy heat cycling that can warp hardware or cause bolts to break. At that point, paying a professional can save time, stress, and a pile of extra repair costs.
Before you start, soak any heat-cycled fasteners with penetrating lubricant. One snapped stud can turn a simple install into an expensive headache. After the system is on, cycle the suspension through full compression and droop. Then check clearance at the axle, driveshaft, and shocks.
You also want to keep the exhaust away from brake hoses, ABS lines, shocks, and fuel tank vents. Under load, exhaust heat can get high enough to create problems in a hurry. And this matters even more off-road, where articulation, heat, and vibration push the system much harder than a quick driveway check ever will.
Universal weld-on mufflers need welding, so they’re usually a better fit for a shop or an experienced fabricator. If you change your lift, tires, or wheels later, recheck exhaust clearance before the first trail run.
Final Buying Checklist
Before you buy, run through these last checks:
- Platform fitment: Confirm it matches your exact make, model, year, and engine variant
- Exhaust type: Make sure it lines up with your power goals and your comfort level with installation
- Material: Check corrosion resistance for your climate and terrain
- Construction: Look for tucked-up routing, flanged sections, and heavy-duty rubber bushing hangers
- Clearance: Verify space at the rear axle, driveshaft, and shocks through full articulation
- Sound: Make sure the volume works for daily driving and trailhead trips
- Install complexity: Match the tools, time, and skill needed to the system, and budget for professional installation if headers or welding are part of the job
Only buy after you’ve confirmed fitment, clearance, sound, and install difficulty. The right exhaust is the one that matches your terrain, your vehicle, and the way you drive.
FAQs
How do I know if my exhaust will clear my suspension at full flex?
You need to physically cycle the suspension through its full range of motion. An exhaust that looks fine with the truck sitting level can still hit parts like the upper control arm once the axle starts to articulate.
As you route the exhaust, keep safe clearance from suspension parts, brake hoses, and fuel lines through the full cycle. That’s the best way to spot contact points or places where something could get pinched.
Will a bigger exhaust pipe hurt low-end torque off-road?
Yes. An exhaust pipe that’s too large can cut low-end torque off-road.
A larger pipe can improve exhaust flow and add horsepower. But if it’s too big for your engine, exhaust gas velocity can fall. That slower flow can hurt throttle response and reduce the torque you need for tough trail obstacles.
The goal is balance: pick a pipe diameter that supports airflow without giving up low-end power.
When is 304 stainless worth the extra cost?
304 stainless is worth the extra cost if your vehicle deals with harsh conditions and you want the best rust resistance. That includes coastal areas, roads with heavy salt use, or regular water crossings.
Compared with 409, it does a better job resisting deep rust and holds its polished finish for years, even through repeated heat cycles. If long-term durability and appearance matter more to you than price, 304 is the better pick.
Leave a Reply