Off-road vehicles endure intense stress, and chassis bracing is key to improving performance and durability. Here are five effective techniques to strengthen your vehicle’s frame and minimize chassis flex:
- Subframe Connectors and Crossmembers: Strengthen the connection between frame sections, reducing twist and maintaining suspension alignment.
- Strut Tower, Shock Mount, and Bed Bracing: Reinforce suspension mounting points for better handling and reduced body roll.
- Seam Welding and Plating Factory Joints: Add welds and plates to high-stress areas for improved durability and crack resistance.
- Roll Cages and Triangulation: Use roll cages to absorb torsional loads and protect the cabin during rollovers.
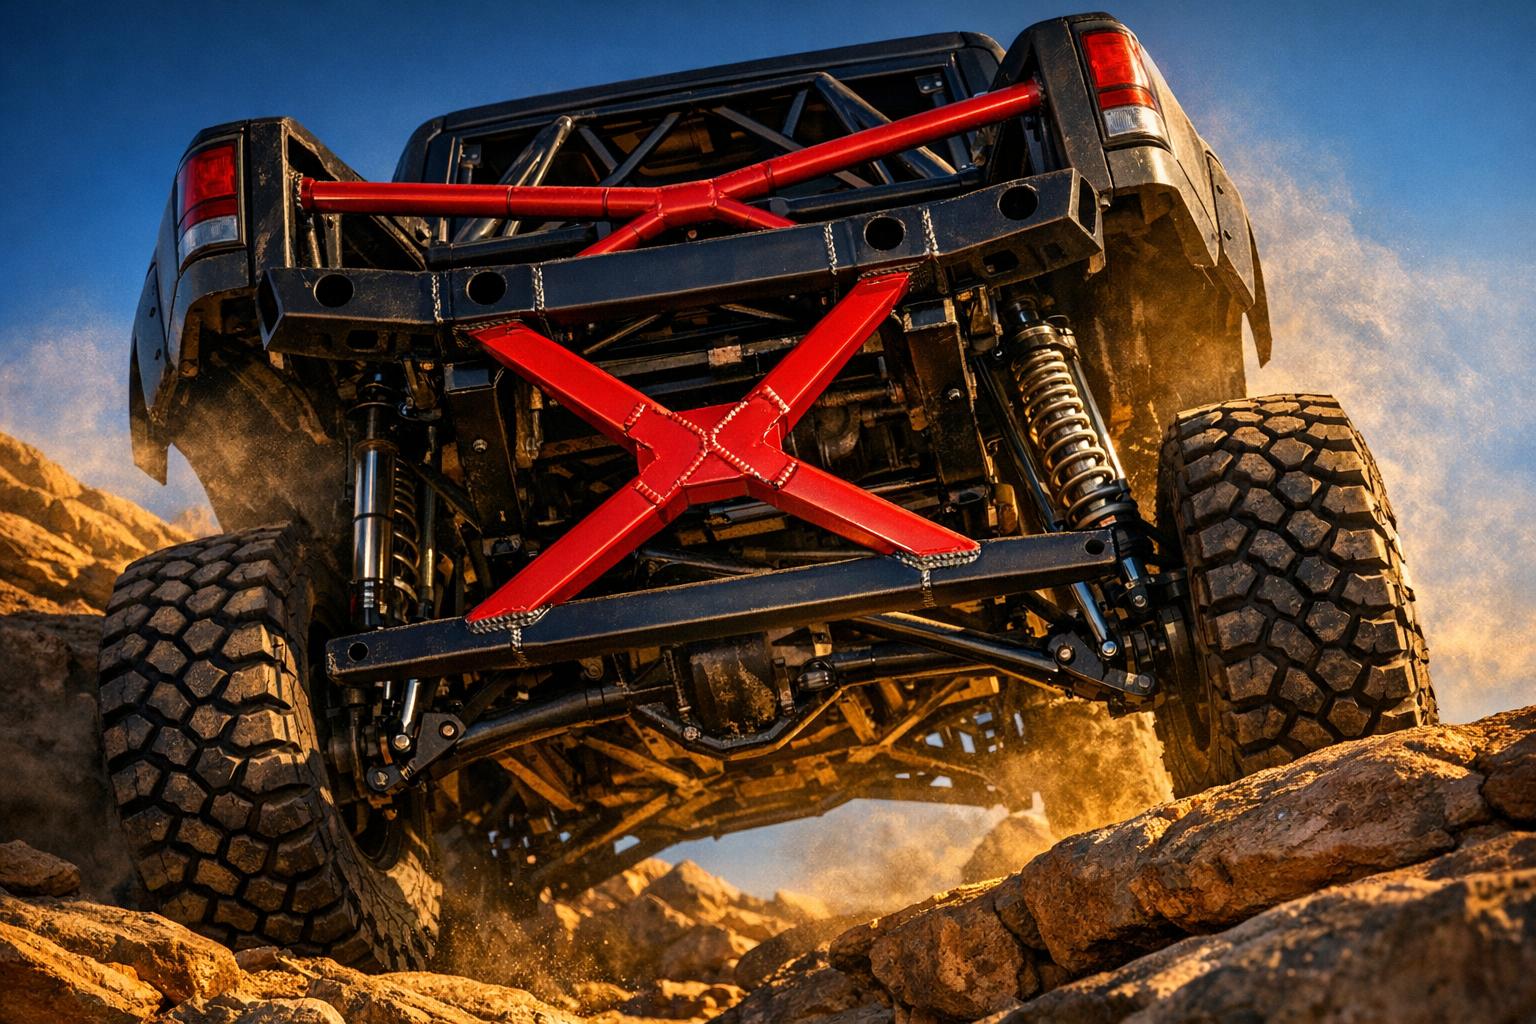
- X-Bracing, Underbody Braces, and Skid-Integrated Structures: Reinforce the chassis from underneath to handle impacts and improve rigidity.
Each method targets specific weak points, ensuring your vehicle can handle rough terrain without compromising performance. Whether you choose bolt-on or weld-in solutions, proper installation and material selection are critical for long-lasting results.
Quick Comparison
| Technique | Best Use Case | Installation Type | Key Trade-Off |
|---|---|---|---|
| Subframe Connectors & Crossmembers | Stabilizes frame under torque | Weld-in | Can limit access to underbody components |
| Strut Tower, Shock Mount & Bed Bracing | Reduces body roll and suspension flex | Bolt-in/Weld-in | Adjustable bars may reduce rigidity |
| Seam Welding & Plating | Reinforces factory weak points | Weld-in | Labor-intensive, requires stripping frame |
| Roll Cages & Triangulation | Protects cabin, absorbs torsional loads | Weld-in/Hybrid | Complex geometry, needs precise fabrication |
| X-Bracing & Skid-Integrated Structures | Handles impacts, improves torsional rigidity | Bolt-in/Weld-in | Improper design may create stress points |
A solid off-road chassis balances stiffness and flexibility. Reinforcing your frame properly ensures better handling, durability, and safety during tough adventures.
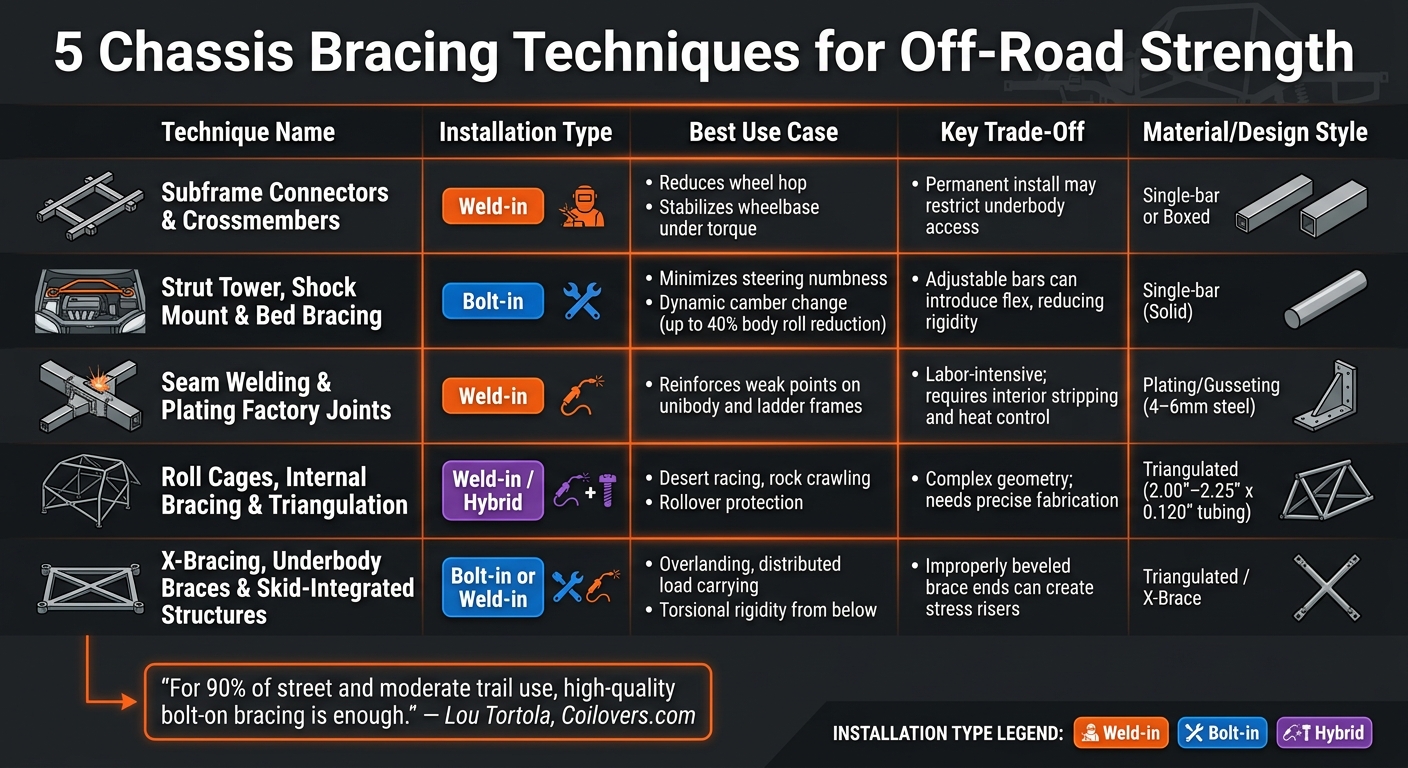
5 Chassis Bracing Techniques for Off-Road Vehicles: Side-by-Side Comparison
How To Weld Chassis Bracing
sbb-itb-afc4690
1. Subframe Connectors and Crossmembers
Subframe connectors and crossmembers play a key role in strengthening your chassis. Subframe connectors join the front and rear subframes into a single, rigid structure, which helps reduce chassis twist under stress. On the other hand, crossmembers link the longitudinal frame rails, preventing rail spread and minimizing unsupported spans, which reduces deflection.
Without proper bracing, a chassis can face up to three times the force imbalance from side to side during extreme lateral loads. This imbalance can also cause up to 1.5 degrees of dynamic camber change, making stable mounting points essential to maintaining proper suspension geometry.
"If the mounting points shift under load, your coilover kit fights flex instead of controlling the tires." – Lou Tortola, Coilovers.com
When installing subframe connectors, choose the right type based on your needs:
- Weld-in connectors: Best for high-torque or dedicated off-road builds.
- Bolt-on connectors: Ideal for dual-purpose or moderate trail rigs.
For weld-in options, use 2×3 14-gauge steel tubing. Taper the ends where they meet the frame to avoid stress risers. Always load the suspension before welding to prevent locking the chassis in a twisted state. Stitch welding is recommended to reduce heat input and prevent warping. Additionally, carefully route the connectors to maintain clearance for critical components like e-brake cables, fuel lines, and exhaust systems, while ensuring access to oil filters and drain plugs remains unobstructed.
If you’re upgrading your off-road chassis, LSK Suspension offers a variety of high-performance, customizable components, including weld-it-yourself kits. These options provide a solid foundation for further reinforcements, boosting durability and off-road capability.
2. Strut Tower, Shock Mount, and Bed Bracing
When suspension mounts experience chassis flex, performance takes a hit. Strut tower braces, shock mount hoops, and bed bracing tackle this issue head-on by stabilizing mounting points and ensuring the suspension operates as intended. Each method targets a specific area to maintain suspension efficiency.
Strut tower braces are one of the easiest upgrades to install. These bolt-on components can be attached in under an hour using basic tools. They’re particularly effective at reducing the sensation of body roll – by as much as 40% – by keeping the suspension plane consistent. For trucks primarily used on streets or moderate off-road trails, this level of reinforcement is often more than enough. As Lou Tortola from Coilovers.com explains:
"For 90 percent of street and moderate track use, high-quality bolt-on bracing is enough."
Shock mount bracing, on the other hand, is a more permanent solution. Shock hoops, in particular, are weld-in components constructed from 1.75-inch, .120-wall DOM tubing and 3/16-inch steel plating. These are essential for vehicles with long-travel suspension setups. Factory frames often lack the height and strength needed for longer-travel coilovers. Shock hoops solve this by creating elevated and reinforced mounting points. In some cases, an 8-inch narrowing of the rear frame is also necessary to accommodate coilovers and larger tires. For example, Motobilt applied this strategy to Jeep YJ/TJ/LJ models, narrowing the rear frame to fit long-travel coilovers while also improving the departure angle.
Bed and rear shock bracing takes a different approach by integrating with the tub, inner fenders, or roll cage. This spreads the load across a larger area, reducing the risk of stress concentrating on a single point. This is especially crucial for off-road vehicles, where jump landings can exert forces exceeding 5G. As CA Tech USA points out:
"The first hard hit rarely kills a mount. Repeated shock loads do. Metal fatigue is a memory game, and the chassis never forgets."
To ensure proper installation, cycle the suspension through its full range – from full bump to full droop – to check for any interference with components like links, tires, or steering. Additionally, make sure all structural hardware is torqued to the correct specifications (typically 40–50 ft-lbs). Before installing the brace, inspect for "witness marks" such as cracked paint, rust lines, or shiny metal around bolt heads, as these can indicate areas of concern.
3. Seam Welding and Plating Factory Joints
Reinforcing factory joints with seam welding and plating is a crucial step in building a durable off-road chassis. While factory frames are designed for production efficiency, they often sacrifice durability, relying on spot welds and open C-channels that can’t handle repeated high-stress impacts. Seam welding and plating address these weaknesses by strengthening the frame exactly where it’s needed.
Plating adds thickness to high-stress areas like steering box regions, suspension mounts, and shock towers. This helps distribute loads more evenly and reduces the risk of cracks. Stitch welding, on the other hand, fills the gaps between spot welds, creating stronger structural connections and minimizing strain at weak points. Together, these techniques turn a flexible, open frame into a more rigid, crack-resistant structure.
Before welding, strip the chassis down to bare metal. To avoid overheating and warping the frame, use stitch welding instead of continuous weld beads. For example, weld in 2-inch sections with 3-inch gaps to balance heat input while maintaining strength. Refab Engineering emphasizes the importance of heat control:
"When welding a chassis, it’s crucial to control heat and minimize warping. To ensure even tension and contraction as the welds heat and cool, weld corresponding spots on one side and, while still hot, weld the same area on the opposite side."
When designing plates, round off sharp 90-degree corners to reduce stress concentrations. Gradual thickness transitions also help match the parent rail and ensure smooth load transfer. As OZK Customs advises: "The goal is smooth load transfer, not random thickness."
To prevent corrosion, drill drainage holes and apply weld-through primer along with seam sealer on non-welded edges. For heavy-duty builds, use plating at least 6mm thick, while 4–5mm plating works well for standard 4×4 setups.
4. Roll Cages, Internal Bracing, and Triangulation
A roll cage does more than protect you during a rollover – it also strengthens your vehicle by redirecting torsional loads from the body to the frame. Acting as a rigid backbone, it absorbs and channels impact forces, helping to preserve the cabin’s integrity.
The strength of a roll cage lies in triangulation. Jim Oaks, Founder of The Ranger Station, explains:
"Triangulation is essential for lateral support."
In a well-designed cage, every tube should form part of a triangle. The strongest points in the structure are the node points, where multiple tubes meet. However, there’s one critical design rule: never let a tube terminate in the middle of another. Doing so creates a leverage point that can bend the receiving tube under stress. These principles tie directly into the importance of connecting the cage to the chassis, a topic discussed further below.
Chassis Integration: A Key to Strength
Just like subframe connectors and crossmembers, a roll cage must integrate seamlessly with the chassis to control flex. The connection between the cage and the frame is especially crucial. For heavy off-road use, a direct tie-in to the frame is the strongest option. This setup ensures that mounting plates and gussets distribute stress evenly along the frame rail. On the other hand, body-mounted cages can work for lighter trail use, but if the cage is too rigid for a flexible frame, it may lead to fatigue cracks over time. As Mechaniquad puts it:
"The strength and safety of your 4WD depend heavily on how the roll cage is tied into the frame. This single connection point decides whether the structure will absorb impact forces efficiently or fold like a soda can under torsion."
Construction Details Matter
Building a roll cage requires precision at every step. Tube notching, bend calculations, and welding quality all play a role in creating a reliable structure. For example:
- TIG welding is recommended for 4130 Chromoly steel.
- MIG welding works well for DOM mild steel.
For vehicles weighing over 4,000 lbs., Best in the Desert (BITD) minimum standards specify tubing dimensions of at least 2.25" x 0.120" for open cockpits and 2.00" x 0.120" for closed cockpits.
If custom fabrication sounds too daunting, companies like LSK Suspension offer weld-it-yourself roll cage kits for popular UTVs, including the Can-Am Maverick X3 and Polaris RZR XP 1000. These kits simplify the process by using the vehicle itself as the assembly jig.
5. X-Bracing, Underbody Braces, and Skid-Integrated Structures
This section shifts focus to strengthening the chassis from below, targeting areas that endure the brunt of off-road impacts. Diagonal X-bracing plays a pivotal role by redirecting torsional loads away from weaker points rather than simply thickening frame rails. The "X" configuration creates two sturdy triangles, which help counteract racking forces from opposing directions. This effectively turns a flexible mid-section into a more rigid and reliable base.
Underbody braces, like 6-point subframe braces, add crucial connections between the subframe and the unibody, which are often missing in factory designs. Dana Webb of Evilla Motorsports explains:
"A chassis brace’s purpose is to reinforce a certain area with additional structure to prevent flexing… minimizing the gap between tire movement and body reaction."
This reinforcement improves handling on uneven terrain, delivering sharper and more consistent performance by reducing unwanted body movement.
Skid-integrated structures take things a step further. Instead of acting solely as protective armor, these skid plates are designed to function as load-bearing components. They connect frame sections, especially in cases where factory crossmembers are removed to improve ground clearance. To ensure durability, properly designed mounting interfaces with gussets distribute impact forces along the frame rails. Without this distribution, a hard strike on a rock could focus stress on a small area, increasing the risk of cracking.
When implementing these techniques, avoiding abrupt transitions is essential. Abrupt terminations in braces or skid plates can create stress risers, leading to potential failures. Beveling or "fishmouthing" brace ends ensures smoother load transfer. Mechaniquad highlights the importance of balance:
"A frame that is too stiff in the wrong place fails faster. Metal needs controlled movement. Completely locking down one section while leaving adjacent areas flexible creates hinge points."
Fabrication Tips for Longevity
Proper preparation is key for effective reinforcement. Grind down to bare metal, extending about 1/4" beyond the weld area to prevent porous welds caused by paint off-gassing. Use stitch welding to control heat input, and seal all edges with automotive-grade seam sealer to block moisture and debris. For bolt-on underbody braces, torque fasteners to 40–50 ft-lbs as specified for structural hardware. Regularly inspect and re-torque these fasteners every 10,000 miles or after intense off-road use, as vibrations can loosen them over time.
For those looking to fully reinforce their chassis, LSK Suspension offers customizable components designed to integrate seamlessly with these methods.
Comparison Table
Each technique addresses specific needs, making it crucial to choose the right one for eliminating weak points. Below is a summary of the five bracing techniques, outlining their installation methods, design styles, ideal applications, and trade-offs.
| Technique | Installation | Design Style | Best Use Case | Key Trade-off |
|---|---|---|---|---|
| Subframe Connectors & Crossmembers | Weld-in | Single-bar or Boxed | Reduces wheel hop and stabilizes the wheelbase under torque | Permanent installation may restrict future access to underbody components |
| Strut Tower, Shock Mount & Bed Bracing | Bolt-in | Single-bar (Solid) | Minimizes steering numbness and dynamic camber change | Adjustable bars can introduce flex, impacting rigidity |
| Seam Welding & Plating Factory Joints | Weld-in | Plating/Gusseting | Reinforces weak points on unibody and ladder frames | Labor-intensive process requiring interior stripping and careful heat control |
| Roll Cages, Internal Bracing & Triangulation | Weld-in / Hybrid | Triangulated | Ideal for desert racing, rock crawling, and rollover protection | Complex geometry; hybrid mounts needed for vehicles with dual purposes |
| X-Bracing, Underbody Braces & Skid-Integrated Structures | Bolt-in or Weld-in | Triangulated / X-Brace | Best for overlanding and distributed load carrying; improves torsional rigidity from below | Improperly beveled brace ends can create stress risers |
These techniques highlight the importance of tailoring your approach to your specific off-road needs. Whether you prioritize ease of installation, durability, or performance, there’s a solution for every scenario.
As Lou Tortola, owner of Coilovers.com, points out:
"For 90 percent of street and moderate track use, high-quality bolt-on bracing is enough. Weld-in kits are reserved for dedicated track cars and high-torque drag builds."
For most applications, bolt-on kits offer sufficient reinforcement, while weld-in options are better suited for high-torque or track-focused setups. Material selection also plays a role: steel is best for maximum rigidity under the vehicle, aluminum works well in the upper engine bay for weight savings, and 4130 chromoly strikes a balance between strength and weight reduction.
Conclusion
A strong off-road chassis isn’t just about bolting on tougher parts – it’s about designing the entire frame as a cohesive system. As Jason Mundy from Defiant Motorsports explains:
"Chassis fabrication is not just about adding metal – it’s about engineering a system that works as a whole."
If one section is reinforced while neighboring areas remain flexible, it creates weak points where cracks can form under repeated stress. The key is to map out load paths, reinforce in sequence, and taper transitions so forces are distributed evenly instead of building up in one spot.
Using a combination of pre-engineered components and custom fabrication is the best way to achieve this balance. Standardized parts – like long travel kits, control arms, and roll cage components from LSK Suspension – offer a reliable starting point. From there, custom touches like gusseting joints, plating seams, or adding skid-based underbody braces tailor the reinforcements to your vehicle’s specific needs. This blend of precision and adaptability ensures your chassis can handle the demands of off-road use.
The goal isn’t to eliminate all movement in the frame but to create movement that’s predictable. A properly tuned chassis is rigid where it needs to be, flexible where it should be, and consistent in how it handles stress. Nail that balance, and every part of your vehicle – from the suspension to the drivetrain – has the foundation it needs to perform, whether you’re tackling rocky trails, desert terrain, or extended overland trips.
FAQs
Which bracing mod should I do first for my rig?
To begin, tackle any current damage, such as cracks or signs of fatigue, by sleeving those spots to bring back the structure’s strength. Once the frame is solid, select reinforcements based on your vehicle’s specific requirements. For steering problems, a steering box brace can make a big difference. If reducing chassis flex is the goal, consider strut tower braces or subframe connectors. Companies like LSK Suspension provide parts tailored to fortify off-road vehicles.
Bolt-on vs. weld-in bracing: what should I choose?
The choice boils down to what you’re aiming for – strength, flexibility, or ease of upkeep. Weld-in bracing creates a permanent, rigid connection that’s perfect for handling high-stress areas. On the other hand, bolt-on bracing offers a modular setup, making repairs or upgrades much simpler. Many builders actually use a mix of both methods: bolting parts together for mock-ups and then welding the final assembly. Companies like LSK Suspension even offer weld-it-yourself kits, making it simple to customize bracing for off-road durability and performance.
How do I avoid warping or cracking my frame when welding braces?
To keep your workpiece from warping or cracking, pay attention to thermal management and weld sequencing. Begin by using tack welds to secure the parts in position. Then, alternate between different sections to spread the heat evenly. You can protect nearby areas by placing water-soaked rags over them, and alignment jigs can help maintain the proper geometry throughout the process. To prevent overheating, focus on working one edge at a time, ensuring the frame stays within the required specifications.
Leave a Reply